Introduction
This manual provides comprehensive instructions for the assembly, operation, and maintenance of your HEXEUM 80mm Aperture 600mm Astronomical Portable Refracting Telescope. Designed for both beginners and experienced users, this telescope offers clear views of celestial objects and terrestrial landscapes. Please read this manual thoroughly before use to ensure optimal performance and longevity of your instrument.
What's in the Box
Carefully unpack all components and verify against the list below. If any items are missing or damaged, please contact customer support.
- Telescope Optical Tube
- Adjustable Aluminum Tripod
- 25mm Eyepiece
- 10mm Eyepiece
- 3x Barlow Lens
- 5x24 Finder Scope
- Zenith Mirror (Diagonal Mirror)
- Phone Adapter
- Wireless Remote Control
- Carrying Bag
- Instruction Manual

Setup Instructions
Follow these steps for quick and easy assembly without the need for additional tools.
- Assemble the Tripod: Extend the legs of the aluminum tripod to your desired height. Secure the legs using the locking clamps. Attach the accessory tray to the center brace of the tripod. The tripod allows for three-level height adjustment and multi-angle movement (360° horizontal, 180° vertical).

Figure 2: Multifunctional Aluminum Alloy Tripod with height and angle adjustments. - Attach the Telescope Tube: Mount the telescope optical tube onto the altazimuth mount on the tripod. Secure it firmly using the mount lock knob.
- Install the Zenith Mirror: Insert the zenith mirror (diagonal mirror) into the focuser of the telescope. Tighten the small screw to hold it in place. This mirror provides a more comfortable viewing angle.
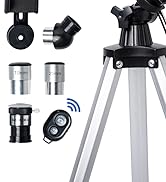
Figure 3: Step 1 - Install the zenith mirror. - Insert an Eyepiece: Choose either the 25mm or 10mm eyepiece and insert it into the zenith mirror. Secure it with the small screw. For initial viewing, the 25mm eyepiece is recommended for a wider field of view.
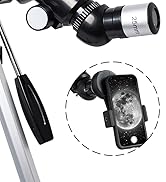
Figure 4: Step 2 - Insert the 25mm eyepiece. - Attach the Finder Scope: Mount the 5x24 finder scope onto the telescope tube. This accessory aids in locating objects before viewing through the main eyepiece.
- Install Phone Adapter (Optional): If you wish to capture images with your smartphone, attach the phone adapter to an eyepiece and then secure your phone to the adapter. This allows for astrophotography.

Figure 5: Instructions for installing the phone adapter.
Operating Instructions
1. Locating Objects
- Use the 5x24 finder scope to initially locate the desired celestial or terrestrial object. Align the finder scope with the main telescope by adjusting its screws until the object is centered in both.
- Once the object is roughly centered in the finder scope, look through the main telescope's eyepiece.
2. Focusing
- While looking through the eyepiece, slowly rotate the focus knob until the image appears sharp and clear. Fine-tune the focus for optimal clarity.
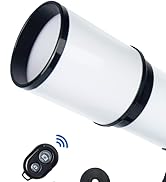
Figure 6: Step 3 - Rotate the focus knob for clear viewing. 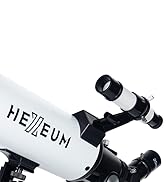
Figure 7: Step 4 - Achieve clear focus by rotating the focus knob.
3. Adjusting Magnification
- The telescope comes with two eyepieces: a 25mm eyepiece for 24X magnification and a 10mm eyepiece for 60X magnification.
- For higher magnification, insert the 3x Barlow lens between the zenith mirror and your chosen eyepiece. This trebles the magnifying power (e.g., 25mm eyepiece + 3x Barlow = 72X; 10mm eyepiece + 3x Barlow = 180X).

Figure 8: Magnification options with different eyepieces and Barlow lens. 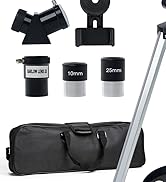
Figure 9: Step 5 - Use 10mm eyepiece + 3x Barlow for higher magnification.
4. Using the Wireless Remote Control
- Pair the wireless remote control with your smartphone via Bluetooth.
- Once paired, use the remote to trigger your phone's camera shutter, allowing you to capture images without touching the telescope and causing vibrations.
Maintenance
- Cleaning Optics: Use a soft, lint-free cloth specifically designed for optical lenses to clean eyepieces and the objective lens. Avoid touching optical surfaces with bare hands. Use a blower brush to remove dust before wiping.
- Storage: When not in use, store the telescope in its carrying bag in a dry, dust-free environment. Ensure all caps are on the lenses and eyepieces to prevent dust accumulation.
- Handling: Always handle the telescope and its components with care to avoid accidental drops or impacts.
Troubleshooting
- Blurry Images: Adjust the focus knob slowly until the image is sharp. Ensure the correct eyepiece is securely inserted. Atmospheric conditions can also affect image clarity.
- Difficulty Locating Objects: First, ensure the finder scope is properly aligned with the main telescope. Use the finder scope to center the object before switching to the main eyepiece. Start with the lowest magnification eyepiece (25mm) for a wider field of view.
- No Image Visible: Check that all lens caps are removed from both the objective lens and the eyepiece. Ensure the eyepiece is correctly inserted into the zenith mirror.
- Shaky Image: Ensure the tripod is set up on a stable, level surface. Tighten all locking knobs on the tripod and mount. Avoid touching the telescope during observation, especially when using the phone adapter with the wireless remote.
Specifications
| Feature | Specification |
|---|---|
| Brand | HEXEUM |
| Model Name | AZ80600 |
| Optical Tube Length | 600 Millimeters |
| Objective Lens Diameter | 80 Millimeters |
| Focal Length | 600mm (f/6.7) |
| Eyepiece Lenses | 25mm (24X), 10mm (60X) Kellner |
| Barlow Lens | 3x |
| Finder Scope | 5x24 Reflex |
| Telescope Mount | Altazimuth Mount |
| Tripod | Adjustable Aluminum Alloy |
| Focus Type | Manual Focus |
| Item Weight | 6.15 pounds |
| Product Dimensions | 23.4 x 5.4 x 7.9 inches (packaging) / 22.8"D x 8.2"W x 5.1"H (assembled) |
Warranty and Support
HEXEUM offers lifetime maintenance for this product. If you have any questions regarding the product or service, please do not hesitate to contact us. We are committed to providing assistance within 24 hours.


