SMARTKLIK IPC167
SMARTKLIK IPC167 1080P Indoor Security Camera User Manual
Model: IPC167 | Brand: SMARTKLIK
1. Introduction
This manual provides detailed instructions for the installation, operation, and maintenance of your SMARTKLIK IPC167 1080P Indoor Security Camera. Please read this manual thoroughly before using the product to ensure proper functionality and safety. Keep this manual for future reference.
2. Product Overview
The SMARTKLIK IPC167 is a 1080P indoor security camera designed for monitoring various indoor environments, including nurseries, pet areas, and general home security. It features 360-degree pan and 180-degree tilt capabilities, two-way audio, night vision, motion tracking, and sound detection.
2.1 Key Features
- 1080P Full HD Video: Provides clear and detailed video resolution.
- 355° Pan & 180° Tilt: Offers extensive coverage of your indoor space.
- Two-Way Audio: Enables communication through the camera.
- Night Vision: Clear visibility up to 32 feet (10 meters) in low-light conditions.
- Motion & Sound Detection: Alerts you to detected activity.
- Motion Tracking: Automatically follows detected movement.
- Privacy Mode: Allows the camera lens to be obscured for privacy.
- Wi-Fi Connectivity: Supports 2.4GHz Wi-Fi for wireless connection.
2.2 Camera Components
Familiarize yourself with the main components of your camera:
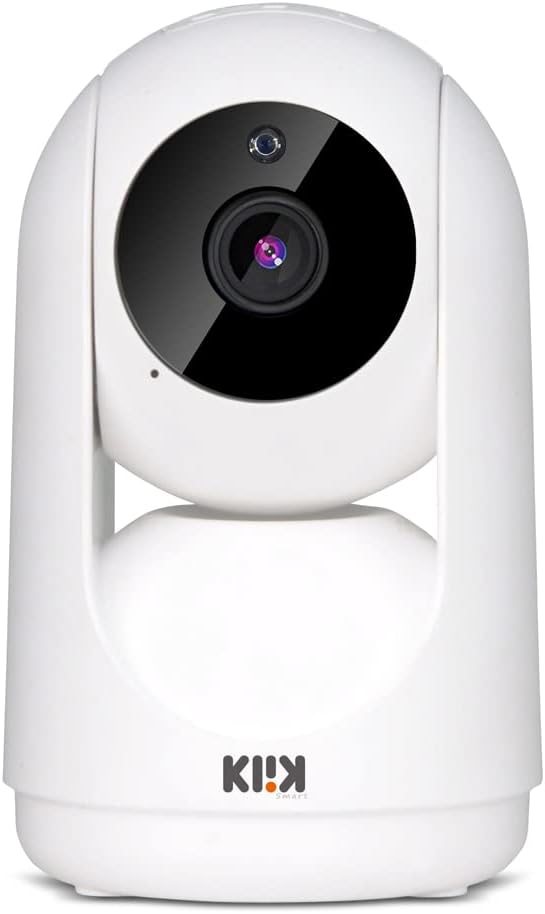
Image 2.2.1: Front view of the SMARTKLIK IPC167 camera, showing the lens and indicator light.
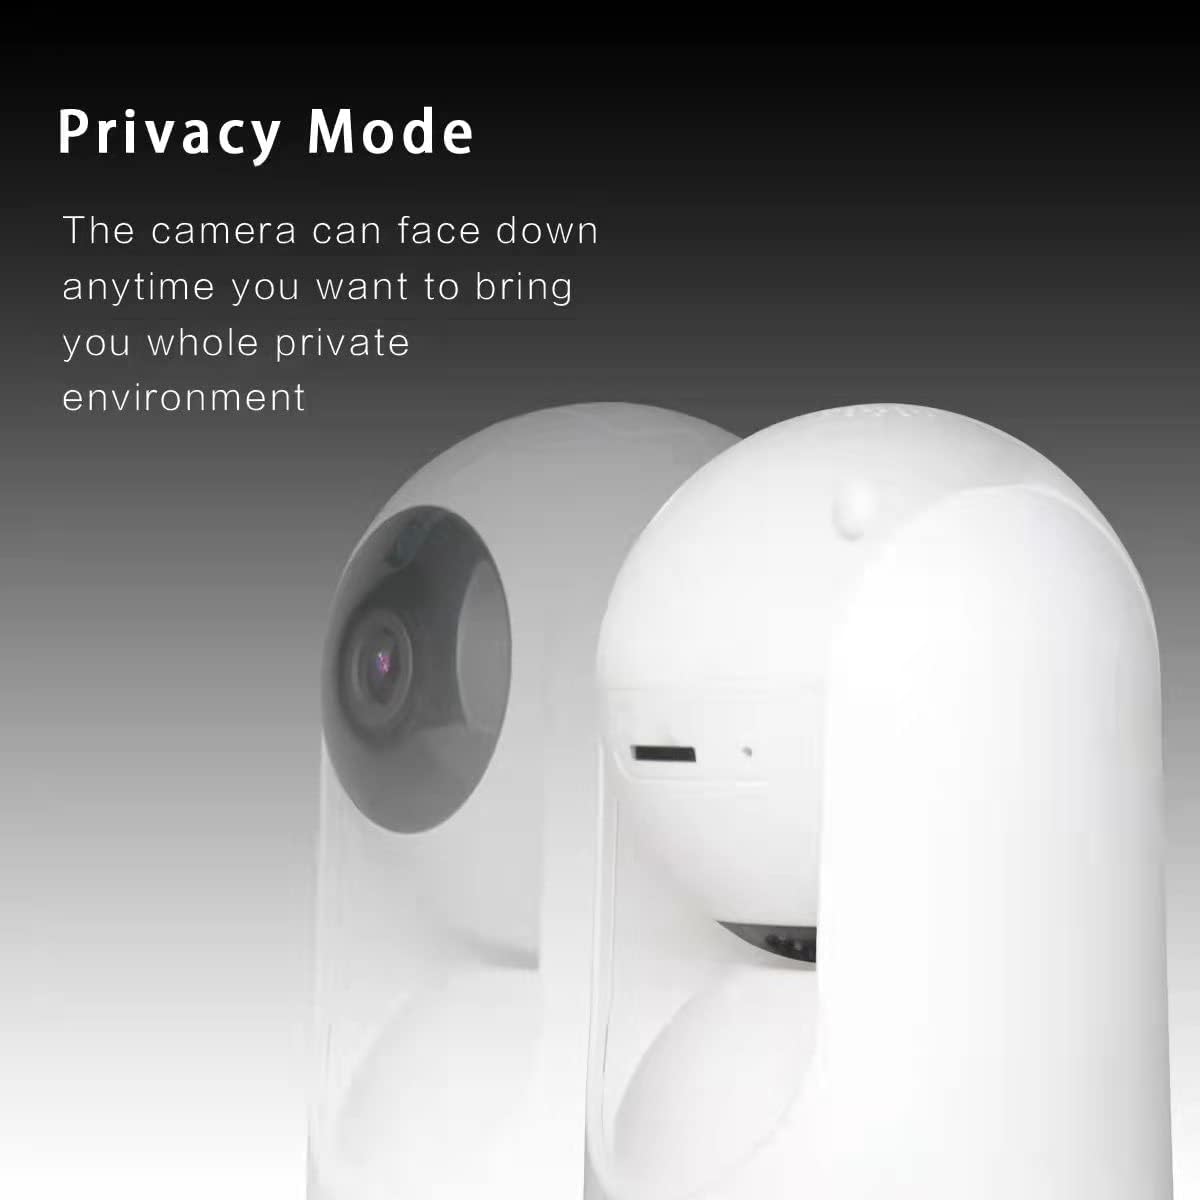
Image 2.2.2: Back view of the SMARTKLIK IPC167 camera, highlighting the speaker grille and Type-C power port at the base.
3. Setup Guide
3.1 Unboxing and Initial Inspection
- Carefully remove all components from the packaging.
- Verify that all items are present: camera unit, power adapter, USB cable, mounting accessories (if included).
- Inspect the camera for any signs of damage. If damaged, do not proceed with setup and contact customer support.
3.2 Powering On the Camera
- Connect the USB cable to the Type-C port on the back of the camera.
- Plug the power adapter into a standard electrical outlet.
- The camera will power on, and an indicator light will illuminate, typically blinking to indicate readiness for pairing.
3.3 App Download and Account Registration
- Download the recommended smart home application (e.g., Tuya Smart) from your mobile device's app store (App Store for iOS, Google Play Store for Android).
- Open the app and register for a new account or log in if you already have one.
3.4 Connecting the Camera to Wi-Fi
Ensure your mobile device is connected to a 2.4GHz Wi-Fi network. The camera does not support 5GHz Wi-Fi.
- In the app, tap 'Add Device' or the '+' icon.
- Select 'Security & Video Surveillance' and then 'Smart Camera' or similar.
- Follow the on-screen instructions to put the camera into pairing mode (usually indicated by a blinking light).
- Enter your 2.4GHz Wi-Fi network name and password when prompted.
- The app will generate a QR code. Position your phone screen in front of the camera lens (approximately 6-8 inches away) until the camera beeps or indicates successful scanning.
- Wait for the camera to connect to the Wi-Fi network. Once connected, the indicator light will typically turn solid, and the app will confirm successful pairing.

Image 3.4.1: Illustration of flexible installation options, including vertical placement, wall mounting, and ceiling mounting.
3.5 Mounting the Camera
The camera can be placed on a flat surface or mounted to a wall or ceiling. Use the provided mounting accessories if applicable.
- Tabletop Placement: Simply place the camera on a stable, flat surface.
- Wall/Ceiling Mount: Secure the mounting bracket to the desired location using screws. Attach the camera to the bracket, ensuring it is locked securely. Adjust the camera's orientation in the app if necessary.
4. Operating Instructions
4.1 Live View
Once connected, open the app and select your camera from the device list to access the live video feed.
4.2 Pan and Tilt Control
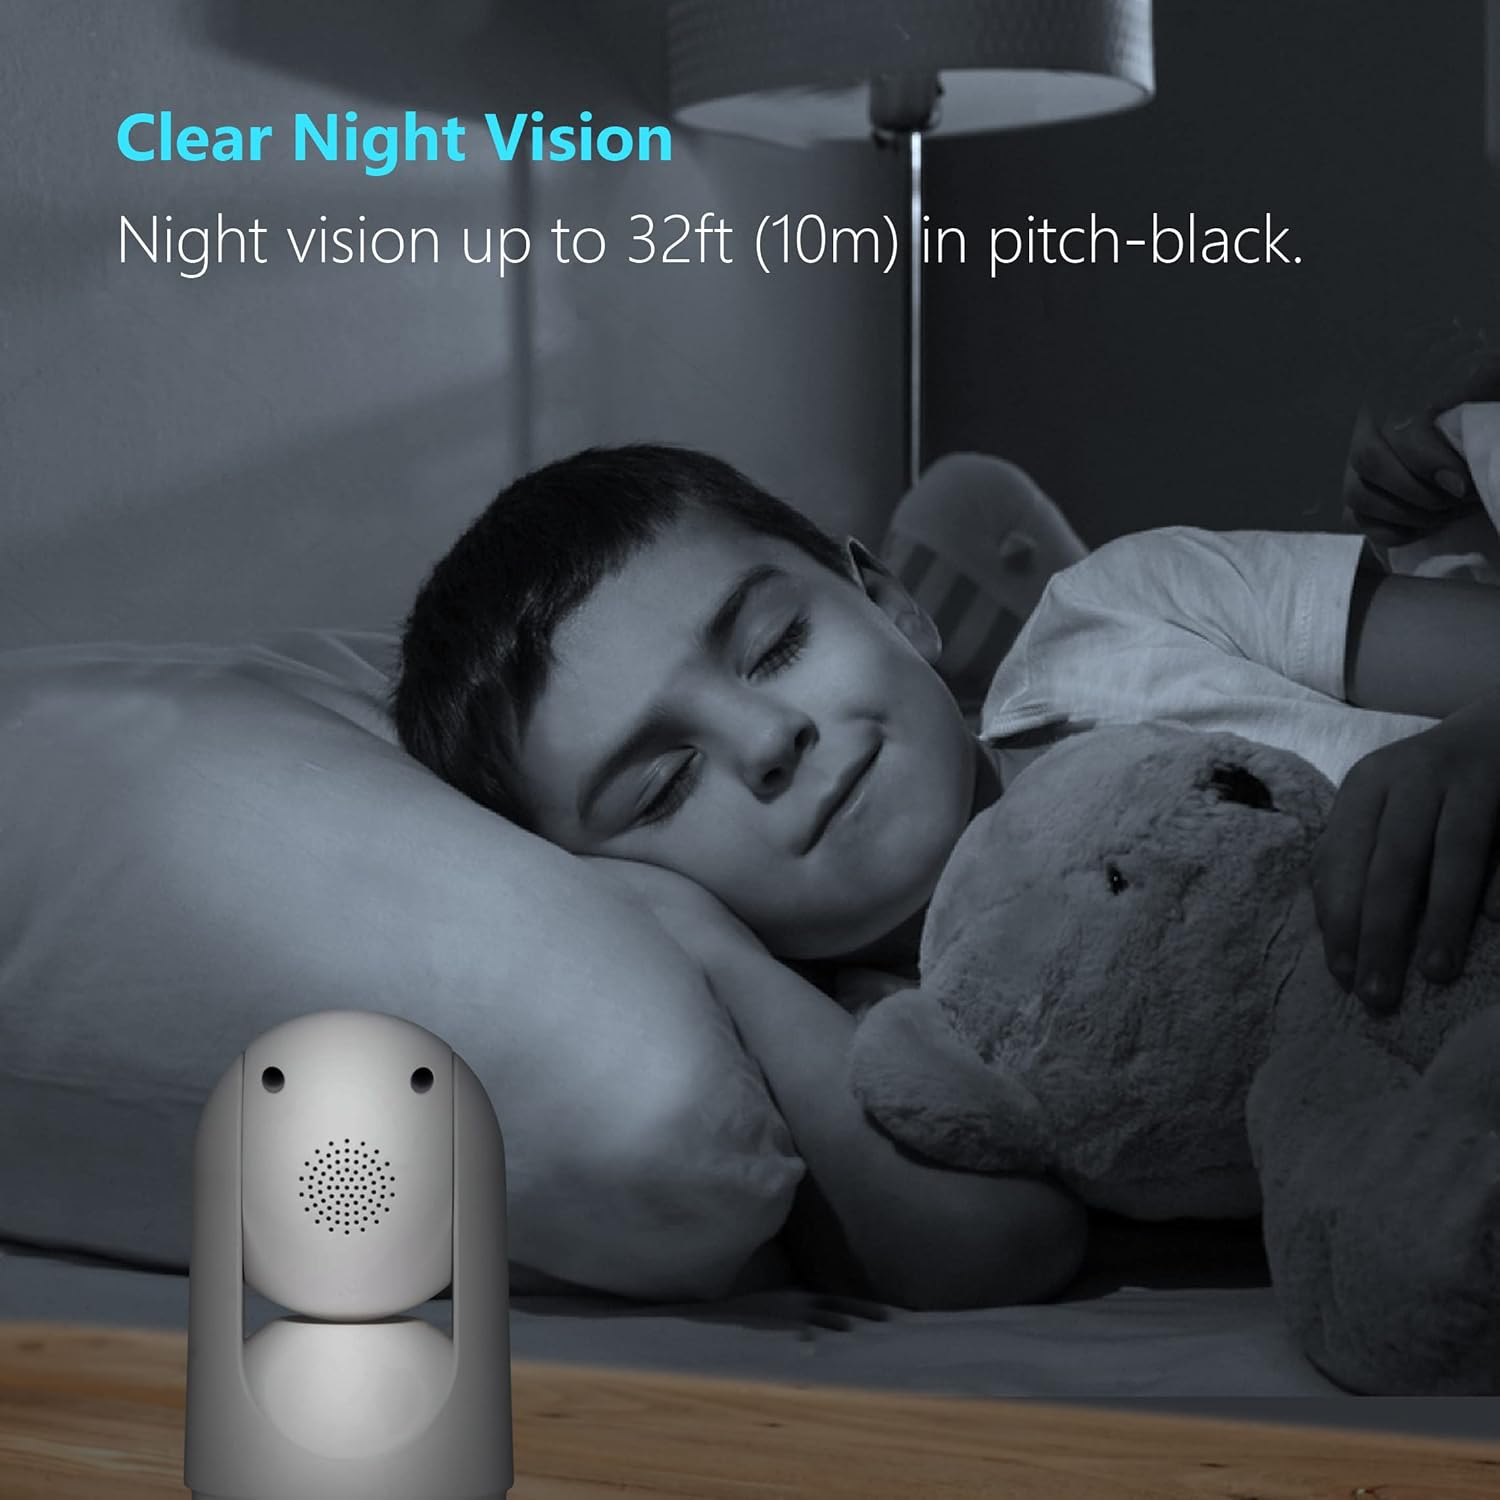
Image 4.2.1: Visual representation of the camera's 355-degree horizontal pan and 180-degree vertical tilt capabilities.
On the live view screen, use the directional controls (often a joystick or arrow icons) to remotely adjust the camera's viewing angle. The camera supports 355° horizontal pan and 180° vertical tilt.
4.3 Two-Way Audio

Image 4.3.1: An image illustrating the two-way audio feature, showing a person speaking to a dog through the camera.
Tap the microphone icon in the app to speak through the camera's speaker. Tap the speaker icon to listen to audio from the camera's microphone.
4.4 Motion and Sound Detection
Access the camera settings in the app to enable and configure motion and sound detection. You can set sensitivity levels and define detection zones. When an event is detected, you will receive push notifications on your mobile device.
4.5 Motion Tracking
Enable motion tracking in the camera settings. When motion is detected, the camera will automatically pan and tilt to follow the moving object within its field of view.
4.6 Night Vision
The camera automatically switches to night vision mode in low-light conditions, providing clear black and white video. Night vision range is up to 32 feet (10 meters).
4.7 Privacy Mode

Image 4.7.1: The camera shown with its lens rotated downwards, indicating activation of privacy mode.
Activate Privacy Mode through the app settings. In this mode, the camera lens will physically rotate downwards, preventing video recording and live viewing for enhanced privacy.
4.8 Video Recording and Storage
The camera supports local storage via a MicroSD card (not included) and cloud storage (subscription may be required). Configure recording settings (continuous, event-based) and playback options within the app.
5. Maintenance
5.1 Cleaning the Camera
Use a soft, dry cloth to clean the camera lens and body. Do not use liquid cleaners or abrasive materials, as they may damage the camera.
5.2 Firmware Updates
Periodically check the app for available firmware updates. Keeping your camera's firmware up-to-date ensures optimal performance, security, and access to new features. Follow the in-app instructions for firmware updates.
5.3 Storage Management
If using a MicroSD card, regularly check its storage capacity and format it as needed through the app to maintain recording functionality. For cloud storage, manage your subscription and recordings via the app.
6. Troubleshooting
- Camera not powering on: Ensure the power adapter and USB cable are securely connected and the outlet is functional.
- Unable to connect to Wi-Fi:
- Confirm your Wi-Fi network is 2.4GHz. The camera does not support 5GHz.
- Check your Wi-Fi password for accuracy.
- Ensure the camera is within range of your Wi-Fi router.
- Restart your router and the camera, then attempt pairing again.
- No live video feed: Check your internet connection. If the camera is connected to Wi-Fi, try restarting the camera and the app.
- Two-way audio not working: Ensure microphone and speaker permissions are granted to the app on your phone. Check the volume settings in the app.
- Motion/Sound detection not sending alerts: Verify that detection is enabled in the app settings and notification permissions are granted for the app on your phone. Check sensitivity settings.
- Camera is offline: This usually indicates a loss of Wi-Fi connection. Follow the steps for 'Unable to connect to Wi-Fi'.
7. Specifications
| Feature | Specification |
|---|---|
| Model Number | IPC167 |
| Video Capture Resolution | 1080p, 720p |
| Connectivity Protocol | Wi-Fi (2.4GHz only) |
| Pan Range | 355 degrees |
| Tilt Range | 180 degrees |
| Night Vision Range | Up to 32 feet (10 meters) |
| Alert Type | Audio and Motion |
| Two-Way Audio | Supported |
| Mounting Type | Wall Mount, Tabletop, Ceiling |
| Indoor/Outdoor Usage | Indoor |
| Power Input | Type-C USB |
| Product Dimensions | 5.91 x 2.76 x 2.76 inches |
| Item Weight | 9.9 ounces |
8. Warranty and Support
For warranty information and technical support, please refer to the documentation included with your product or visit the official SMARTKLIK website. Keep your purchase receipt as proof of purchase for warranty claims.
For further assistance, you may contact SMARTKLIK customer service through their official channels.
Ask a question about this manual
Ask about setup, troubleshooting, compatibility, parts, safety, or missing instructions. Manuals+ will review the question and use this page’s manual context to help answer it.