1. Introduction
The RaeSung MS6300 is a portable, professional multifunction environment meter designed for comprehensive environmental monitoring. It integrates the functions of a sound level meter, illuminometer, relative humidity meter, temperature meter, and anemometer into a single device. Featuring a large LCD digital display with backlight, the MS6300 provides clear and easy-to-read measurements for various environmental parameters.
This manual provides detailed instructions for the safe and effective operation, maintenance, and troubleshooting of your MS6300 meter.
2. Key Features
- Dual LCD Display for simultaneous value presentation.
- Integrated backlight for enhanced visibility in low-light conditions.
- Automatic and manual ranging capabilities.
- Measurement functions include: Maximum, Minimum, Average, and Maximum-Minimum Difference.
- Low battery alerts to indicate power status.
- Automatic shutdown feature to conserve battery life.
- Data hold function for freezing displayed readings.
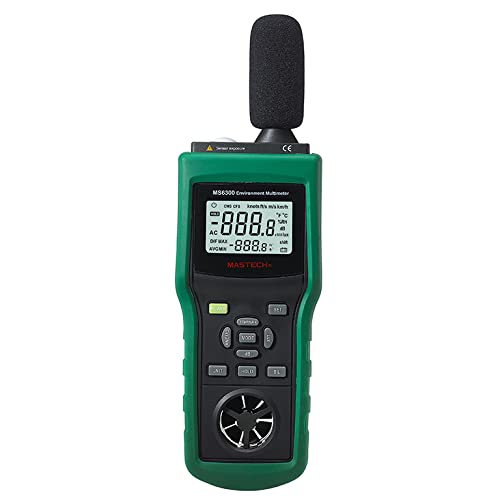
Figure 2.1: Front view of the MS6300 Multifunction Environment Meter, showing the LCD display, control buttons, sound level microphone, and anemometer fan.
3. Package Contents
Upon opening the package, verify that all the following items are present and in good condition:
- MS6300 Environment Tester Unit
- Tripod Stand
- User Manual (this document)
- One 6F22 9V Battery (typically pre-installed or included separately)
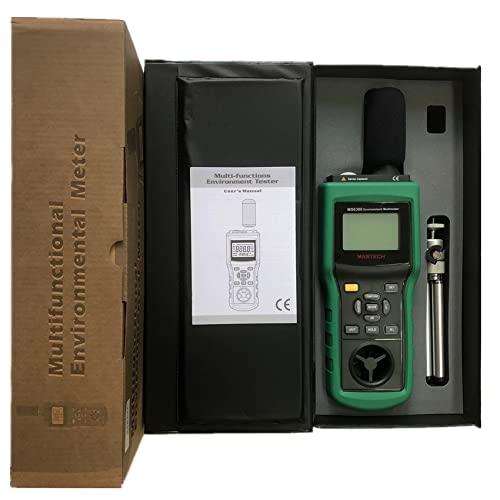
Figure 3.1: Contents of the MS6300 package, showing the main unit, tripod, and user manual within the product box.
4. Setup and Battery Installation
4.1 Battery Installation
The MS6300 meter is powered by one 6F22 9V battery. To install or replace the battery:
- Locate the battery compartment cover on the back of the meter.
- Carefully remove the protective rubber casing if present (refer to Figure 4.1).
- Open the battery compartment cover.
- Connect a new 6F22 9V battery to the battery connector, observing correct polarity.
- Place the battery into the compartment and close the cover securely.
- Re-attach the protective rubber casing.
The LCD display will show a battery voltage indication symbol when the battery level is low, prompting replacement.
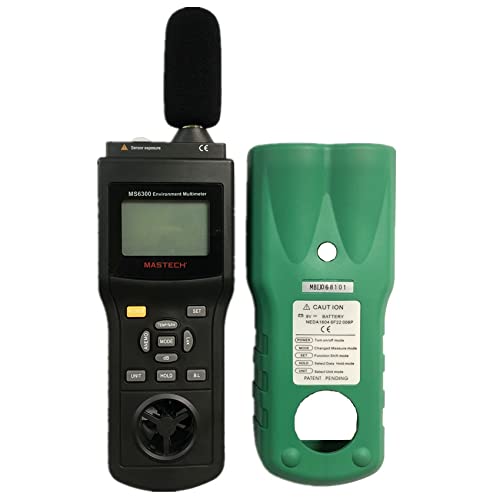
Figure 4.1: Back view of the MS6300 meter with the protective casing removed, illustrating the battery compartment and product label.
4.2 Attaching the Tripod Stand
The included tripod stand can be attached to the bottom of the meter for stable, hands-free operation, especially useful for long-term monitoring or precise measurements.
- Locate the tripod mounting screw hole at the base of the MS6300 meter.
- Screw the tripod stand firmly into the mounting hole until secure.
- Adjust the tripod legs for desired height and stability.
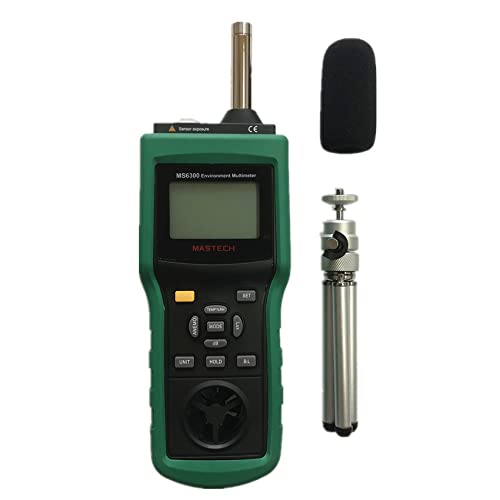
Figure 4.2: The MS6300 meter shown with its included tripod stand and microphone foam cover.
5. Operating Instructions
5.1 Powering On/Off
Press the POWER button to turn the meter on. The LCD display will illuminate. To turn off the meter, press and hold the POWER button until the display turns off. The meter also features an automatic shutdown function to conserve battery life, which can typically be disabled or adjusted via settings (refer to specific button functions below).
5.2 Mode Selection
The MS6300 combines multiple measurement functions. Use the MODE button to cycle through the available measurement modes:
- Temperature & Humidity: Measures ambient temperature and relative humidity.
- Illumination: Measures light intensity (Lux).
- Wind Speed & Air Volume: Measures air velocity (m/s, km/h, ft/s, knots) and calculates air volume (CMM, CFM).
- Sound Level: Measures sound pressure level (dB A/C).
The active measurement mode will be indicated on the LCD display.
5.3 Unit Selection
For measurements like temperature, wind speed, and air volume, you can switch between different units. Press the UNIT button to toggle through the available units for the current mode (e.g., Celsius/Fahrenheit for temperature, m/s/km/h/ft/s/knots for wind speed).
5.4 Data Hold Function
To freeze the current reading on the display, press the HOLD button. Press it again to release the hold and resume live measurements.
5.5 Max/Min/Avg/Dif Measurements
The MS6300 can record and display statistical values. Press the MAX/MIN/AVG/DIF button (or similar labeled button) to cycle through:
- MAX: Displays the maximum recorded value since the function was activated.
- MIN: Displays the minimum recorded value.
- AVG: Displays the average of recorded values.
- DIF: Displays the difference between the maximum and minimum recorded values.
To clear these recorded values and start a new measurement session, refer to the specific button combination or power cycle the device.
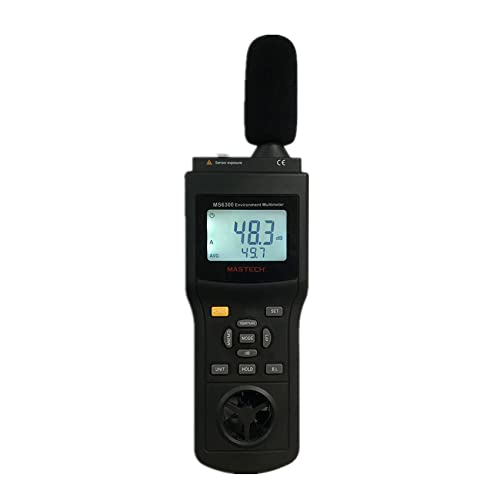
Figure 5.1: The MS6300 display showing temperature readings and an average value, demonstrating the dual display capability.
6. Maintenance
6.1 Cleaning the Meter
To ensure accurate readings and prolong the life of your MS6300 meter, keep it clean. Wipe the casing with a soft, damp cloth. Do not use abrasive cleaners, solvents, or immerse the meter in water. Ensure the sensors (microphone, light sensor, anemometer fan) are free from dust and debris.
6.2 Battery Replacement
When the low battery indicator appears on the LCD, replace the 9V battery as described in Section 4.1. Remove the battery if the meter will not be used for an extended period to prevent leakage and damage.
6.3 Storage
Store the meter in a cool, dry place, away from direct sunlight, extreme temperatures, and high humidity. Use the original packaging or a protective case for storage to prevent damage.
7. Troubleshooting
| Problem | Possible Cause | Solution |
|---|---|---|
| Meter does not power on. | Battery is dead or incorrectly installed. | Replace the 9V battery or ensure it is installed with correct polarity. |
| Low battery indicator is displayed. | Battery voltage is low. | Replace the 9V battery. |
| Inaccurate readings. | Sensors are dirty or obstructed; meter is not calibrated (unlikely for user); environmental interference. | Clean sensors. Ensure proper operating environment. If issues persist, contact customer support. |
| Display is blank or frozen. | Meter is in data hold mode; internal error. | Press the HOLD button to release. Power cycle the device. If problem persists, replace battery. |
8. Technical Specifications
| Parameter | Range / Value | Accuracy |
|---|---|---|
| Temperature | -10°C to 60°C (14°F to 140°F) | ±1.5°C (±2.7°F) |
| Humidity | 0% to 100% RH | ±3% RH (at 25°C) |
| Illumination | 0 to 2000 Lux (×1) 2000 to 20000 Lux (×10) 20000 to 50000 Lux (×100) | ±5% |
| Wind Speed | 0.5 to 20 m/s (1.8 to 72 km/h, 1.6 to 65.7 ft/s, 0.9 to 38.9 knots) | ±3% |
| Air Volume | 0 to 999900 CMM (0 to 999900 CFM) | ±3% |
| Sound Level | 30 to 130dB (A) 35 to 130dB (C) | ±1.5dB |
| Display | Four-digit LCD, dual display | N/A |
| Sampling Time | 0.5 seconds | N/A |
| Operating Temperature | -10°C to 60°C (14°F to 140°F) | N/A |
| Storage Temperature | -10°C to 50°C (14°F to 122°F) | N/A |
| Power Supply | One 6F22 9V battery | N/A |
| Dimensions | 280mm (L) x 89mm (W) x 50mm (H) (includes sensor probe) | N/A |
| Weight | Approximately 430g | N/A |
9. Warranty and Support
This product is manufactured by RaeSung. For specific warranty terms and conditions, please refer to the documentation provided with your purchase or contact the retailer where the product was acquired. RaeSung typically provides a standard manufacturer's warranty against defects in materials and workmanship.
For technical support, troubleshooting assistance beyond this manual, or warranty claims, please contact RaeSung customer service or your authorized dealer. Keep your purchase receipt as proof of purchase for warranty purposes.
Manufacturer: RaeSung
ASIN: B09P845WGP
Date First Available: December 20, 2021