1. Introduction
Thank you for choosing the alpina 850W Bagged Vacuum Cleaner. This manual provides essential information for the safe and efficient use, maintenance, and troubleshooting of your appliance. Please read these instructions carefully before first use and keep them for future reference.
Safety Information
Always follow basic safety precautions when using electrical appliances to reduce the risk of fire, electric shock, or injury. Ensure the voltage rating on the appliance matches your local power supply. Do not use the vacuum cleaner on wet surfaces or to pick up flammable or combustible materials. Keep children and pets away from the appliance during operation.
2. Product Overview
The alpina 850W Bagged Vacuum Cleaner is designed for effective cleaning of various surfaces. It features a lightweight design, soft wheels, and a practical carrying handle for easy maneuverability. The vacuum includes multiple attachments for versatile cleaning tasks.
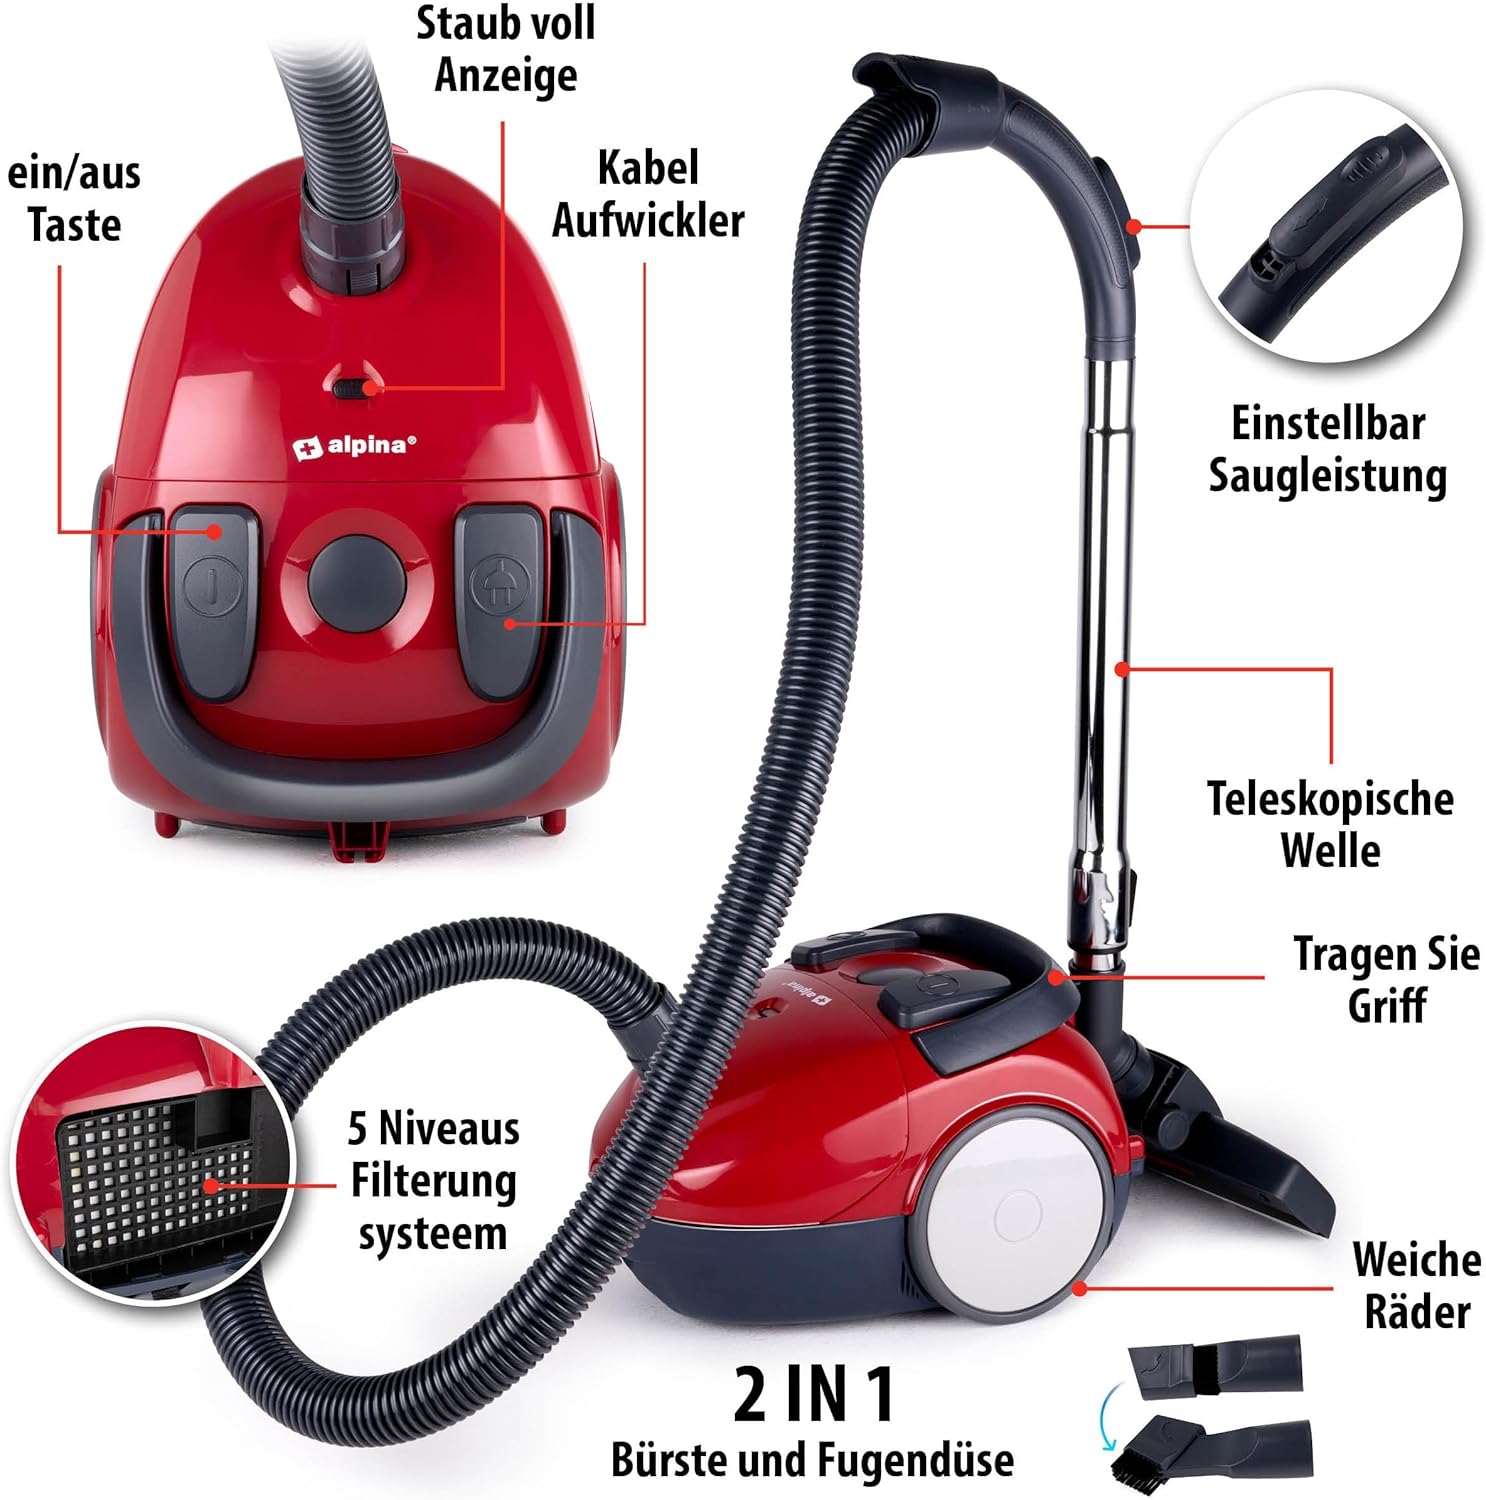
Image 1: Overview of the alpina Bagged Vacuum Cleaner with key components labeled. Features include the On/Off button, Cable Rewinder, Dust Full Indicator, Adjustable Suction Power, Telescopic Tube, Carrying Handle, 5-Level Filtration System, Soft Wheels, and a 2-in-1 Brush and Crevice Nozzle.
Key Features:
- Bagged System: Collects dust and debris in a 1.5-liter dust bag with a full indicator.
- Adjustable Suction Power: Allows for customized cleaning based on surface type.
- Versatile Attachments: Includes a crevice tool, dust brush, and small nozzle for various cleaning needs.
- Parking Mode: Convenient storage position for the telescopic tube and nozzle.
- Automatic Cord Rewind: Simplifies storage of the 4-meter power cable.
- Lightweight and Portable: Equipped with soft wheels and a carrying handle.
- 5-Stage Filtration System: Enhances air quality during cleaning.

Image 2: Front view of the alpina 850W Bagged Vacuum Cleaner, showcasing its compact design and red and black color scheme.
3. Setup
Follow these steps to assemble your vacuum cleaner before first use:
- Attach the Hose: Insert the flexible hose into the suction inlet on the main unit until it clicks securely into place. To remove, press the release button and pull the hose out.
- Assemble the Telescopic Tube: Connect the telescopic metal tube to the handle end of the hose. Adjust the length of the telescopic tube by pressing the release button and extending or retracting it to a comfortable height.
- Attach the Floor Nozzle: Connect the desired floor nozzle (e.g., the 2-in-1 brush and crevice nozzle) to the end of the telescopic tube. Ensure it is firmly attached.
- Insert Dust Bag: Open the dust bag compartment (refer to Section 5 for details) and ensure a dust bag is correctly installed.

Image 3: Illustration showing the connection of the metal telescopic tube to the vacuum hose and the floor nozzle. The image also highlights the 180W suction power and 850W power consumption.
4. Operating Instructions
Power On/Off
Plug the power cord into a suitable electrical outlet. Press the On/Off button located on the main unit to start or stop the vacuum cleaner.
Adjusting Suction Power
The vacuum cleaner features adjustable suction power. Use the control dial or slider on the main unit or hose handle to increase or decrease suction as needed for different surfaces and cleaning tasks.
Using Attachments
- Floor Nozzle: The main floor nozzle is suitable for both hard floors and carpets. Use the switch on the nozzle to adjust for the surface type.
- Crevice Tool: Ideal for cleaning narrow gaps, corners, and hard-to-reach areas.
- Dust Brush: Use for delicate surfaces such as furniture, bookshelves, and electronics.
- Small Nozzle: Perfect for cleaning upholstery, car seats, and other small fabric surfaces.
Automatic Cord Rewind
After use, unplug the vacuum cleaner from the power outlet. Press the cord rewind button (usually located near the On/Off button) to automatically retract the power cord into the unit.
Parking Mode
For temporary storage or breaks during cleaning, the vacuum cleaner features a parking mode. Simply insert the floor nozzle into the designated slot at the rear of the main unit to stand the vacuum upright and keep the tube securely in place.

Image 4: The alpina vacuum cleaner demonstrating its compact size, automatic cord rewind feature, and convenient parking mode for upright storage. Also shows the floor surface switch on the nozzle.

Image 5: Illustration highlighting the airflow regulation feature, which is beneficial for individuals with asthma, allergies, or breathing difficulties.
5. Maintenance
Regular maintenance ensures optimal performance and extends the life of your vacuum cleaner.
Dust Bag Replacement
The vacuum cleaner is equipped with a dust full indicator. When this indicator lights up or when suction power decreases significantly, it's time to replace the dust bag.
- Unplug the vacuum cleaner from the power outlet.
- Open the dust bag compartment cover.
- Carefully remove the full dust bag from its holder. Dispose of it properly.
- Insert a new 1.5-liter dust bag into the holder, ensuring it is correctly seated and sealed.
- Close the dust bag compartment cover securely.

Image 6: View of the dust bag compartment, showing a paper dust bag with a capacity of 1.5 liters.
Filter Cleaning/Replacement
The vacuum cleaner uses a HEPA filter and a 5-stage filtration system. Regularly check and clean or replace filters according to the manufacturer's recommendations to maintain suction power and air quality. Refer to the filter compartment for specific instructions on accessing and cleaning filters.
General Cleaning
Wipe the exterior of the vacuum cleaner with a soft, damp cloth. Do not use abrasive cleaners or solvents. Periodically check the nozzles and hose for blockages and remove any accumulated debris.
6. Troubleshooting
If you encounter issues with your vacuum cleaner, refer to the following common problems and solutions:
| Problem | Possible Cause | Solution |
|---|---|---|
| Vacuum cleaner does not turn on | No power supply; Power cord not plugged in; On/Off button not pressed. | Check power outlet; Ensure cord is fully plugged in; Press On/Off button firmly. |
| Low suction power | Dust bag full; Filters clogged; Hose or nozzle blocked; Suction power set too low. | Replace dust bag; Clean or replace filters; Remove blockages from hose/nozzle; Adjust suction power setting. |
| Unusual noise | Foreign object in hose/nozzle; Motor issue. | Check and remove any foreign objects; If noise persists, contact customer support. |
| Dust escapes from vacuum | Dust bag not installed correctly; Filters missing or damaged; Compartment cover not closed properly. | Reinstall dust bag; Check and replace filters; Ensure all covers are securely closed. |
7. Specifications
| Feature | Specification |
|---|---|
| Model Number | 8711252190358 |
| Power Consumption | 850 W |
| Voltage | 220-240 V |
| Frequency | 50-60 Hz |
| Suction Power | 180 W |
| Dust Bag Capacity | 1.5 Liters |
| Cable Length | 4 Meters |
| Noise Level | 79 dB |
| Filter Type | HEPA Filter |
| Dimensions (L x W x H) | 35 x 26 x 22 cm |
| Weight | 4.1 Kilograms |
| Color | Red and Black |
| Included Components | 1 Vacuum Cleaner, 1 Metal Telescopic Tube, 1 2-in-1 Brush and Crevice Nozzle, 1 Plastic Brush, 1 Paper Dust Bag |
8. Warranty and Support
For warranty information or technical support, please refer to the warranty card included with your purchase or contact your retailer. Keep your proof of purchase for any warranty claims.