1. Introduction
This user manual provides comprehensive instructions for the installation, operation, and maintenance of your ASUS Prime B660M-K D4 Gaming Motherboard. Designed for Intel LGA 1700 processors, this mATX motherboard offers robust power delivery, comprehensive cooling, and ultra-fast connectivity for an optimal computing experience. Please read this manual thoroughly before proceeding with installation.

Figure 1.1: ASUS Prime B660M-K D4 Motherboard and Retail Packaging.
2. Product Overview
2.1 Key Features
- Intel LGA 1700 Socket: Ready for Intel processors of the 12th generation.
- Improved Power Supply: Features an 8-pin ProCool connector, alloy coils, and durable capacitors for stable power output.
- Comprehensive Cooling: Includes VRM heatsink, PCH heatsink, hybrid fan headers, and Fan Xpert for efficient thermal management.
- Ultra-fast Connectivity: Equipped with PCIe 4.0, dual M.2 slots, and front USB 3.2 Gen 1 ports.
2.2 Motherboard Layout and Components
Familiarize yourself with the various components and connectors on the motherboard. Refer to the diagrams below for detailed identification.

Figure 2.1: Overview of memory, storage, and expansion slots. This image highlights the two DIMM slots for DDR4 memory, two M.2 2280 slots for NVMe SSDs (PCIe 4.0 x4), and the PCIe 4.0 x16 SafeSlot Core.

Figure 2.2: Rear I/O Panel and Internal Connectors. This diagram shows the various connectivity options including USB 2.0, HDMI, D-SUB, USB 3.2 Gen 1, Realtek 1Gb Ethernet, and audio jacks. It also indicates internal USB 2.0 headers and SATA 6Gb/s ports.

Figure 2.3: Fan Header Locations. This image points out the 4-pin onboard PWM fan header and the 4-pin onboard PWM/DC fan header, crucial for comprehensive cooling management.

Figure 2.4: RGB Header Location. This image highlights the 4-pin RGB header, allowing for personalization of your PC build with compatible RGB lighting.
3. Setup & Installation
3.1 Pre-installation Checks
- Ensure you have all necessary components: CPU, RAM, storage devices, power supply, and a compatible PC case.
- Unpack the motherboard carefully and place it on an anti-static surface.
- Review the "What's in the Box" section to confirm all accessories are present.
3.2 Physical Installation
- Install the CPU: Open the CPU socket lever, align the CPU with the triangle marker on the socket, gently place the CPU, and close the lever.
- Install the CPU Cooler: Follow the cooler manufacturer's instructions to install the CPU cooler onto the motherboard.
- Install Memory (RAM): Open the clips on the DIMM slots. Align the RAM module with the notch in the slot and press down firmly on both ends until the clips snap into place. This motherboard supports 2 x DIMM DDR4.
- Install M.2 SSDs: Locate the M.2 slots. Insert the M.2 SSD at an angle and secure it with the provided M.2 Anchor screw. This motherboard supports dual M.2 slots.
- Install Graphics Card (PCIe): Open the PCIe slot latch. Align your graphics card with the PCIe 4.0 x16 slot and press firmly until it seats correctly and the latch closes.
- Mount Motherboard in Case: Install the I/O shield into your PC case. Carefully align the motherboard with the standoffs in the case and secure it with screws.
3.3 Connecting Peripherals
- Power Connectors: Connect the 24-pin ATX power connector and the 8-pin CPU power connector from your power supply to the motherboard.
- SATA Devices: Connect SATA data cables from your storage drives (HDDs/SSDs) to the SATA 6Gb/s ports on the motherboard.
- Front Panel Connectors: Connect the power button, reset button, HDD LED, power LED, and front panel USB/audio connectors from your case to the corresponding headers on the motherboard. Refer to your case manual for specific pin assignments.
- Fan Connections: Connect case fans and CPU cooler fans to the available 4-pin fan headers.
- External Peripherals: Connect your monitor, keyboard, mouse, and other USB devices to the rear I/O panel ports.
4. Operating Your Motherboard
4.1 First Boot and BIOS/UEFI Setup
After assembling your system, power it on. Press the DEL key during startup to enter the BIOS/UEFI setup utility. Here you can configure boot order, system time, fan speeds, and other advanced settings.
- Boot Priority: Set your primary boot device (e.g., M.2 SSD with OS).
- Fan Control: Utilize Fan Xpert settings within the BIOS to optimize cooling performance and noise levels.
- XMP Profile: Enable the XMP (Extreme Memory Profile) for your DDR4 memory to run at its advertised speeds.
4.2 Driver Installation
After installing your operating system, it is crucial to install the latest drivers for your motherboard components. These can typically be found on the ASUS support website for your specific model.
- Chipset Drivers
- LAN Drivers (Realtek 1Gb Ethernet)
- Audio Drivers (Realtek Codec)
- USB Drivers
4.3 Software Utilities
ASUS provides several software utilities to enhance your experience:
- Armoury Crate: A centralized software suite for system monitoring, driver updates, and ASUS Lighting Control.
- Fan Xpert: Advanced fan control software for precise thermal management.
5. Maintenance
5.1 Cleaning Your Motherboard
Regular cleaning helps maintain optimal performance and longevity.
- Ensure the system is powered off and unplugged before cleaning.
- Use compressed air to remove dust from heatsinks, fan blades, and other components.
- For stubborn dirt, use a soft brush or cotton swab lightly dampened with isopropyl alcohol.
- Avoid using harsh chemicals or excessive moisture.
5.2 BIOS Updates
BIOS updates can provide performance improvements, bug fixes, and support for new hardware. Always download BIOS updates directly from the official ASUS support website. Follow the instructions provided with the BIOS update file carefully.
5.3 Driver Updates
Periodically check the ASUS support website for updated drivers for your motherboard components to ensure system stability and performance.
6. Troubleshooting
This section provides solutions to common issues you might encounter.
| Problem | Possible Cause | Solution |
|---|---|---|
| System does not power on. | Loose power cables, faulty power supply, incorrect front panel connections. | Check all power connections (24-pin ATX, 8-pin CPU). Ensure power supply is switched on. Verify front panel power button connection. Test with a known good power supply if possible. |
| No display on monitor. | Incorrect display cable connection, faulty graphics card, RAM not seated correctly. | Ensure display cable is securely connected to the graphics card/motherboard and monitor. Reseat the graphics card and RAM modules. Test with another monitor or graphics card if available. |
| System reboots unexpectedly. | Overheating, unstable power, faulty RAM. | Check CPU and case fan operation. Ensure proper airflow. Verify power supply stability. Run memory diagnostic tests. |
| USB devices not recognized. | Missing USB drivers, faulty USB port, incorrect front panel USB connection. | Install/update USB drivers from ASUS support site. Try different USB ports. Check front panel USB header connection. |
For more advanced troubleshooting or issues not covered here, please refer to the ASUS support website or contact their technical support.
7. Specifications
| Feature | Detail |
|---|---|
| Brand | ASUS |
| Model Name | PRIME B660M-K D4 |
| CPU Socket | LGA 1700 |
| Compatible Processors | Intel Core of the 12th generation |
| Chipset Type | Intel B660 |
| RAM Memory Technology | DDR4 |
| Memory Slots | 2 x DIMM |
| Max Memory Speed | 2133 MHz (Base, supports higher via XMP) |
| Storage Interfaces | 2 x M.2 slots (PCIe 4.0 x4), 4 x SATA 6Gb/s ports |
| PCIe Slots | 1 x PCIe 4.0 x16 SafeSlot Core |
| USB Ports (Rear I/O) | USB 3.2 Gen 1, USB 2.0 |
| Video Output | HDMI, D-Sub |
| LAN | Realtek 1Gb Ethernet |
| Audio | Realtek Codec, Audio Shielding |
| Form Factor | mATX |
| Dimensions (LxWxH) | 9.61 x 8.31 x 1.42 inches |
| Item Weight | 1.08 pounds |
8. Warranty and Support
8.1 Warranty Information
Your ASUS Prime B660M-K D4 Motherboard comes with a limited warranty. Please refer to the warranty card included in your product packaging or visit the official ASUS website for detailed warranty terms and conditions specific to your region. Keep your proof of purchase for warranty claims.
8.2 Technical Support
For technical assistance, driver downloads, BIOS updates, or further information, please visit the official ASUS support website:
https://www.asus.com/support/
You may also find helpful resources and FAQs on the product's dedicated support page.
9. What's in the Box
The ASUS Prime B660M-K D4 Motherboard package typically includes the following items:
- ASUS Prime B660M-K D4 Motherboard
- User Guide / Manual
- Rear I/O Panel Shield
- SATA Cables (typically 2)
- M.2 Anchor / Screws for M.2 SSD installation
- Support DVD (for drivers and utilities)
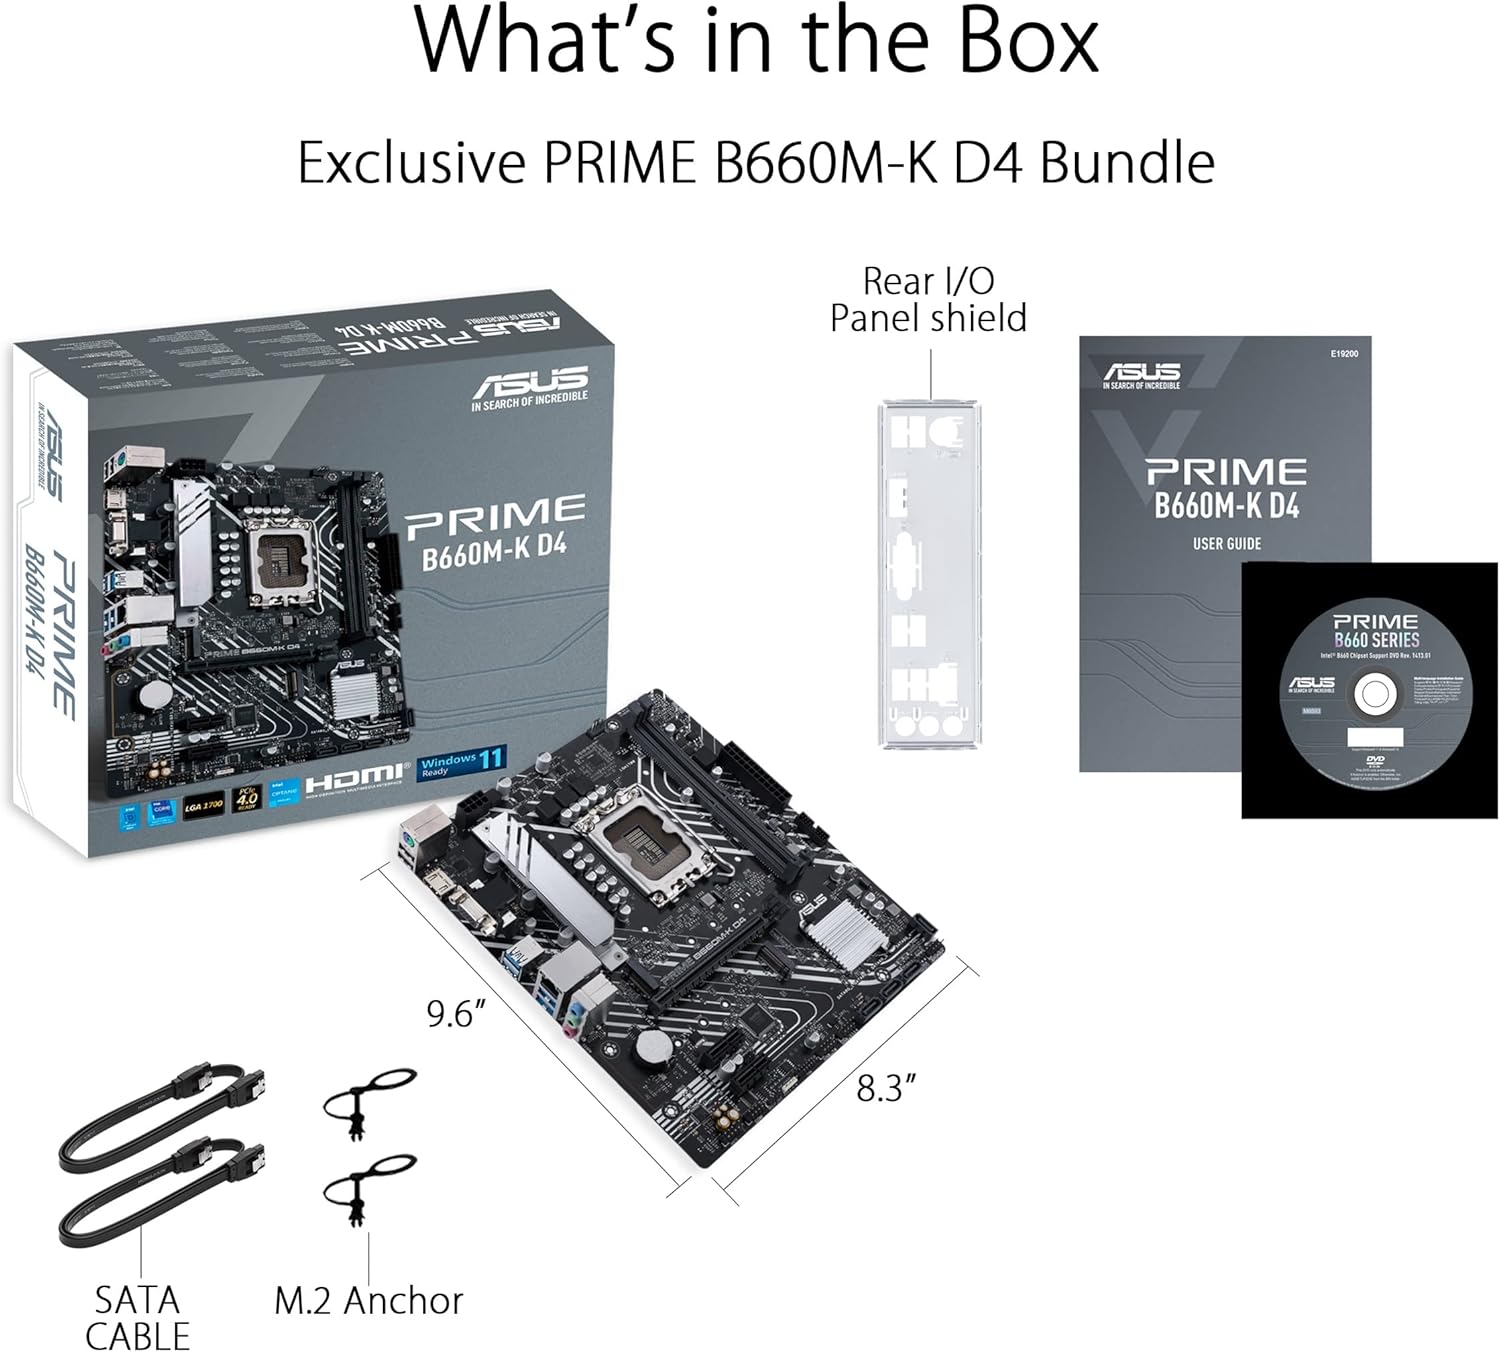
Figure 9.1: Included accessories with the ASUS Prime B660M-K D4 Motherboard. This image shows the motherboard, retail box, user guide, rear I/O panel shield, SATA cables, M.2 anchor, and a support DVD.


