Instruction Manual
WEIJIA 089290001701 Switch with Lockout Key for Ridgid R4513 Table Saw
Model: 089290001701
1. Introduction
This manual provides essential information for the safe and effective installation, operation, and maintenance of the WEIJIA 089290001701 Switch with Lockout Key, designed as a replacement part for the Ridgid R4513 Table Saw. Please read this manual thoroughly before attempting any installation or operation to ensure your safety and the proper function of the product.
2. Safety Information
WARNING: Improper installation or use can result in serious injury or damage to equipment.
- For your safety, some replacement parts, including this switch, need to be installed by qualified professionals. If you are not confident in your ability to safely install this part, seek professional assistance.
- Always disconnect power to the table saw before attempting any installation, maintenance, or inspection.
- Consult your table saw's owner's manual for proper part number identification and specific installation procedures.
- Ensure all connections are secure and properly insulated after installation.
- Keep the lockout key in a safe place, out of reach of children, when not in use.
3. Product Overview
The 089290001701 switch is a critical safety component for your Ridgid R4513 Table Saw, featuring a push-button ON/OFF mechanism and an integrated lockout key for enhanced safety. It is designed for flush mounting and provides reliable control over your power tool.

Figure 3.1: Front view of the WEIJIA 089290001701 Switch. This image shows the red 'OFF' paddle, the yellow 'ON' paddle, and the black switch body with electrical terminals. The yellow paddle serves as the lockout key.
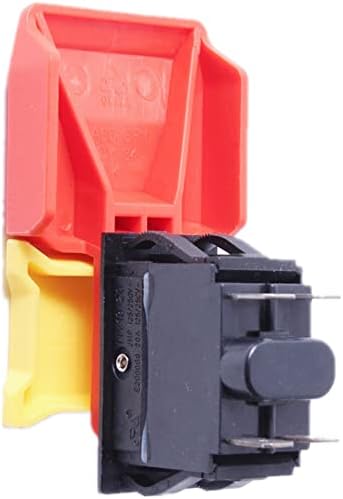
Figure 3.2: Side view of the WEIJIA 089290001701 Switch. This perspective highlights the electrical terminals at the back of the switch, which are essential for connecting it to the table saw's power system.
4. Setup and Installation
Installation of this replacement switch requires careful attention to electrical connections and safety protocols. It is strongly recommended that installation be performed by a qualified professional.
Installation Steps:
- Disconnect Power: Before beginning, ensure the table saw is completely unplugged from its power source. Verify there is no power to the machine.
- Access Old Switch: Locate and access the existing switch on your Ridgid R4513 Table Saw. This may involve removing covers or panels.
- Document Connections: Carefully note or photograph the wiring connections to the old switch. This is crucial for correct re-installation.
- Remove Old Switch: Disconnect the wires from the old switch and remove it from its mounting.
- Install New Switch: Mount the new WEIJIA 089290001701 switch into the designated opening.
- Connect Wiring: Reconnect the wires to the new switch according to your documentation. Ensure all connections are tight and secure.
- Secure and Test: Replace any covers or panels. Plug the table saw back into the power source and perform a functional test of the switch and lockout key.
5. Operating Instructions
Turning the Saw ON:
- Ensure the lockout key (yellow paddle) is inserted into the switch.
- Press the green or yellow 'ON' button/paddle to activate the table saw.
Turning the Saw OFF:
- Press the large red 'OFF' paddle to immediately stop the table saw.
Using the Lockout Key:
- To prevent unauthorized use or accidental startup, remove the yellow lockout key from the switch when the table saw is not in use.
- The saw cannot be started without the lockout key inserted.
6. Maintenance
The WEIJIA 089290001701 switch is designed for durability and requires minimal maintenance. However, regular inspection can prolong its lifespan and ensure safe operation.
- Cleaning: Keep the switch free from sawdust, debris, and moisture. Use a dry cloth or compressed air to clean the surface. Do not use liquid cleaners directly on the switch.
- Inspection: Periodically inspect the switch for any signs of physical damage, loose connections, or excessive wear. If any damage is observed, replace the switch immediately.
- Electrical Connections: Ensure that the electrical connections remain tight and free from corrosion. If you are not comfortable checking electrical connections, consult a professional.
7. Troubleshooting
If you experience issues with your switch, refer to the following table for common problems and solutions. If the problem persists, consult a qualified professional.
| Problem | Possible Cause | Solution |
|---|---|---|
| Saw does not turn ON | Lockout key not inserted No power to saw Faulty wiring connection Defective switch | Insert lockout key Check power outlet/breaker Inspect and secure wiring (professional) Replace switch (professional) |
| Saw does not turn OFF | Defective switch | Immediately disconnect power from the wall. Replace switch (professional). |
| Switch feels loose or wobbly | Improper mounting Damaged housing | Ensure switch is securely mounted. If housing is damaged, replace switch (professional). |
8. Specifications
| Feature | Detail |
|---|---|
| Part Number | 089290001701 |
| Type | Switch with Lockout Key |
| Operation Mode | Manual |
| Actuator Type | Push Button |
| Mounting Type | Flush Mount |
| Color | Multi (Red/Yellow/Black) |
| Contact Material | Copper, Brass, Silver |
| Number of Positions | 1 |
| Compatibility | Ridgid R4513 Table Saw |
9. Warranty and Support
For information regarding warranty coverage or technical support for your WEIJIA 089290001701 Switch, please contact the seller or manufacturer directly. Refer to your purchase documentation for specific contact details. It is recommended to retain your proof of purchase for any warranty claims.