MSI MAGB660MMORTARDDR4
MSI MAG B660M Mortar DDR4 Motherboard User Manual
Model: MAGB660MMORTARDDR4
1. Introduction
This manual provides detailed instructions for the installation, configuration, and maintenance of your MSI MAG B660M Mortar DDR4 Motherboard. Please read this manual thoroughly before beginning installation to ensure proper setup and operation.
The MSI MAG B660M Mortar DDR4 is a Micro-ATX motherboard designed for Intel 12th Gen Core Processors (LGA 1700 socket). It features DDR4 memory support up to 4800+MHz/OC, PCIe 4.0 and 3.0 x16 slots, dual M.2 Gen4 slots, and 2.5G LAN connectivity.
2. Package Contents
Verify that all items listed below are present in your motherboard package. If any items are missing or damaged, contact your retailer.
- MSI MAG B660M Mortar DDR4 Motherboard
- Quick Installation Guide
- 2 x SATA Cables
- EZ M.2 Clips
- Driver DVD
- MAG Stickers
- MSI Case Badge
- Product Registration Card

Figure 2.1: Motherboard and Included Accessories. This image displays the MSI MAG B660M Mortar DDR4 Motherboard alongside its retail box, a Quick Installation Guide, two SATA cables, EZ M.2 clips, a driver DVD, MAG stickers, an MSI case badge, and a product registration card, illustrating the complete package contents.
3. Setup and Installation
3.1 Safety Precautions
Always disconnect the power supply before installing or removing any components. Wear an anti-static wrist strap to prevent electrostatic discharge (ESD) damage to components. Handle components by their edges.
3.2 Motherboard Layout
Familiarize yourself with the key components and connectors on the motherboard.

Figure 3.1: Motherboard Overview. This image provides a top-down view of the MSI MAG B660M Mortar DDR4 Motherboard, highlighting the LGA 1700 CPU socket, DDR4 DIMM slots, PCIe slots, and various headers. Intel Core and B660 Chipset compatibility logos are visible in the top left.

Figure 3.2: Key Features Highlight. This image showcases the MSI MAG B660M Mortar DDR4 Motherboard, emphasizing its Memory Boost technology for DDR4 RAM, Lightning Gen4 support for PCIe and M.2 slots, and Intel Optane Memory Ready compatibility.
3.3 Installing the CPU
- Open the CPU socket lever.
- Carefully align the CPU with the socket, ensuring the triangular mark on the CPU matches the mark on the socket.
- Gently place the CPU into the socket without forcing it.
- Close the socket lever to secure the CPU.
3.4 Installing Memory (RAM)
The motherboard supports DDR4 memory modules. For optimal performance, install memory modules in the recommended DIMM slots as per the motherboard manual (refer to the Quick Installation Guide for specific slot configurations).
- Open the clips at both ends of the DIMM slot.
- Align the notch on the memory module with the key in the DIMM slot.
- Press down firmly on both ends of the memory module until the clips snap into place.
3.5 Installing Storage Devices (M.2 SSDs, SATA Drives)
The motherboard features dual M.2 Gen4 x4 64Gb/s slots with Shield Frozr for NVMe SSDs and multiple SATA 6Gb/s ports for traditional hard drives or SSDs.
3.5.1 M.2 SSD Installation
- Locate the M.2 slots on the motherboard. Some slots may have a Shield Frozr heatsink that needs to be removed first.
- Insert the M.2 SSD into the slot at a slight angle.
- Gently push down the SSD and secure it with the EZ M.2 clip or screw.
- If applicable, reattach the Shield Frozr heatsink.
3.5.2 SATA Drive Installation
- Connect one end of the SATA data cable to a SATA port on the motherboard.
- Connect the other end of the SATA data cable to your storage drive (HDD/SSD).
- Connect a SATA power cable from your power supply unit (PSU) to the storage drive.
3.6 Installing the Graphics Card (GPU)
The motherboard includes a PCIe 4.0 x16 Steel Armor slot for the primary graphics card.
- Open the latch on the PCIe x16 slot.
- Align the graphics card with the slot and press down firmly until it is fully seated and the latch snaps into place.
- Secure the graphics card to the chassis with screws.
- Connect any necessary PCIe power cables from your PSU to the graphics card.
3.7 Connecting Front Panel Headers and Power Supply
Connect the front panel cables (power button, reset button, USB, audio) and the main ATX power connectors from your PSU to the motherboard.

Figure 3.3: Motherboard and Packaging. This image shows the MSI MAG B660M Mortar DDR4 Motherboard alongside its retail packaging, providing a visual reference for the product.
4. Operating Instructions
4.1 First Boot and BIOS Setup
Upon first boot, the system will enter the BIOS (Basic Input/Output System). You can access the BIOS by pressing the DEL key during startup. The BIOS allows you to configure system settings, boot order, and monitor hardware status.
MSI's BIOS interface is designed to be user-friendly. Navigate using the keyboard or mouse. Ensure your boot drive is correctly prioritized.
4.2 Driver Installation
After installing the operating system, install the necessary drivers for the motherboard components. These include chipset drivers, LAN drivers, audio drivers, and any other peripheral drivers. Drivers can be found on the included Driver DVD or downloaded from the official MSI website.
It is recommended to download the latest drivers from the MSI support website for optimal performance and stability.
4.3 Rear I/O Panel Overview
The rear I/O panel provides various ports for connecting external devices.

Figure 4.1: Rear I/O Panel. This image details the rear input/output panel of the MSI MAG B660M Mortar DDR4 Motherboard, labeling ports such as USB 2.0, HDMI 2.1, DisplayPort 1.4, USB 3.2 Gen 2x2 Type-C (20Gbps), 2.5G LAN, and 7.1 HD Audio ports with S/PDIF output.
| Port | Description |
|---|---|
| USB 2.0 Ports | Connect USB 2.0 devices such as keyboards, mice, and printers. |
| HDMI 2.1 Port | Connect to a display device using an HDMI cable. Supports 4K/60Hz. |
| DisplayPort 1.4 | Connect to a display device using a DisplayPort cable. |
| USB 3.2 Gen 2x2 Type-C | High-speed USB port (20Gbps) for compatible Type-C devices. |
| 2.5G LAN Port | Connect to a network using an Ethernet cable for high-speed internet. |
| Audio Jacks | Connect audio devices such as speakers, headphones, and microphones. Supports 7.1 HD Audio. |
| S/PDIF Out | Digital audio output for connecting to compatible audio receivers. |
5. Maintenance
5.1 Keeping Your System Clean
Regularly clean your computer case and motherboard to prevent dust buildup, which can lead to overheating and component failure. Use compressed air to remove dust from fans, heatsinks, and vents. Ensure the system is powered off and unplugged before cleaning.
5.2 BIOS Updates
Periodically check the MSI website for BIOS updates. BIOS updates can improve system stability, add support for new hardware, and fix bugs. Follow the instructions provided by MSI carefully when updating the BIOS to avoid system damage.
5.3 Driver Updates
Keep your drivers updated to ensure optimal performance and compatibility with new software and hardware. Visit the MSI support website regularly for the latest driver versions.
6. Troubleshooting
6.1 Common Issues and Solutions
- No Power: Ensure all power cables (24-pin ATX, 8-pin CPU) are securely connected to the motherboard and PSU. Check the PSU switch and wall outlet.
- No Display: Verify that the monitor is connected to the graphics card (or motherboard if using integrated graphics) and powered on. Reseat the graphics card and RAM modules. Try a different display cable or monitor.
- System Instability/Crashes: Check RAM seating and test memory modules individually. Ensure CPU cooler is properly installed and making good contact. Monitor temperatures using software. Update drivers and BIOS.
- Boot Device Not Found: Check SATA/M.2 cable connections to storage drives. Verify boot order in BIOS. Ensure the operating system is correctly installed on the selected boot drive.
- Peripheral Not Detected: Try connecting the peripheral to a different USB port. Ensure drivers for the peripheral are installed. Check BIOS settings for USB port enablement.
6.2 BIOS Reset (Clear CMOS)
If you encounter issues after changing BIOS settings, you can reset the BIOS to its default settings. This can be done by:
- Powering off the system and unplugging the power cord.
- Locating the JBAT1 jumper on the motherboard (refer to the Quick Installation Guide for exact location).
- Shorting the JBAT1 pins with a jumper cap for 5-10 seconds.
- Removing the jumper cap and reconnecting the power cord.
Alternatively, you can remove the CMOS battery for a few minutes and then reinsert it.
7. Specifications
| Feature | Detail |
|---|---|
| Model Name | MAG B660M MORTAR DDR4 |
| CPU Socket | LGA 1700 |
| Chipset | Intel B660 |
| Memory | 4 x DDR4 DIMM slots, up to 128GB, 4800+MHz (OC) |
| PCIe Slots | 1 x PCIe 4.0 x16, 1 x PCIe 3.0 x16 (supports AMD CrossFire) |
| Storage | 2 x M.2 Gen4 x4 64Gb/s slots (with Shield Frozr), 6 x SATA 6Gb/s ports |
| LAN | Realtek 2.5G LAN |
| USB Ports (Rear) | USB 3.2 Gen 2x2 Type-C (20Gbps), USB 3.2 Gen 2 Type-A, USB 3.2 Gen 1 Type-A, USB 2.0 |
| Video Output | HDMI 2.1, DisplayPort 1.4 |
| Audio | 7.1-Channel High Definition Audio with Audio Boost |
| Form Factor | Micro-ATX |
| Dimensions | 9.61 x 9.61 x 1.97 inches |
| Weight | 1.98 pounds |
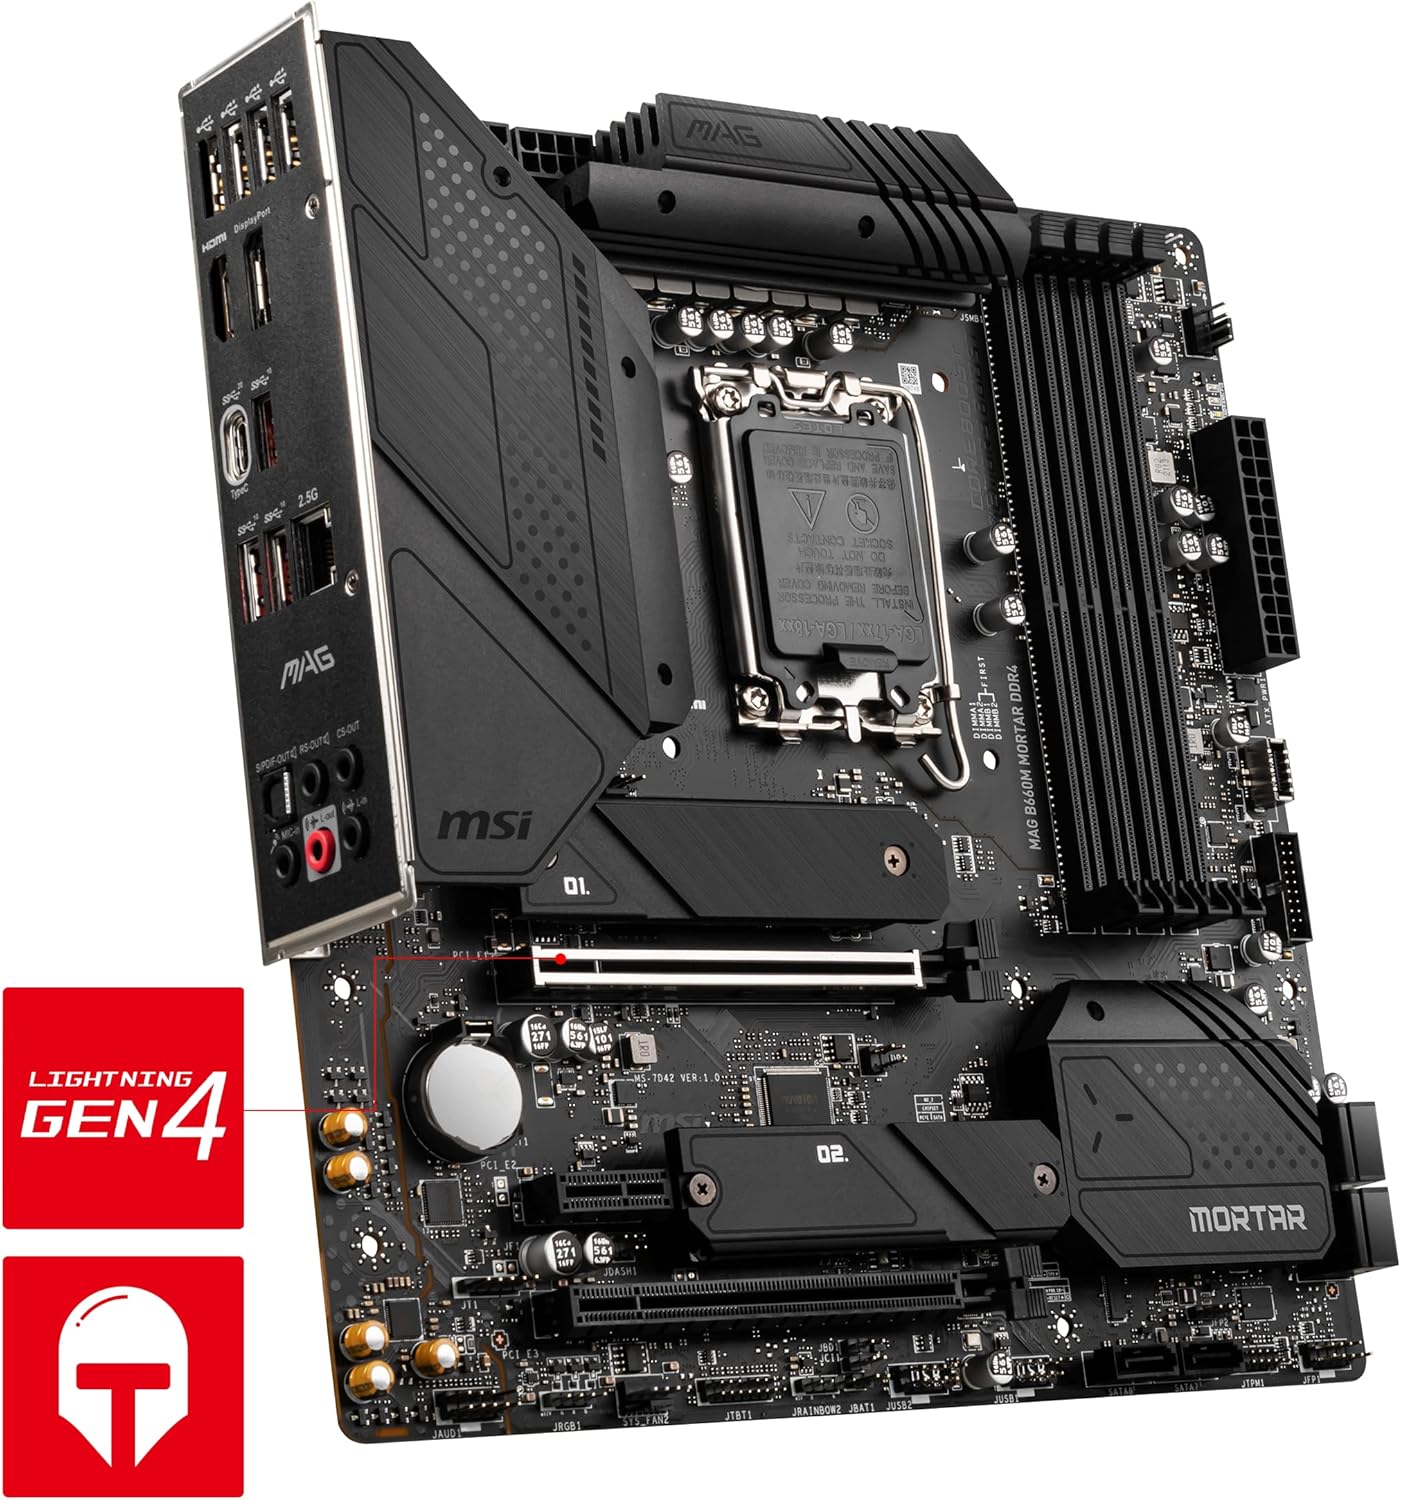
Figure 7.1: Advanced Cooling Design. This image highlights the robust cooling features of the MSI MAG B660M Mortar DDR4 Motherboard, including its 2oz thickened copper PCB, extended heatsinks, and M.2 Shield Frozr, designed for efficient heat dissipation.
8. Warranty Information
MSI products come with a limited warranty. The specific terms and duration of the warranty may vary by region and product. Please refer to the Product Registration Card included in your package or visit the official MSI website for detailed warranty information and registration procedures.
Retain your proof of purchase for warranty claims.
9. Customer Support
For technical support, driver downloads, BIOS updates, and FAQs, please visit the official MSI support website:
You can also contact MSI customer service through their website for further assistance.