AIRAIN TECH ARNT02WS300
AIRAIN TECH WiFi Weather Station User Manual
Model: ARNT02WS300
1. Introduction
Thank you for choosing the AIRAIN TECH WiFi Weather Station. This comprehensive 14-in-1 system provides accurate and real-time weather data for both indoor and outdoor environments. This manual will guide you through the setup, operation, and maintenance of your new weather station.
Package Contents:
- Display Console
- Integrated Outdoor Sensor Array (7-in-1)
- Remote Thermo-hygrometer Sensor
- User Manual (this document)

Figure 1.1: Overview of the AIRAIN TECH WiFi Weather Station components.
2. Key Features
- Multifunctional Data Collection: Monitors barometric pressure, rainfall, wind speed, wind direction, dew point, light, UV index, moon phase, indoor/outdoor temperature, and humidity.
- 7-in-1 Wireless Sensor Array: Includes a rain gauge, anemometer, wind vane, UV meter, solar radiometer, and outdoor temperature/hygrometer. Designed for outdoor use with a transmission range of up to 300 feet (91 meters) in open fields.
- Large 8.07" Color Display: Provides clear, easy-to-read weather data from various angles, organized into distinct sections for quick reference.
- Adjustable Backlight: The display console features 4 adjustable backlight levels for optimal visibility in different lighting conditions.
- Remote Thermo-hygrometer Sensor: An additional sensor for monitoring temperature and humidity in other locations, with selectable Fahrenheit (℉) or Celsius (℃) units.
- Wi-Fi Connectivity: Seamlessly uploads weather data to popular online weather services such as Weather Underground and Weather Cloud, allowing real-time data viewing on smartphones, tablets, and computers.

Figure 2.1: Comprehensive 14-in-1 weather monitoring capabilities.

Figure 2.2: Components of the 7-in-1 Outdoor Sensor Array and Remote Sensor.
3. Setup Guide
3.1 Battery Installation
The weather station requires 5 AAA batteries in total (not included): 3 for the outdoor sensor array and 2 for the display console.
- Outdoor Sensor Array: Locate the battery compartment on the underside of the outdoor sensor array. Insert 3 new AAA batteries, ensuring correct polarity (+/-). Close the battery cover securely.
- Display Console: Open the battery compartment on the back of the display console. Insert 2 new AAA batteries, observing correct polarity. Close the battery cover.
- Remote Thermo-hygrometer Sensor: Open the battery compartment. Insert 2 new AAA batteries, observing correct polarity. Close the battery cover.
3.2 Sensor Placement
Proper placement of the sensors is crucial for accurate readings.
- Outdoor Sensor Array:
- Mount the sensor array in an open area, away from obstructions like buildings, trees, or fences, which can affect wind and rain readings.
- Ensure the solar panel faces south for optimal charging.
- Use the integrated bubble level to ensure the array is perfectly horizontal for accurate rain collection and wind direction.
- The recommended height for wind measurement is 10 meters (33 feet) above ground, though this may not be practical for home use. Aim for at least 2 meters (6.5 feet) above ground.
- Display Console: Place the display console indoors, within the transmission range of the outdoor sensor array (up to 300 feet/91 meters). Avoid placing it near heat sources or direct sunlight.
- Remote Thermo-hygrometer Sensor: This sensor can be placed in a room, kitchen, basement, cellar, greenhouse, or warehouse to monitor specific indoor conditions. Ensure it is within range of the main display console.

Figure 3.1: Recommended placement and transmission range.
4. Operating Instructions
4.1 Initial Power-Up and Sensor Synchronization
Once batteries are installed in all units, the display console will automatically begin searching for signals from the outdoor sensor array and the remote thermo-hygrometer sensor. This process may take a few minutes. Ensure all units are within range.
4.2 Display Console Overview
The 8.07-inch color display presents various weather parameters clearly. Data is typically organized into sections for outdoor conditions (temperature, humidity, wind), indoor conditions, rainfall, barometric pressure, UV index, sunlight, moon phase, time, and date.
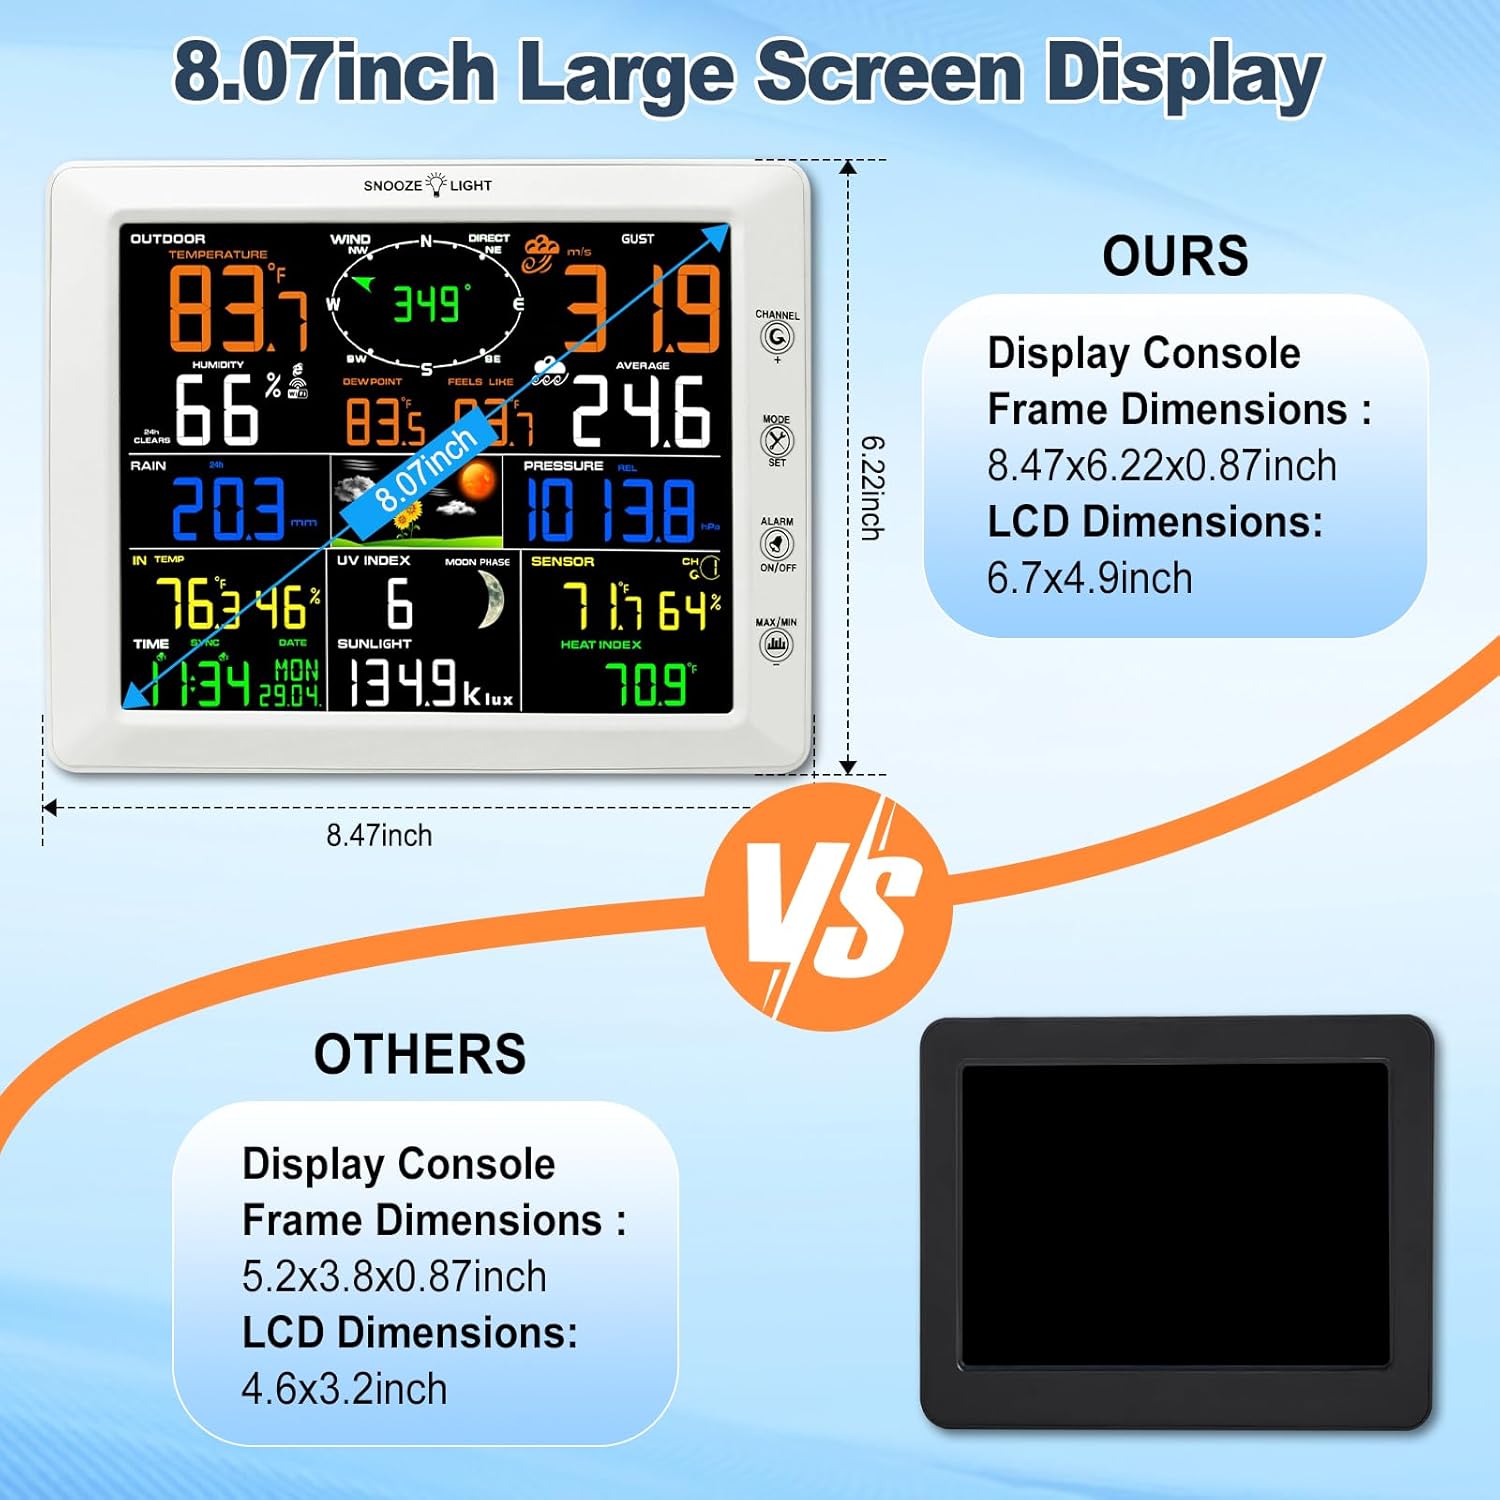
Figure 4.1: The large, clear display for easy reading.
4.3 Adjusting Backlight
The display console features 4 adjustable backlight levels. Press the "SNOOZE/LIGHT" button (usually located on the top or front of the console) to cycle through the brightness settings (High, Medium, Low, Off). Press and hold the "SNOOZE/LIGHT" button for 3 seconds to turn the backlight on or off completely.

Figure 4.2: Backlight adjustment options.
4.4 Wi-Fi Connection and Online Data Upload
The weather station can connect to your home Wi-Fi network (2.4G router required) to upload data to online weather services.
- Ensure your display console is powered on and the Wi-Fi icon is flashing, indicating it's ready for connection.
- On a computer or smartphone, connect to the Wi-Fi network broadcast by the weather station (e.g., "WeatherHome" or similar, check your manual for the exact SSID).
- Open a web browser and navigate to the weather station's setup page (usually an IP address like 192.168.x.x, refer to your specific manual for the address).
- Follow the on-screen instructions to select your home Wi-Fi network and enter the password.
- Once connected, you can configure settings to upload data to Weather Underground and Weather Cloud. You will need to create accounts on these platforms and obtain your Station ID and Key.
- After successful configuration, your weather data will be automatically uploaded, allowing you to view current and historical data from anywhere via their websites or mobile apps.

Figure 4.3: Wi-Fi connectivity and online data sharing.
5. Maintenance
5.1 Battery Replacement
Replace batteries in the outdoor sensor array and display console approximately once a year, or when the low battery indicator appears on the display. Always replace all batteries in a unit at the same time with new, high-quality batteries.
For the outdoor sensor array, ensure the solar panel is clean to maximize its charging efficiency, which extends battery life.
5.2 Cleaning
- Display Console: Wipe the display and casing with a soft, damp cloth. Do not use abrasive cleaners or solvents.
- Outdoor Sensor Array: Periodically check the rain collector for debris (leaves, insects) and clean as necessary. Ensure the wind cups and wind vane spin freely. Gently wipe the solar panel to remove dust or dirt.
6. Troubleshooting
| Problem | Possible Cause | Solution |
|---|---|---|
| No outdoor data on display. |
|
|
| Inaccurate wind speed/direction. |
|
|
| Rainfall readings incorrect. |
|
|
| Wi-Fi connection issues. |
|
|
7. Specifications
| Feature | Detail |
|---|---|
| Model Number | ARNT02WS300 |
| Product Dimensions (Display Console) | 8.5 x 6.2 x 0.9 inches |
| Weight | 5.2 Pounds (total package) |
| Power Source | Solar Powered (Outdoor Sensor Array), Battery (5 AAA total: 3 for outdoor sensor, 2 for display console) |
| Connectivity | Wi-Fi (2.4Ghz) |
| Outdoor Sensor Transmission Range | Up to 300 feet (91 meters) in open field |
| Material | Plastic |
| Special Features | Customizable Alert, Adjustable Brightness, Alarm, Weather Resistant, Clock |
| Manufacturer | AIRAIN TECH |
8. Warranty and Support
AIRAIN TECH products are designed for reliability and performance. For specific warranty details and terms, please refer to the warranty card included with your product or visit the official AIRAIN TECH website. Keep your purchase receipt as proof of purchase.
For technical support, troubleshooting assistance, or inquiries regarding your weather station, please contact AIRAIN TECH customer service. Contact information can typically be found on the product packaging or the brand's official website.
We are committed to providing excellent customer service and support for your AIRAIN TECH weather station.
Related Documents - ARNT02WS300
 |
SAINLOGIC WS-0835 Plus WiFi Weather Station User Manual Comprehensive user manual for the SAINLOGIC WS-0835 Plus Professional WiFi Wireless Weather Station, covering installation, operation, troubleshooting, and online connectivity. |
 |
RK110-01G Wind Direction Sensor - Rika Technical Specifications Comprehensive technical specifications for the Rika RK110-01G Wind Direction Sensor. Details include overview, features, applications, technical parameters, output characteristics, and mounting dimensions for professional weather monitoring. |
 |
AURIOL Radio-Controlled Weather Station User Manual Comprehensive user manual for the AURIOL radio-controlled weather station (Model 4-LD6674, IAN 456364_2401). Learn how to set up, operate, and maintain your device for accurate weather monitoring, time display, and environmental data. |
 |
AURIOL Radio-Controlled Weather Station User Manual (IAN 466444_2404) Comprehensive user manual for the AURIOL Radio-Controlled Weather Station (IAN 466444_2404), providing setup, operation, safety, and technical information. Learn how to use your weather station effectively. |
 |
PRO TECH WSMIHP2550 Professional WiFi Weather Station Operation Manual This operation manual provides comprehensive instructions for the PRO TECH WSMIHP2550 Professional WiFi Weather Station, covering setup, operation, and maintenance. Learn to install sensors, connect to Wi-Fi, and stream data to online weather services. |
 |
LIVARNO home Radio-Controlled Weather Station User Manual User manual for the LIVARNO home Radio-Controlled Weather Station, detailing setup, operation, features like temperature, humidity, weather forecast, moon phases, and troubleshooting. Includes technical specifications and safety information. |
Ask a question about this manual
Ask about setup, troubleshooting, compatibility, parts, safety, or missing instructions. Manuals+ will review the question and use this page’s manual context to help answer it.