1. Product Overview
The CREWORKS 30 x 38CM Heat Press Machine is a versatile tool designed for transferring images onto various materials. Its 360-degree swing-away design allows for easy placement and removal of items, enhancing operational efficiency. The machine features precise temperature and time controls, ensuring consistent and high-quality transfers.
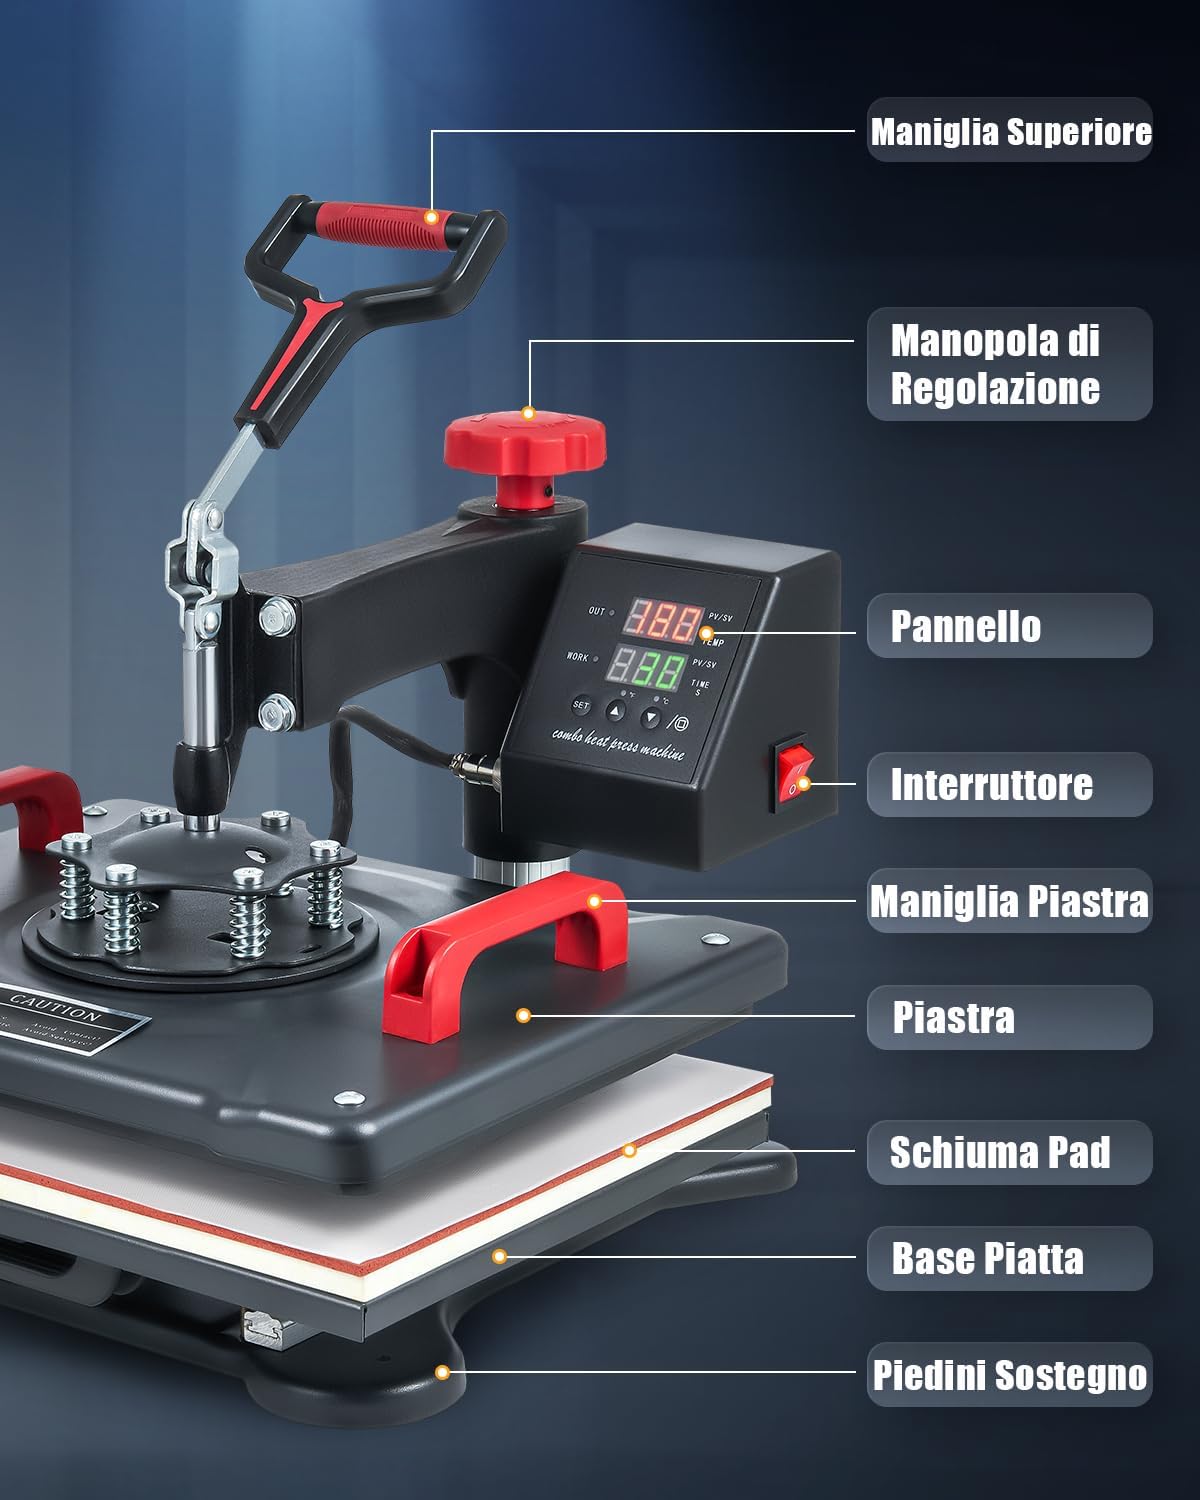
Figure 1: Key components of the CREWORKS 30 x 38CM Heat Press Machine, including the top handle, adjustment knob, control panel, power switch, platen handle, heating platen, foam pad, flat base, and support feet.

Figure 2: The heat press machine demonstrating its versatile application across various items such as t-shirts, cushions, mouse pads, bags, masks, and backpacks.
2. Safety Instructions
Please read all safety instructions carefully before operating the heat press machine to prevent injury or damage.
- Always operate the machine on a stable, heat-resistant surface.
- Keep hands and body clear of the heating platen during operation, as surfaces become extremely hot.
- Use the heat-resistant handle for safe operation.
- Ensure adequate ventilation in the work area.
- Do not leave the machine unattended while it is powered on.
- Unplug the machine from the power outlet when not in use or before cleaning.
- The machine features an automatic shut-off function after 30 minutes of inactivity for enhanced safety.
3. Setup
- Unpack and Inspect: Carefully remove all components from the packaging. Inspect the machine for any signs of damage during transit.
- Position the Machine: Place the heat press on a sturdy, level, and heat-resistant workbench. Ensure there is sufficient space around the machine for safe operation and heat dissipation.
- Connect the Control Unit: Attach the dual display control unit to the main body of the heat press. Secure the power cord connection to the display unit.
- Power Connection: Plug the machine's power cord into a grounded electrical outlet.
Video 1: Demonstrates the installation of the dual display screen and connecting the power cord to the display unit for the CREWORKS 30 x 38 cm Heat Press.
4. Operating Instructions
4.1 General Operation
- Power On: Flip the red power switch on the control unit to the 'ON' position.
- Set Temperature: Press the 'SET' button once. Use the '▲' or '▼' arrows to adjust the desired temperature (up to 250°C / 480°F). Press 'SET' again to confirm.
- Set Time: Press the 'SET' button twice. Use the '▲' or '▼' arrows to adjust the desired heating duration (up to 999 seconds). Press 'SET' again to confirm.
- Adjust Pressure: Use the red adjustment knob on top of the machine to increase or decrease pressure. Turn clockwise for more pressure, counter-clockwise for less.
- 360° Swing-Away Feature: The heating platen can rotate 360 degrees, allowing you to safely prepare your item on the lower platen without direct contact with the heat.

Figure 3: The intelligent LED control box for precise temperature and time adjustments.

Figure 4: The 360-degree swing-away design and pressure adjustment knob for ease of use.
4.2 T-Shirt Pressing
- Preparation: Place the t-shirt flat on the lower platen. Pre-press for 5-10 seconds to remove moisture and wrinkles.
- Placement: Position your transfer design onto the t-shirt. Cover with a Teflon sheet or parchment paper.
- Pressing: Swing the heating platen over the t-shirt and lower the handle to apply pressure. The timer will start automatically.
- Completion: Once the timer sounds, lift the handle and swing the heating platen away. Carefully remove the transfer paper (hot or cold peel as per transfer instructions).

Figure 5: Applying a design to a t-shirt using the heat press.
4.3 Hat Pressing
To press hats, replace the flat platen with the hat press attachment.
- Attach Hat Platen: Securely attach the hat platen to the machine.
- Preparation: Place the hat onto the hat platen. Position your transfer design.
- Pressing: Lower the heating element onto the hat and apply pressure.
- Completion: After the set time, release the pressure and remove the hat.
4.4 Mug Pressing
To press mugs, replace the flat platen with the mug press attachment.
- Attach Mug Platen: Securely attach the mug press attachment.
- Preparation: Wrap your transfer design around the mug and secure it with heat-resistant tape. Insert the mug into the mug press.
- Pressing: Close the mug press to apply heat and pressure.
- Completion: After the set time, open the press and carefully remove the hot mug. Allow it to cool before peeling the transfer.
4.5 Plate Pressing
To press plates, replace the flat platen with the plate press attachment.
- Attach Plate Platen: Securely attach the plate press attachment.
- Preparation: Place the plate onto the plate platen. Position your transfer design.
- Pressing: Lower the heating element onto the plate and apply pressure.
- Completion: After the set time, release the pressure and remove the plate.
Video 2: A comprehensive demonstration of the CREWORKS 30 x 38 cm Heat Press, showcasing its use for t-shirts, plates, hats, and mugs.
5. Maintenance
- Cleaning: Ensure the machine is unplugged and completely cool before cleaning. Wipe the heating platen with a soft, damp cloth. For stubborn residue, use a non-abrasive cleaner.
- Regular Checks: Periodically check all screws and connections to ensure they are secure.
- Storage: Store the heat press in a dry, dust-free environment when not in use.
6. Troubleshooting
| Problem | Possible Cause | Solution |
|---|---|---|
| Uneven Heat Transfer | Incorrect pressure, faulty heating element, uneven surface. | Adjust pressure, ensure even placement, contact support if heating element is suspected. |
| Machine Not Powering On | Power cord not connected, power switch off, circuit breaker tripped. | Check power connections, ensure switch is on, reset circuit breaker. |
| Poor Transfer Quality | Incorrect temperature/time, wrong transfer paper, material incompatibility. | Verify settings with transfer paper manufacturer's recommendations, use appropriate materials. |
7. Specifications
| Feature | Detail |
|---|---|
| Model | 30 x 38CM |
| Platen Size | 30 x 38 cm |
| Rated Temperature | Up to 250°C (480°F) |
| Power Wattage | 1250 Watts |
| Product Dimensions | 38 x 30 x 38.1 cm |
| Item Weight | 10 kg |
| Heating Element | Double tube heating |
| Safety Features | Automatic shut-off after 30 mins, heat-resistant handle |
8. Warranty and Support
This CREWORKS Heat Press Machine comes with a standard manufacturer's warranty. For detailed warranty information, product support, or service inquiries, please refer to the warranty card included in your product packaging or contact CREWORKS customer service directly. Keep your purchase receipt as proof of purchase.