1. Overview
This manual provides detailed instructions for the assembly, operation, and maintenance of your Marada Racing Simulator Cockpit. Designed for an immersive gaming experience, this cockpit features a robust structure and adjustable components to accommodate various racing peripherals and user preferences.
Key Features:
- Equipment Compatibility: Suitable for Logitech, Fanatec, and Thrustmaster series racing steering wheels and pedals.
- Comfortable Seat: Features a dual-track and dual-locking design, professional comfort, breathability, adjustable 65-180 degree support angle, and strong seat wrapping.
- Diversified Adjustment: Two-stage steering wheel platform with dual-level height and angle adjustment, customizable pedal angle, and shift lever settings.
- Premium Gaming Experience: Constructed with 50x50mm large round tubes and a four-hole flange structure for stability.

Figure 1: Assembled Marada Racing Simulator Cockpit (Steering wheel, pedals, and shifter not included).
2. Setup Instructions
The Marada Racing Simulator Cockpit requires assembly. Please follow these steps carefully. Note that the product is shipped in two packages.
2.1 Assembly Video Guide
Video 1: Detailed installation guide for the Marada Racing Cockpit with Black Seat.
2.2 Step-by-Step Assembly
- Unpack Components: Carefully remove all parts from the packaging. Verify that all components listed in the packing list are present.
- Assemble Base Frame: Connect the main horizontal bars and vertical supports using the provided bolts and U-shaped clamps. Ensure all connections are secure.
- Attach Steering Wheel Platform: Secure the steering wheel platform to the main frame using the designated bolts. This platform supports dual-level height and angle adjustment.
- Install Pedal Platform: Mount the pedal platform to the base. The pedal angle is adjustable to suit your preference.
- Mount Shifter Platform: Attach the shifter platform to the side of the cockpit. This platform can be adjusted for optimal positioning.
- Install Seat Rails: Secure the seat rails to the main base frame.
- Attach Seat: Place the comfort seat onto the installed seat rails and secure it using the provided hardware. Ensure the dual-locking mechanism is engaged for stability.
- Final Tightening: Once all components are in place, re-check and tighten all bolts and connections to ensure maximum stability and safety.
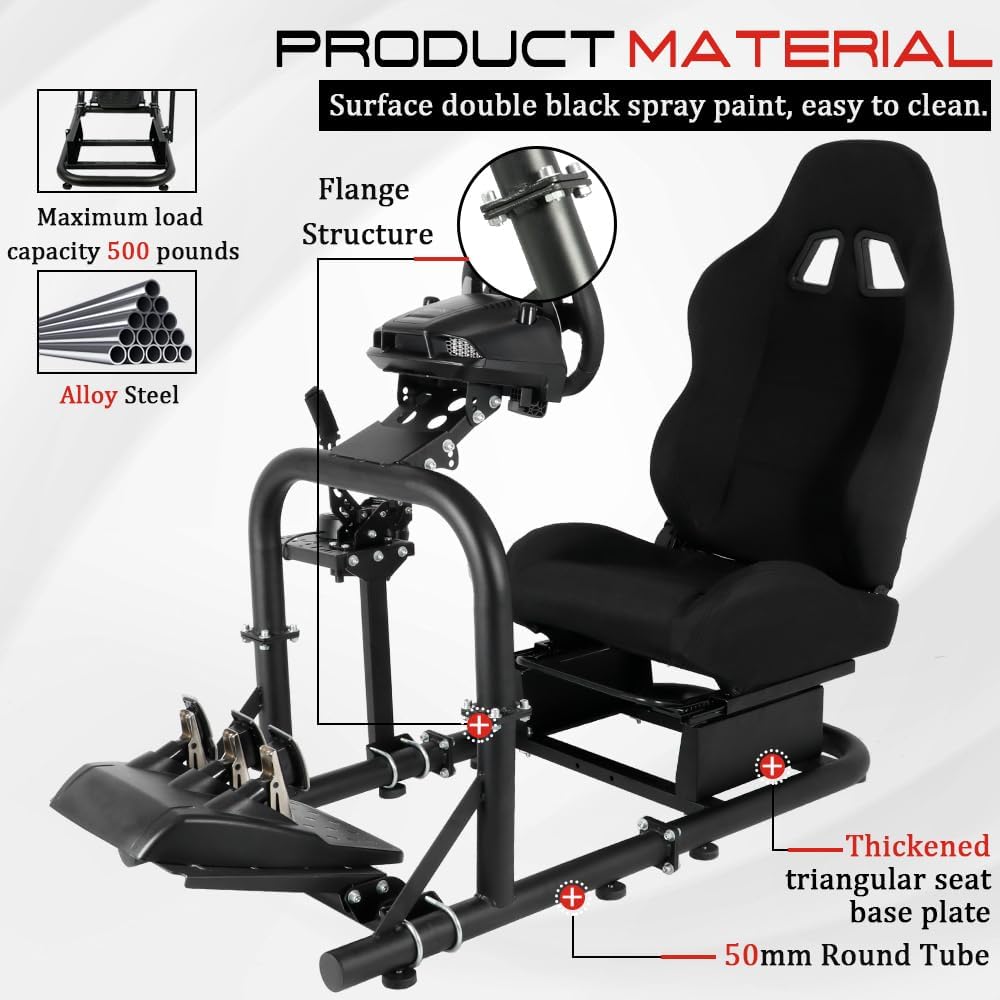
Figure 2: Illustration of the cockpit's robust construction and material details.
3. Operation
3.1 Adjusting the Cockpit
Your Marada Racing Simulator Cockpit offers multiple adjustment points to customize your racing position for comfort and performance.
- Seat Adjustment: Use the lever located under the seat to slide the seat forward or backward on its dual tracks. The seat backrest can be reclined between 65 and 180 degrees for optimal comfort.
- Steering Wheel Platform: The two-stage steering wheel platform allows for adjustments in both height and angle. Loosen the relevant bolts, adjust to your desired position, and re-tighten securely.
- Pedal Platform: The angle of the pedal platform can be adjusted. Loosen the securing bolts, set the desired angle, and tighten firmly.
- Shifter Platform: The shifter platform can be adjusted for left/right positioning and height. Loosen the bolts, position the shifter, and re-tighten.

Figure 3: Ergonomic adjustment points for personalized setup.

Figure 4: Detailed features of the comfort seat.
3.2 Equipment Compatibility
The cockpit is designed for wide compatibility with popular racing peripherals. It supports various models from Logitech, Thrustmaster, and Fanatec. Please ensure your specific racing wheel, pedals, and shifter are compatible with the mounting points before installation.

Figure 5: Examples of compatible racing peripherals (not included).
4. Maintenance
To ensure the longevity and optimal performance of your racing simulator cockpit, regular maintenance is recommended:
- Cleaning: Wipe down the metal frame with a soft, damp cloth. For the seat, use a mild fabric cleaner as needed. Avoid harsh chemicals that may damage the materials.
- Bolt Inspection: Periodically check all bolts and connections for tightness. Re-tighten any loose fasteners to maintain structural integrity and prevent wobbling.
- Moving Parts: Ensure that all adjustable parts, such as the seat sliders and platform adjustments, move smoothly. Lubricate if necessary with a silicone-based spray.
5. Troubleshooting
If you encounter any issues with your Marada Racing Simulator Cockpit, please refer to the following common solutions:
- Cockpit Wobbles: Ensure all bolts and U-shaped clamps are securely tightened. Check that the floor is level.
- Difficulty Adjusting Components: Loosen the adjustment bolts slightly, make the desired adjustment, and then re-tighten firmly. Do not force components.
- Missing Parts: If any parts are missing upon arrival, please contact customer support immediately with your purchase details.
6. Specifications
| Feature | Detail |
|---|---|
| Model Number | Black Strengthen Cockpit+Seat-55H |
| Product Dimensions | 23.6 x 23.6 x 7.5 inches |
| Item Weight | 76.3 pounds |
| Material | Alloy Steel (50x50mm round tube design) |
| Seat Recline Angle | 65-180 degrees |
| Maximum Load Capacity | 500 pounds (approximate, based on material description) |

Figure 6: Key dimensions of the Marada Racing Simulator Cockpit.
7. Warranty and Support
For warranty information, product support, or to report any issues, please contact the seller directly through your purchase platform. Keep your proof of purchase for any warranty claims.
Important Note: This racing simulator cockpit does not include a steering wheel, pedals, or shift lever. These items must be purchased separately.