
1. Introduction
The Y&H 30A solar charge controller is designed for off-grid solar applications, integrating efficient PWM charging to enhance battery life and system performance. Featuring a user-friendly interface and an LCD display, it provides essential battery information. This controller is compatible with 12V/24V battery systems and its compact design ensures straightforward installation.

Image 1.1: Front view of the Y&H 30A PWM Solar Charge Controller, showing the LCD display and USB ports.
2. Key Features
- System Compatibility: Automatically manages 12V/24V solar panel and battery systems.
- Intelligent Control: Built-in industrial microcontroller memorizes user-set parameters, eliminating the need for resets after power loss.
- Dual USB Output: Provides 5V/2.5A (max) for charging mobile phones, tablets, and other USB-powered devices.
- Comprehensive Protection: Includes overcurrent, short-circuit, inverse connection, low voltage, and overcharge protection for safe operation.
- PWM Charging: Features 3-stage Pulse Width Modulation (PWM) charge management to optimize battery charging.
- LCD Display: Clear LCD provides real-time status and data, allowing convenient mode switching and parameter configuration.
- Battery Compatibility: Specifically designed for lead-acid batteries (OPEN, AGM, GEL). Not compatible with other battery types.
- Battery Protection: Automatically shuts off if battery voltage drops below 8V to prolong battery lifespan.
3. Safety Precautions
- Ensure all connections are secure and correct polarity is observed to prevent damage to the controller and connected devices.
- This charge controller is exclusively for lead-acid batteries (OPEN, AGM, GEL). Do not connect it to any other battery types.
- The controller is equipped with multiple protections, but proper installation and usage are crucial for safe operation.
- Avoid exposing the controller to water or excessive moisture.
- Do not attempt to disassemble or repair the controller yourself. Contact support for assistance.
4. Product Overview
The Y&H solar charge controller features a clear LCD display and intuitive buttons for easy interaction. The terminals are clearly marked for straightforward wiring.

Image 4.1: Detailed view of the controller's LCD display, buttons, USB ports, and labeled terminals.
- LCD Display: Shows real-time system status and parameters.
- Menu Button: Used to switch between display interfaces and enter/exit settings.
- Up/Down Buttons: Used to increase or decrease parameter values.
- USB Ports: Dual 5V/2.5A (max) outputs for charging external devices.
- Solar Panel Terminals: Connect to your solar panels.
- Battery Terminals: Connect to your battery bank.
- Load Terminals: Connect to your DC loads.
5. Setup and Installation
Follow these steps for proper installation of your solar charge controller:
- Prepare Wiring: Ensure all wires are of appropriate gauge (12 AWG for 30A model) and stripped correctly.
- Connect Battery: First, connect the battery to the charge controller's battery terminals. Ensure correct polarity (+ to + and - to -). The controller's LCD should light up.
- Connect Solar Panel: Next, connect the solar panel to the charge controller's solar panel terminals. Ensure correct polarity.
- Connect Load: Finally, connect your DC loads to the charge controller's load terminals. Ensure correct polarity.
Important: Always connect the battery first, then the solar panel, then the load. Disconnect in the reverse order: load, then solar panel, then battery.
To secure wires, unscrew the terminal screw, insert the wire into the small hole, and then tighten the screw firmly.

Image 5.1: Wiring diagram illustrating connections for solar panels, battery, DC loads, and optional AC loads via an inverter.
6. Operation
The LCD display provides real-time information and allows for parameter adjustments.
6.1. Browsing Display Interfaces
Press the MENU button to cycle through different display interfaces, showing various system parameters such as battery voltage, float voltage, discharge reconnect voltage, discharge stop voltage, work mode, and battery type.
6.2. Setting Parameters
To set parameters (available in interfaces 2-5):
- Long press the MENU button to enter the setting mode. The displayed value will start flashing.
- Use the UP and DOWN buttons to adjust the parameter value.
- Long press the MENU button again to save the setting and exit the setting mode.
- To restore default parameters, long press the MENU button while in setting mode.
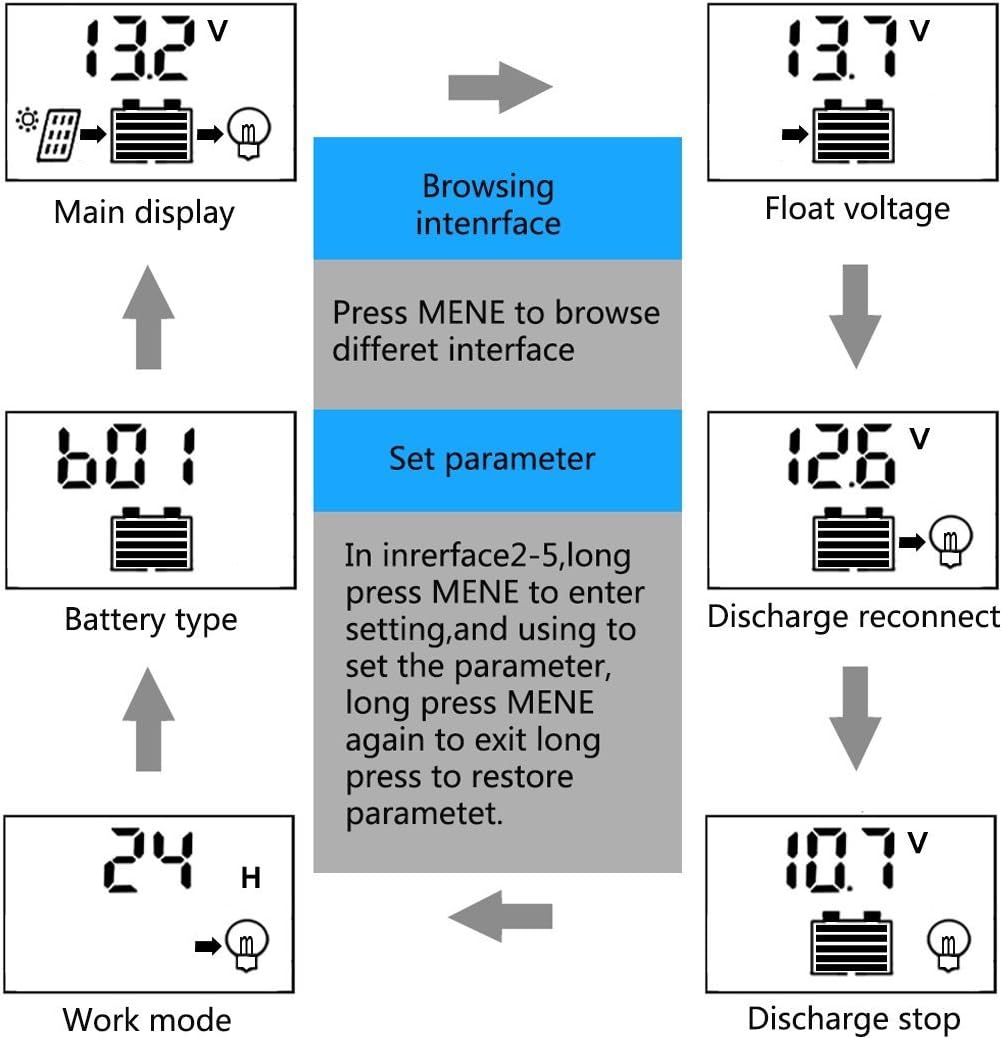
Image 6.1: Flowchart demonstrating how to browse interfaces and set parameters on the LCD display.
6.3. USB Charging
The controller features dual USB ports (5V/2.5A max) for charging mobile devices. Simply connect your device's USB cable to the controller's USB ports.
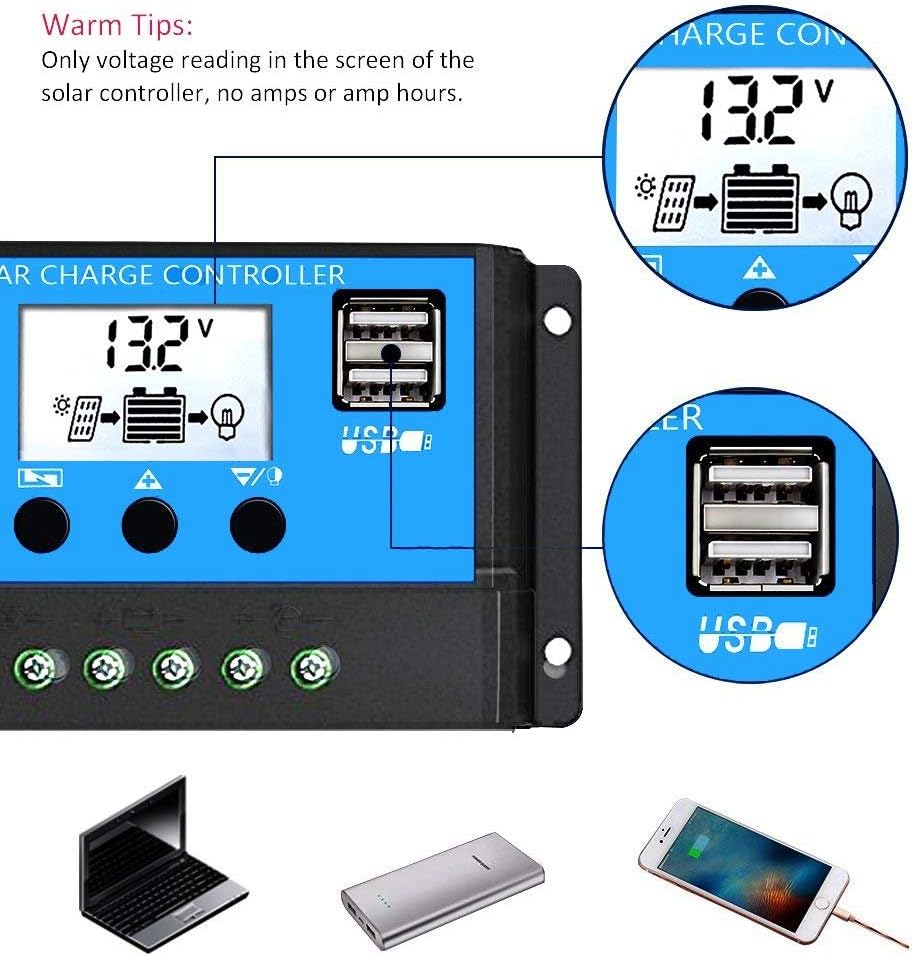
Image 6.2: Close-up of the dual USB charging ports on the Y&H Solar Charge Controller.
7. Maintenance
Regular maintenance ensures optimal performance and longevity of your solar charge controller:
- Inspect Connections: Periodically check all wiring connections (battery, solar panel, load) to ensure they are tight and free from corrosion. Loose connections can lead to power loss or damage.
- Clean Controller: Keep the controller's exterior clean and free from dust, dirt, and moisture. Use a dry cloth for cleaning.
- Monitor Battery Health: Regularly monitor your battery's voltage and overall health. Ensure it is within the recommended operating parameters for lead-acid batteries.
- Environmental Conditions: Ensure the controller is installed in a well-ventilated area, away from direct sunlight, excessive heat, or extreme cold, within its specified operating temperature range (-35°C to +60°C).
8. Troubleshooting
If you encounter issues with your Y&H solar charge controller, refer to the following common problems and solutions:
- Controller Display is Off:
- Check battery connections. Ensure they are secure and correct.
- Verify battery voltage. The controller requires a minimum voltage (above 8V) to operate. If the battery is severely discharged, it may not power the controller. - Battery Not Charging:
- Check solar panel connections and ensure correct polarity.
- Verify that solar panels are receiving adequate sunlight.
- Check for any shading on the solar panels.
- Ensure the solar panel voltage is within the controller's maximum input voltage (<50V). - Load Not Working:
- Check load connections and ensure correct polarity.
- Verify battery voltage. If the battery voltage is too low (below discharge stop voltage), the controller will cut off the load to protect the battery.
- Check the load mode settings on the controller to ensure it is configured to supply power to the load. - Incorrect Voltage Readings:
- Ensure all connections are tight and free from corrosion, which can cause voltage drops.
If the problem persists after checking these points, please contact customer support.
9. Technical Specifications
| Parameter | Value (RBL-30A) |
|---|---|
| System Voltage | 12V/24V Auto Adapt |
| Max Solar Input Voltage | <50V |
| Max Solar Input Power (12V) | 360W |
| Max Solar Input Power (24V) | 720W |
| Charge Current | 30A |
| Discharge Current | 30A |
| Overcharge Protection | 14.4V (12V system) / 28.8V (24V system) |
| Overcharge Floating Charge | 13.7V (12V system) / 27.4V (24V system) |
| Charge Recover Voltage | 12.6V (12V system) / 25.2V (24V system) |
| Over-discharge Protection | 10.7V (12V system) / 21.4V (24V system) |
| Discharge Reconnect Voltage | 12.6V (12V system) / 25.2V (24V system) |
| Load Mode | 24 hours, 1-23 hours, 0 hour |
| Self-consume | <10mA |
| USB Output | 5V/2A Max |
| Operating Temperature | -35°C to +60°C |
| Dimensions | 5.91 x 3.07 x 1.38 inches (15 x 7.8 x 3.5 cm) |
| Item Weight | 5.9 ounces |
| Installation Wire Gauge | 12 AWG |
| Battery Type Compatibility | Lead-Acid (OPEN, AGM, GEL) |
| Equalization (B01 Sealed) | 14.4V |
| Equalization (B02 Gel) | 14.2V |
| Equalization (B03 Flood) | 14.6V |

Image 9.1: Specification table comparing RBL10, RBL20, and RBL30 models, highlighting key electrical and physical parameters.
10. Application Scenarios
The Y&H PWM Solar Charge Controller is suitable for a variety of off-grid solar power applications, including:
- Farm solar power systems
- Solar street lights
- Solar patio lights
- Solar billboards
- Outdoor camping solar systems
- Ship solar systems
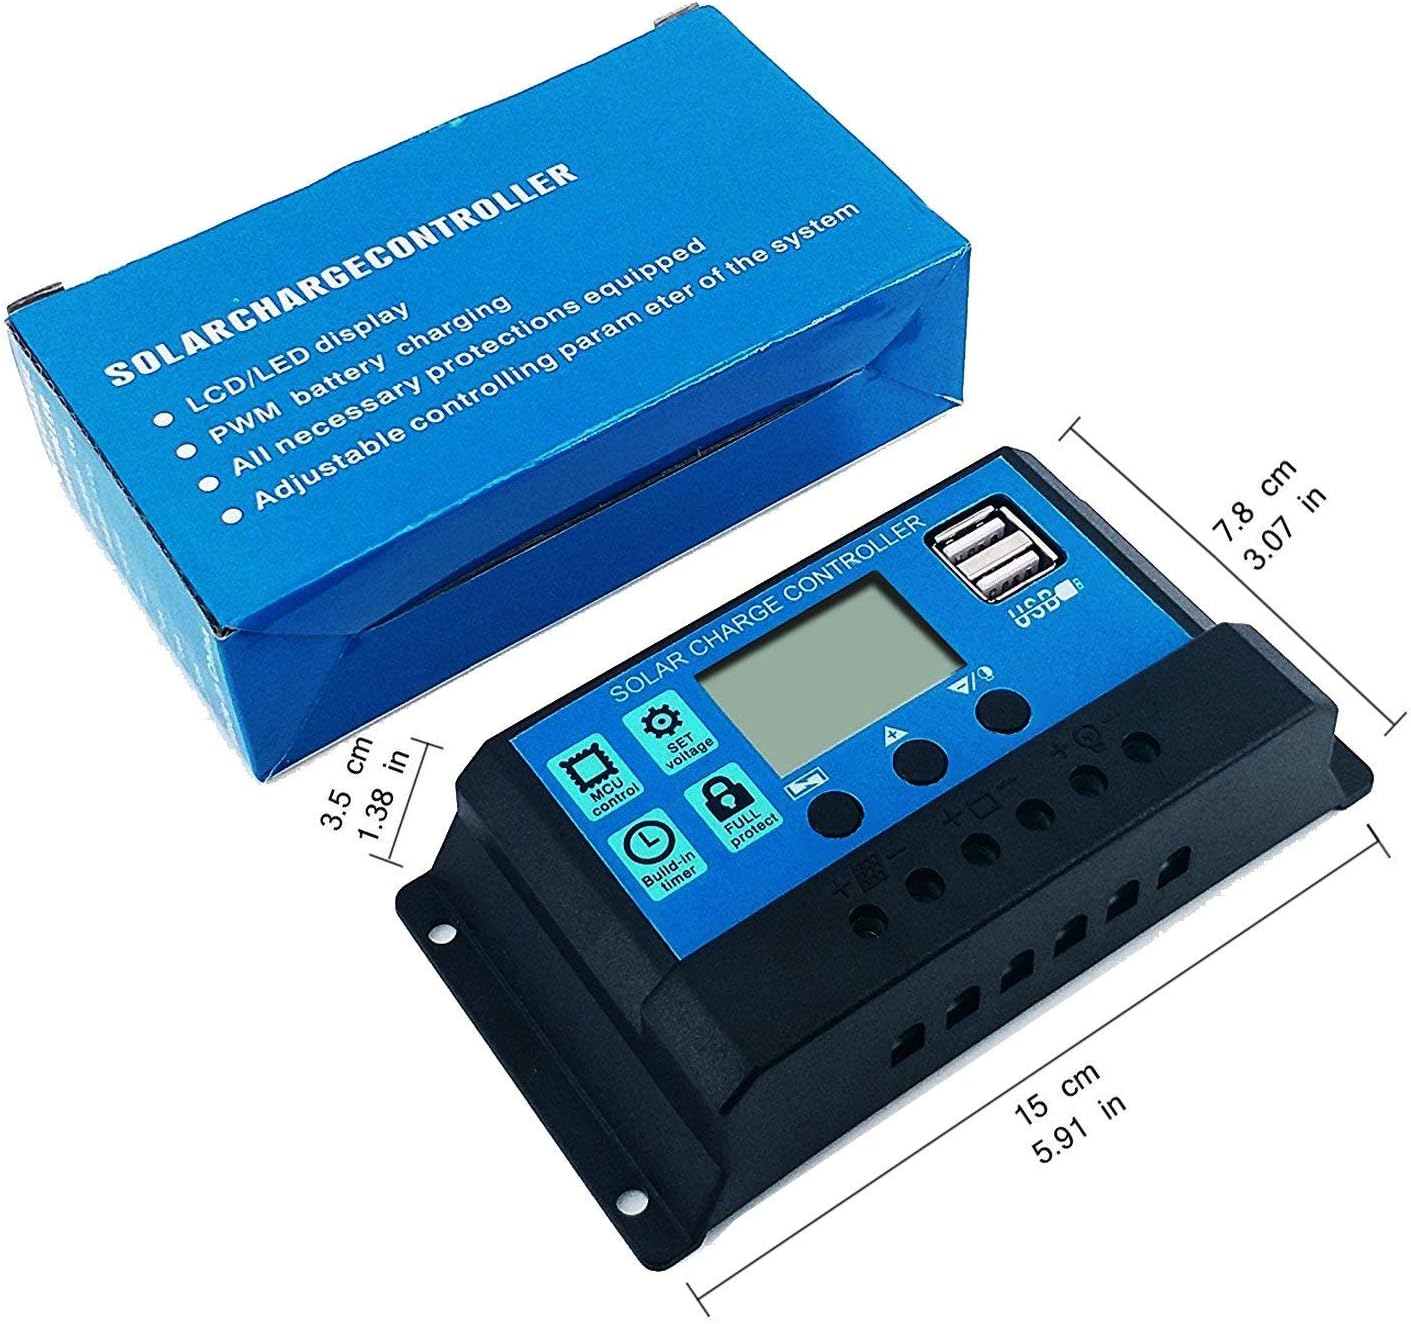
Image 10.1: Visual examples of common applications for solar charge controllers, such as residential, agricultural, and public lighting.
11. Warranty and Support
Y&H provides a 12-month warranty for this product, along with lifetime technical support.
If you encounter any issues or have questions regarding your Y&H solar charge controller, please contact us through Amazon email for assistance. We are committed to arranging a refund or replacement as needed.
For more information about Y&H products, visit the official Y&H Store on Amazon.


