O-CONN 6-Inch Chain and Guide Bar Set
O-CONN 6 Inch Mini Chainsaw Chain and Guide Bar Set User Manual
Brand: O-CONN | Model: 6-Inch Chain and Guide Bar Set
1. Introduction
This manual provides essential information for the safe and effective use, installation, and maintenance of your O-CONN 6 Inch Mini Chainsaw Chain and Guide Bar Set. This set is designed for both replacing existing components and modifying 4-inch mini chainsaws to a 6-inch cutting capacity.

Image 1.1: The O-CONN 6 Inch Mini Chainsaw Chain and Guide Bar Set, showing the guide bar and the chain.
2. Product Overview
The O-CONN 6 Inch Mini Chainsaw Chain and Guide Bar Set offers enhanced cutting capabilities and durability for compatible mini chainsaws. Key features include:
- Wide Compatibility: Designed to fit most 4-inch and 6-inch mini chainsaws, including 20V, 21V, 24V, 26V, 28V, and 36V models.
- Modification Capability: Allows for the upgrade of 4-inch chainsaws to a 6-inch cutting length, expanding application versatility.
- Efficient and Durable Construction: Features a deep quenched and hardened chain and an integrated guide plate, ensuring high wear resistance and long-term durability.
- Optimized Performance: Engineered for safety, consistent performance, and high-quality cutting results.

Image 2.1: Illustration of how the 6-inch chain and guide bar set can replace or upgrade a 4-inch mini chainsaw setup.

Image 2.2: Examples of common applications for the mini chainsaw with the O-CONN chain and bar, including firewood cutting, DIY work, home improvement, and branch cutting.
3. Setup and Installation
Proper installation of the chain and guide bar is crucial for safe and efficient operation. Follow these steps carefully:
- Prepare the Chainsaw: Ensure the chainsaw is powered off and the battery is removed (if applicable) before beginning installation.
- Open Side Cover: Use a nut driver or appropriate tool to open and remove the side cover of your mini chainsaw.
- Remove Old Components: Carefully remove the existing chain and guide bar, if present.
- Install New Guide Plate and Chain: Place the new O-CONN guide plate onto the chainsaw. Then, loop the chain around the sprocket and guide bar. Pay close attention to the direction of the cutter teeth on the chain. The cutting edge should face the direction of rotation, away from the chainsaw body.
- Attach Side Cover: Re-attach the side cover, but do not fully tighten the nuts or screws yet.
- Adjust Chain Tightness: Use a screwdriver to turn the tensioning screw, adjusting the chain's tightness. The chain should be snug against the guide bar but still able to be pulled freely by hand. It should not sag underneath the bar.
- Tighten Fasteners: Once the chain tension is correct, fully tighten the nuts or screws on the side cover to secure the guide bar and chain in place.
- Final Check: Before use, manually rotate the chain to ensure it moves smoothly without binding.

Image 3.1: Visual guide for installing the chain and guide bar, showing steps from opening the cover to tightening the chain.
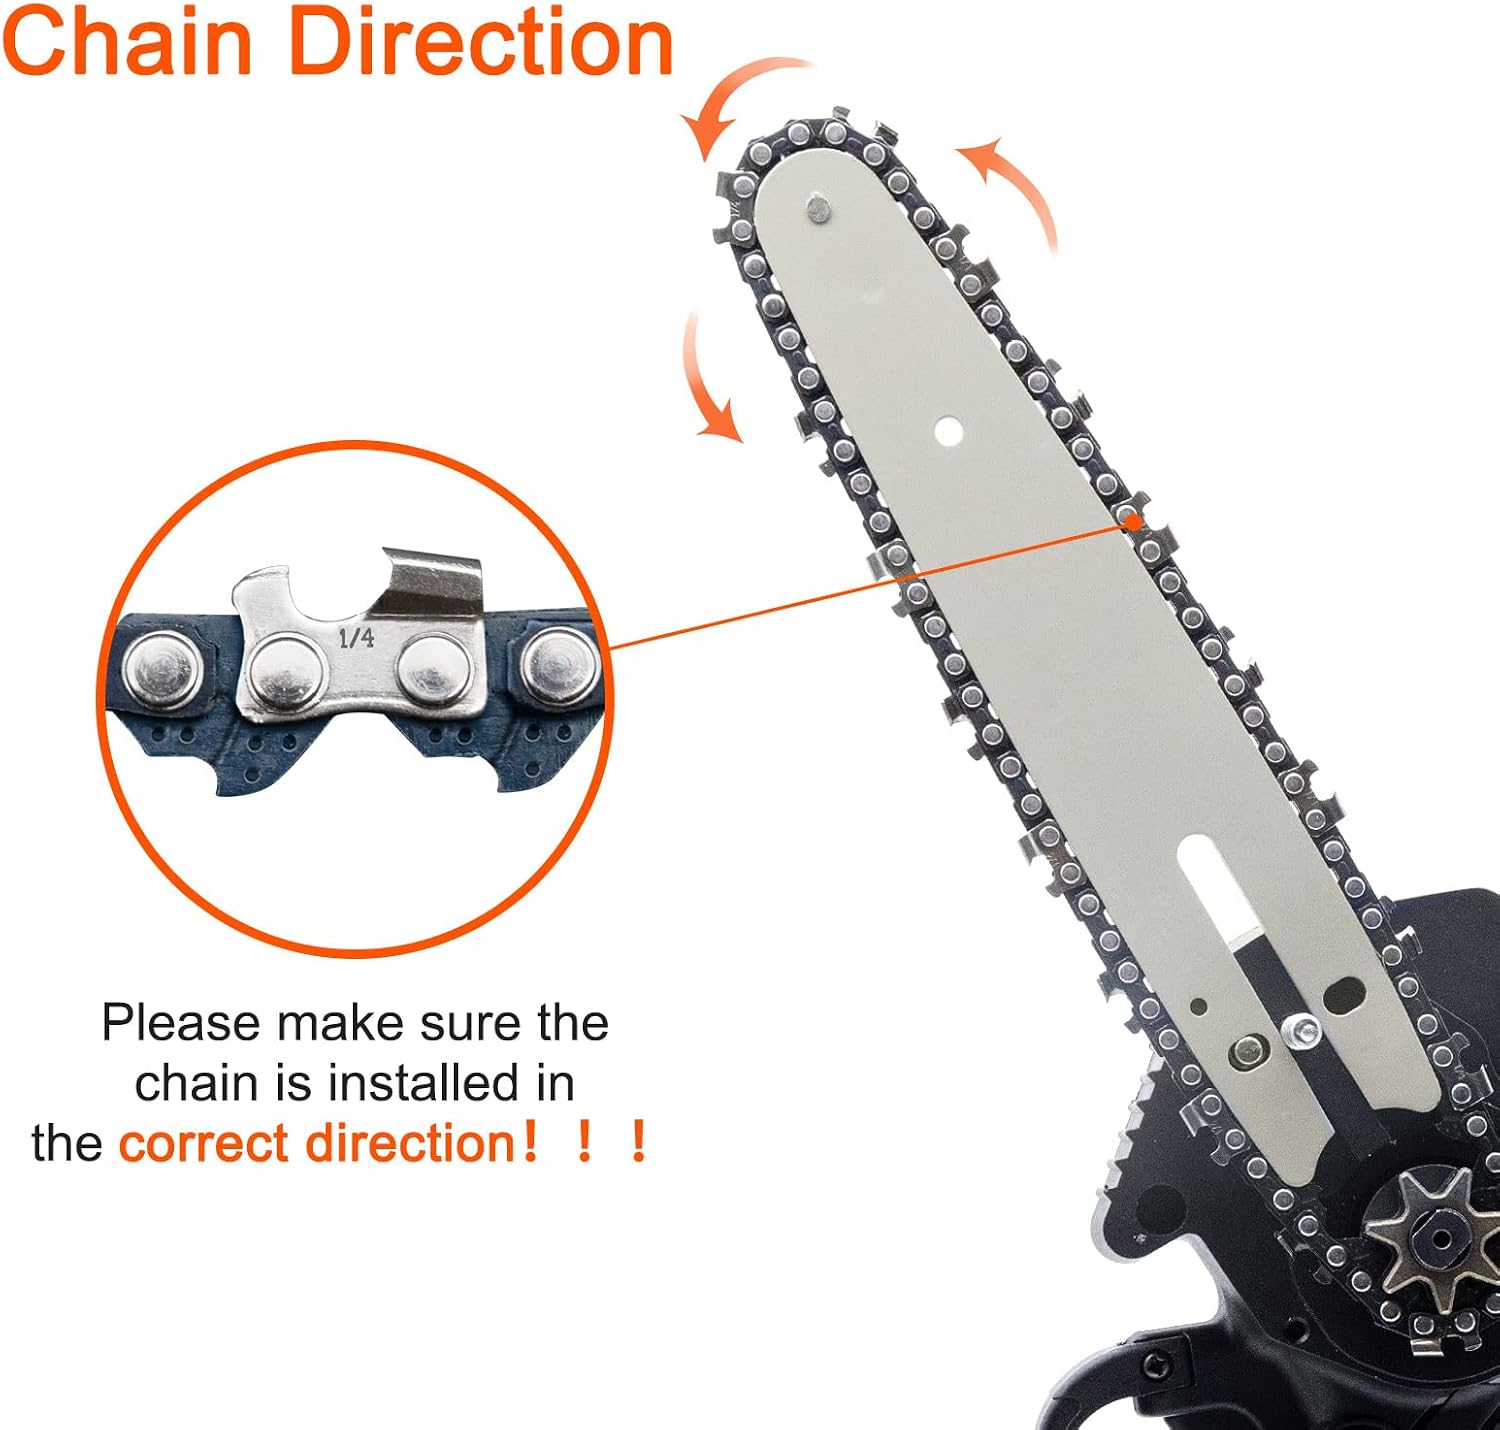
Image 3.2: Important illustration demonstrating the correct direction for chain installation, highlighting the orientation of the cutter teeth.
4. Operating Instructions
Always prioritize safety when operating any power tool. Ensure you are familiar with your mini chainsaw's specific operating instructions before use.
4.1 Safety Precautions
- Wear appropriate personal protective equipment (PPE), including safety glasses, gloves, and hearing protection.
- Ensure a stable footing and clear work area.
- Never operate the chainsaw with one hand unless specifically designed for it and you are trained.
- Be aware of kickback potential, especially with longer bars.
- Do not operate the chainsaw in wet conditions or near flammable materials.
4.2 Cutting Techniques
- Allow the chain to reach full speed before engaging with the material.
- Apply steady, consistent pressure. Do not force the saw through the material.
- For branches, cut from the top down to prevent pinching. For larger pieces, make relief cuts.
- Be mindful of the material's stability and potential for movement during cutting.

Image 4.1: A mini chainsaw equipped with the O-CONN 6-inch chain and guide bar actively cutting through a piece of wood, demonstrating its operational use.
5. Maintenance
Regular maintenance extends the life and performance of your O-CONN chain and guide bar set.
- Chain Sharpening: A sharp chain cuts efficiently and safely. Sharpen the chain regularly according to your chainsaw's manufacturer guidelines or replace it when dull.
- Chain Lubrication: Ensure your chainsaw's automatic oiler (if present) is functioning correctly and filled with appropriate bar and chain oil. Manual lubrication may be required for some models.
- Guide Bar Maintenance: Clean the guide bar groove regularly to remove sawdust and debris. Flip the guide bar periodically to ensure even wear.
- Tension Check: Routinely check chain tension before and during operation. A loose chain can derail, while an overly tight chain can cause premature wear and overheating.
- Cleaning: After each use, clean the chain and guide bar to remove sap, resin, and sawdust. This prevents buildup and corrosion.
6. Troubleshooting
This section addresses common issues you might encounter with your chain and guide bar set.
| Problem | Possible Cause | Solution |
|---|---|---|
| Chain frequently comes off the bar. |
|
|
| Chain not cutting efficiently. |
|
|
| Overheating of bar or chain. |
|
|
7. Specifications
Detailed specifications for the O-CONN 6 Inch Mini Chainsaw Chain and Guide Bar Set:
| Attribute | Value |
|---|---|
| Brand | O-CONN |
| Size | 6 inches |
| Style | 6" Chain & Guide Bar |
| Item Weight | 5.6 ounces |
| Product Dimensions | 1 x 1 x 1 inches |
| Chain Length | 6 Inches |
| Drive Link Count | 54 |
| Batteries Included? | No |
| Batteries Required? | No |
| Date First Available | January 24, 2022 |

Image 7.1: Visual representation of key specifications for the chain and guide bar, including applicable chainsaw length, space between rivets, and number of drive links.
8. Warranty and Support
O-CONN is committed to providing quality products and excellent customer service.
For any questions, concerns, or assistance with your O-CONN 6 Inch Mini Chainsaw Chain and Guide Bar Set, please contact our customer support team. We offer 24/7 after-sales support to address any issues you may encounter.
Please refer to your purchase documentation for specific warranty terms and conditions.
Related Documents - 6-Inch Chain and Guide Bar Set
 |
Tivoli DUET 04 Collection Design Guide A design guide for the Tivoli DUET 04 Collection, detailing surface and recessed profiles, dimensions, ordering information, and available TivoTape options. |
 |
SINUMERIK ONE Basic Functions Function Manual This Function Manual for Siemens SINUMERIK ONE provides detailed information on basic functions, including mode groups, channels, program operation, axes, coordinate systems, kinematic chains, and more, for CNC software version 6.15. |
 |
Subsite 2026 Parts Manual for Utility Inspection Systems Comprehensive parts manual for Subsite's 2026 series of utility inspection systems, detailing components for cameras, reels, transports, controllers, and accessories. Includes part numbers and identification assistance. |
 |
SVHC Safe Use Information for KIA EV5 OV1K [X9] This document provides detailed information on Substances of Very High Concern (SVHCs) present in the KIA EV5 OV1K [X9] vehicle, in compliance with REACH Article 33. It lists identified SVHCs, their presence in specific vehicle parts, and relevant CAS numbers, promoting safe handling and use. |
 |
Pentair Omnifilter Housing O-Ring: Replacement Guide and Fitment Detailed information on the Pentair Omnifilter Housing O-Ring, including replacement instructions, compatible models (WHH10-VIH-SG-1, USH-FF-SG-SP-4), and important safety warnings. Ensure proper seal for your undersink and standard water filter housings. |
 |
WinSystems CBL-251-G-1-1.5F Cable Assembly: Wiring and Specifications Explore the WinSystems CBL-251-G-1-1.5F cable assembly with this detailed technical document. It covers wiring diagrams, pinouts, and assembly instructions for Multi-I/O Serial, PS/2, LPT, and Ethernet interfaces. |
Ask a question about this manual
Ask about setup, troubleshooting, compatibility, parts, safety, or missing instructions. Manuals+ will review the question and use this page’s manual context to help answer it.