1. Product Overview
Thank you for choosing VLAND LED Headlights. This manual provides detailed instructions for the installation, operation, and maintenance of your new headlights. These headlights are designed to enhance visibility and the aesthetic appeal of your vehicle.
Vehicle Compatibility:
- Compatible with Factory halogen & HID Tradesman, Sport, ST, STX, SLT, Rebel, Limited, Laramie all trims.
- Fits Dodge Ram 1500 2500 3500 (2009-2018).
- Fits RAM 1500 Classic (2019-2021).
Key Features:
- Full LED Design: No additional bulbs required.
- Dynamic Animation: Features a breathing light and choreographed sequence upon vehicle lock/unlock.
- Sequential Turn Signal: Amber LED turn signals with a distinctive sequential flow.
- Blue Starting Light: Unique blue light activation.
- Durable Construction: Waterproof, dust-proof, and shock-proof (IP67 rated).
- DOT/SAE Certified: Meets ISO 9002 and QS 9000 quality standards, approved by SAE, and compliant with FMVSS 108 regulations.

Image 1: VLAND LED Headlights installed on a Dodge Ram truck, showcasing the modern design.
2. Safety Information
- Always disconnect the vehicle's battery before performing any electrical work.
- Wear appropriate personal protective equipment (PPE), such as gloves and eye protection.
- Ensure all connections are secure and properly insulated to prevent short circuits.
- Professional installation is recommended for optimal performance and safety.
- Keep all packaging materials and user manuals for future reference.
3. Package Contents
Upon opening the package, please verify that all components are present and undamaged:
- Driver side headlight assembly
- Passenger side headlight assembly
- ACC cable
- Instruction manual
4. Installation Instructions
Follow these steps carefully for proper installation. Professional installation is highly recommended.
Installation Video Guide:
Video 1: Detailed installation guide for VLAND LED Headlights on a Dodge Ram. This video demonstrates the step-by-step process of removing old headlights and installing new ones.
Step-by-Step Guide:
- Prepare the Vehicle: Open the hood of your Dodge Ram. Identify the clips and screws securing the top cover above the grille.
- Remove Top Cover: Carefully remove the plastic clips and screws holding the top cover in place. Use a trim removal tool to avoid damage. Once all fasteners are removed, lift and set aside the cover.
- Remove Bumper Screws: Locate and remove the screws that secure the front bumper to the vehicle frame. These are typically found along the top edge of the bumper, under where the top cover was.
- Access Headlight Fasteners: In the wheel well, locate and remove the fasteners that secure the bumper to the fender liner. Gently pull back the fender liner to access additional clips or screws behind the bumper. Press the buckle inside the bumper at the position shown in the video to release the headlight.
- Remove Bumper: With all fasteners removed, carefully pull the bumper forward and away from the vehicle. It may require gentle persuasion to release from clips.
- Remove Factory Headlights: Locate the screws securing the factory headlights. Remove these screws. Disconnect all electrical connectors from the back of the factory headlight assembly. Carefully pull the old headlight assembly out of its housing.
- Install New Headlights: Connect the wiring harness of the new VLAND LED Headlights to the vehicle's electrical system. Ensure all connections are secure. Plug in the black adapter cable. Note: After two green mini plugs are plugged in, the daytime running lights will turn amber. Connect the red adapter wire to fuse #65 and connect the black adapter wire in parallel with it.
- Test Headlights: Before fully reassembling, test all headlight functions (DRL, low beam, high beam, turn signals, dynamic animation) to ensure they are working correctly.
- Secure New Headlights: Carefully slide the new VLAND LED Headlights into position. Secure them with the screws removed in step 6.
- Reinstall Bumper: Carefully align and reinstall the front bumper. Secure it with all previously removed screws and fasteners.
- Reinstall Top Cover: Place the top cover back into position and secure it with the plastic clips and screws.
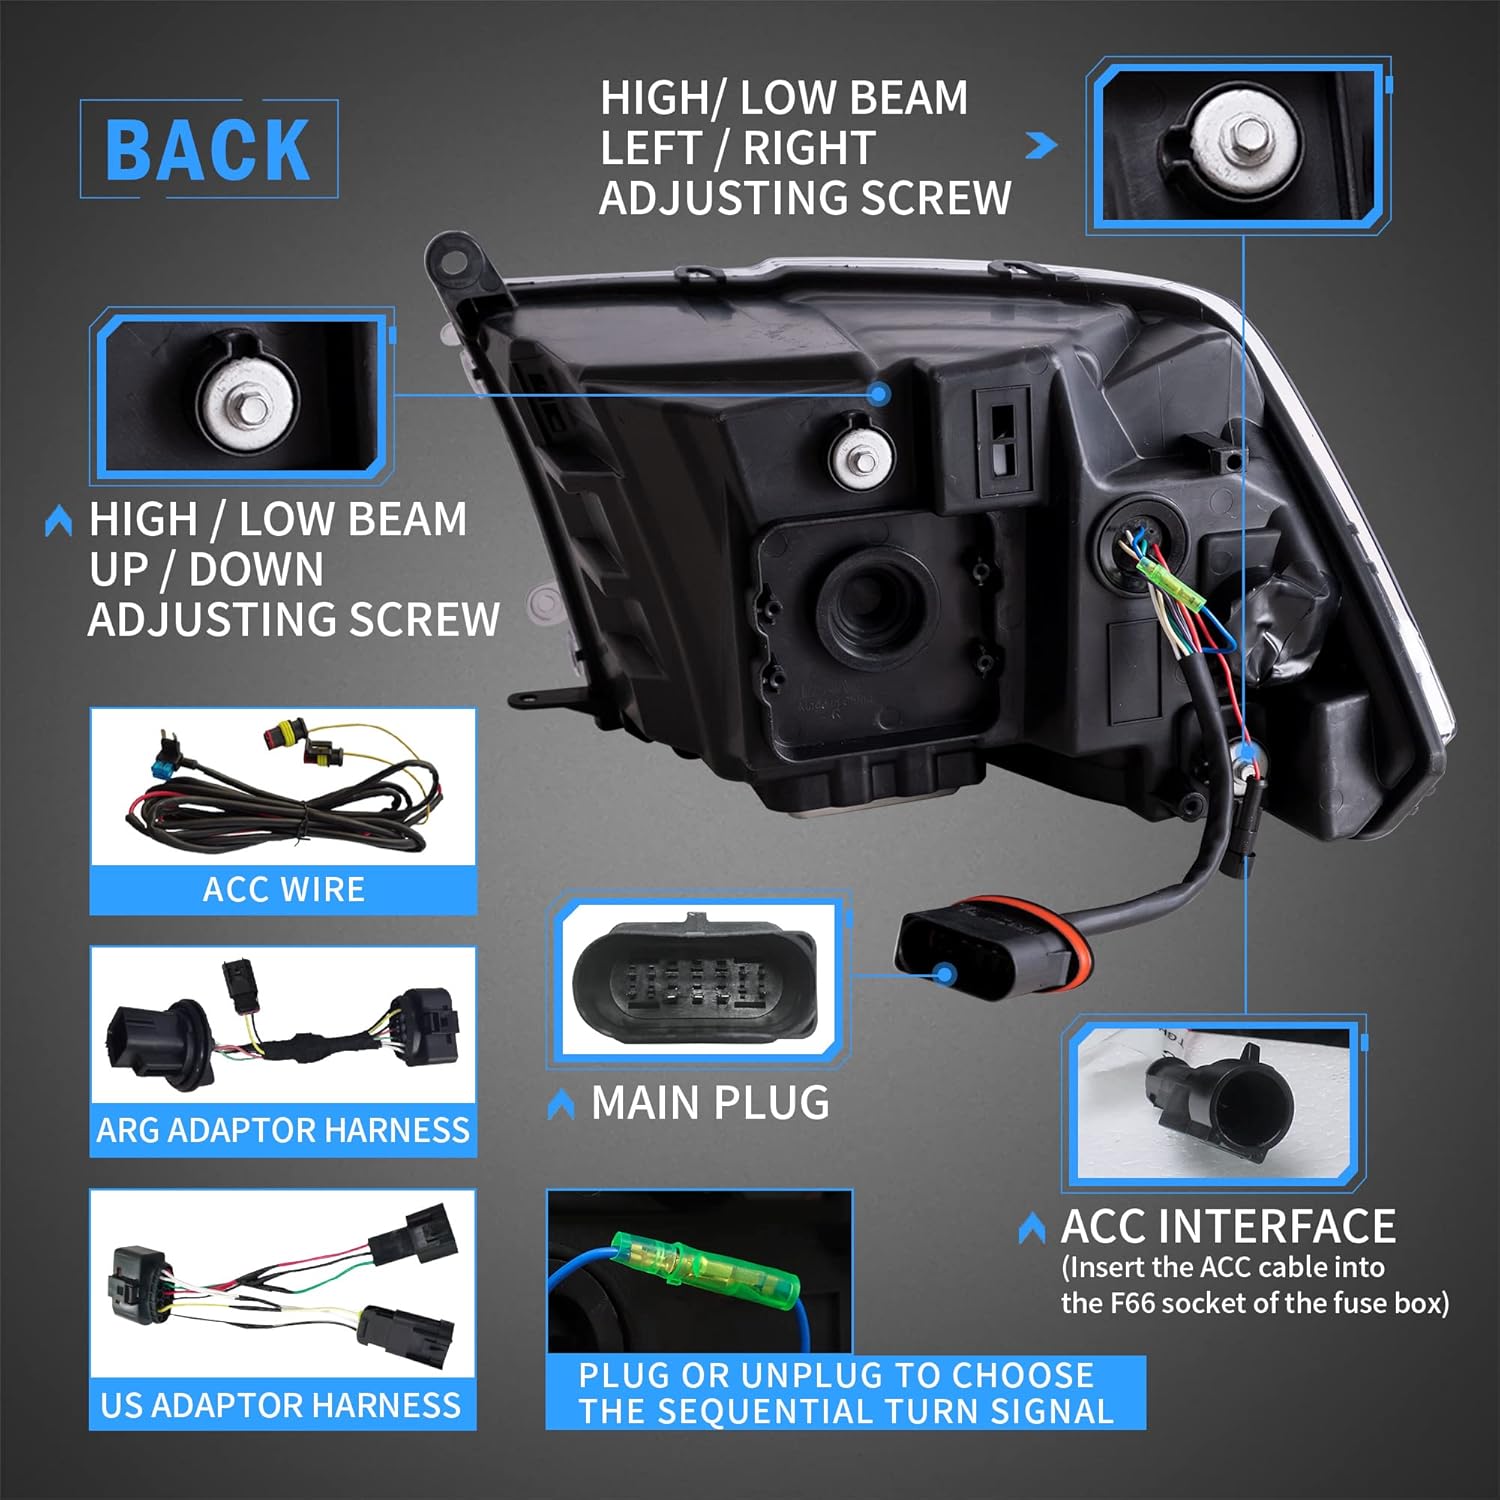
Image 2: Rear view of the VLAND LED Headlight, detailing the ACC wire, ARG/US adaptor harnesses, main plug, and adjustment screws for high/low beam.
5. Operating Instructions
Your VLAND LED Headlights offer various lighting functions for different driving conditions.
Lighting Modes:
- LED DRL (Daytime Running Light): Provides bright white illumination for increased daytime visibility.
- Blue Starting Light: Activates with a distinctive blue light sequence upon vehicle startup or unlocking.
- Low Beam: Standard illumination for night driving, designed to avoid dazzling oncoming traffic.
- High Beam: Provides maximum illumination for clear visibility on dark roads.
- Sequential Turn Signal: Amber LEDs illuminate in a sequential pattern to clearly indicate turns.
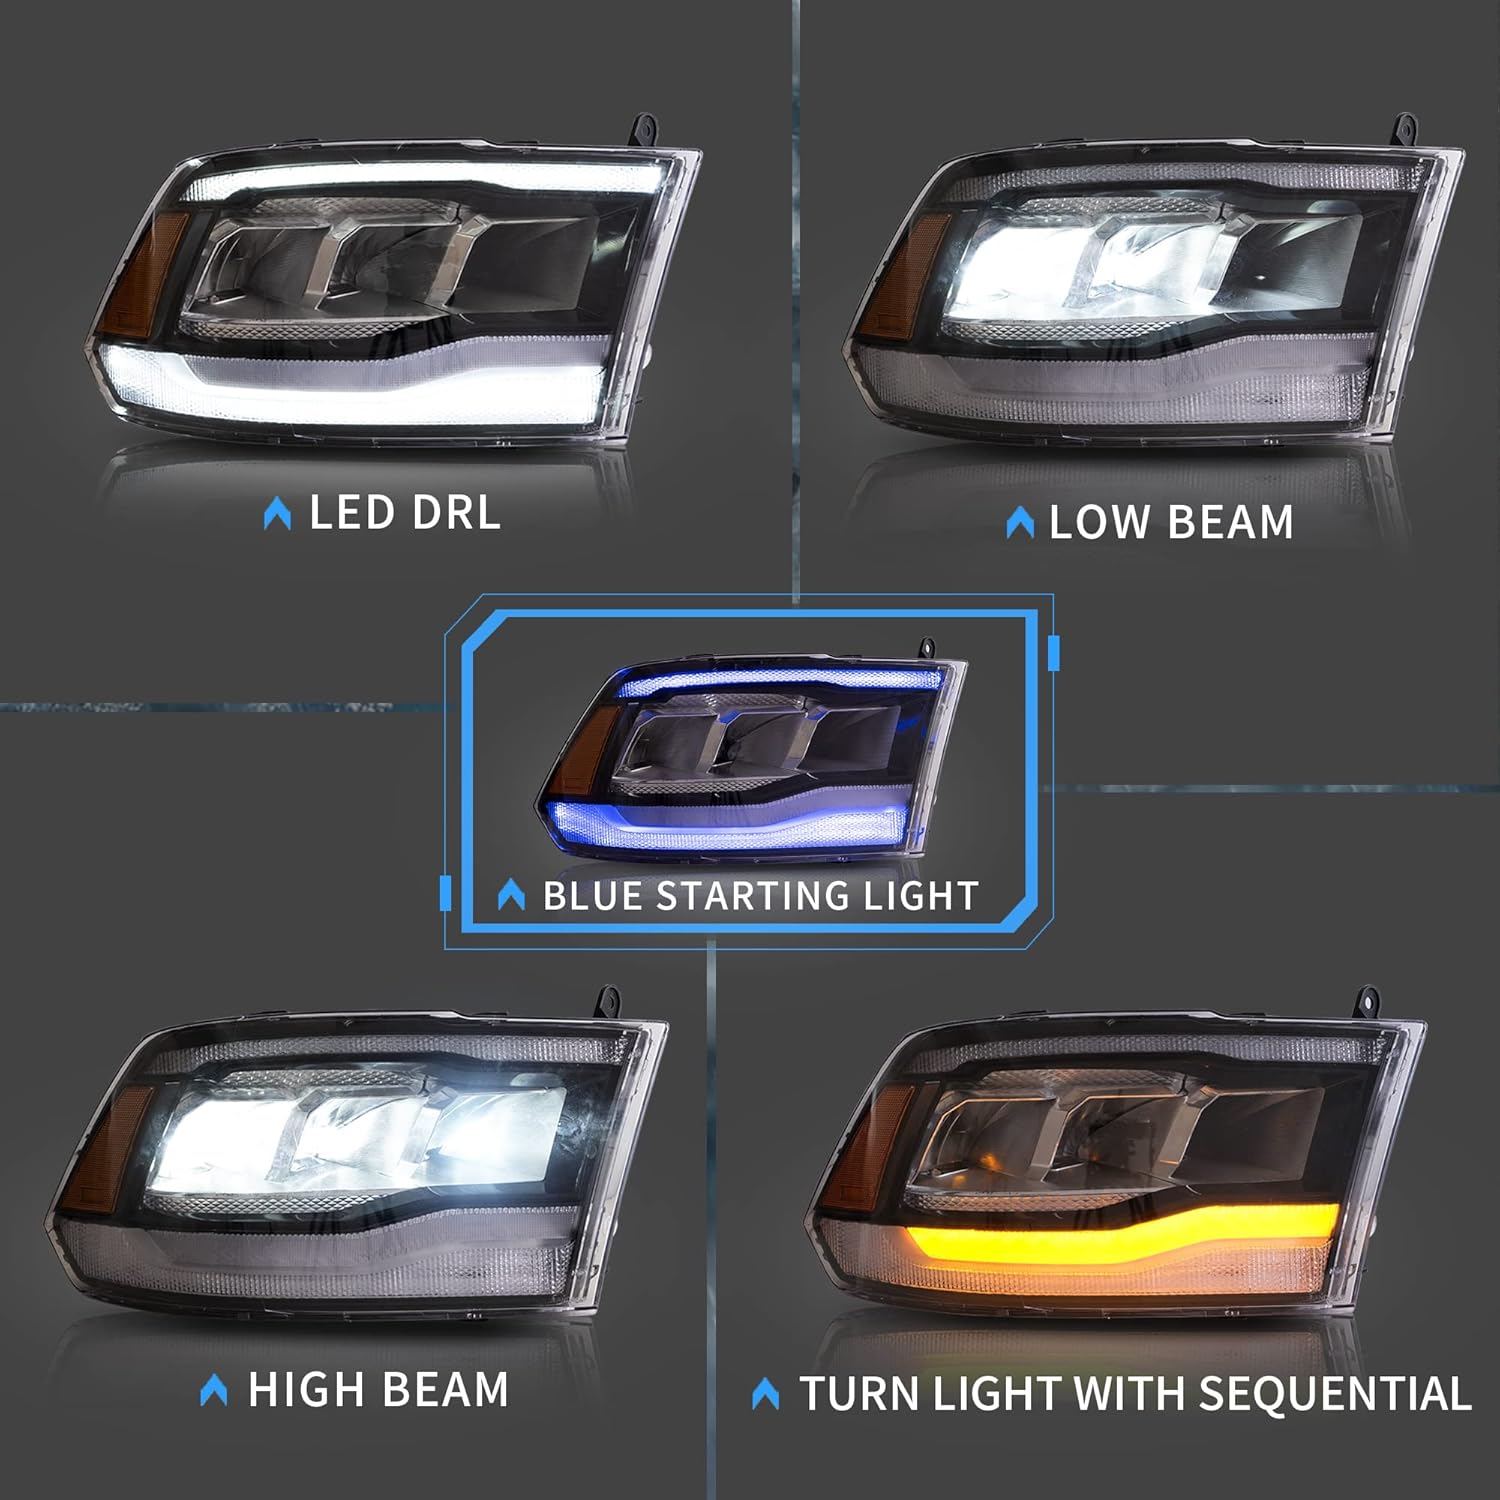
Image 3: Illustration of the various lighting modes including LED DRL, Low Beam, High Beam, Sequential Turn Signal, and Blue Starting Light.

Image 4: Close-up view of the sequential turn signal in action, showing the amber LEDs illuminating in a dynamic pattern.
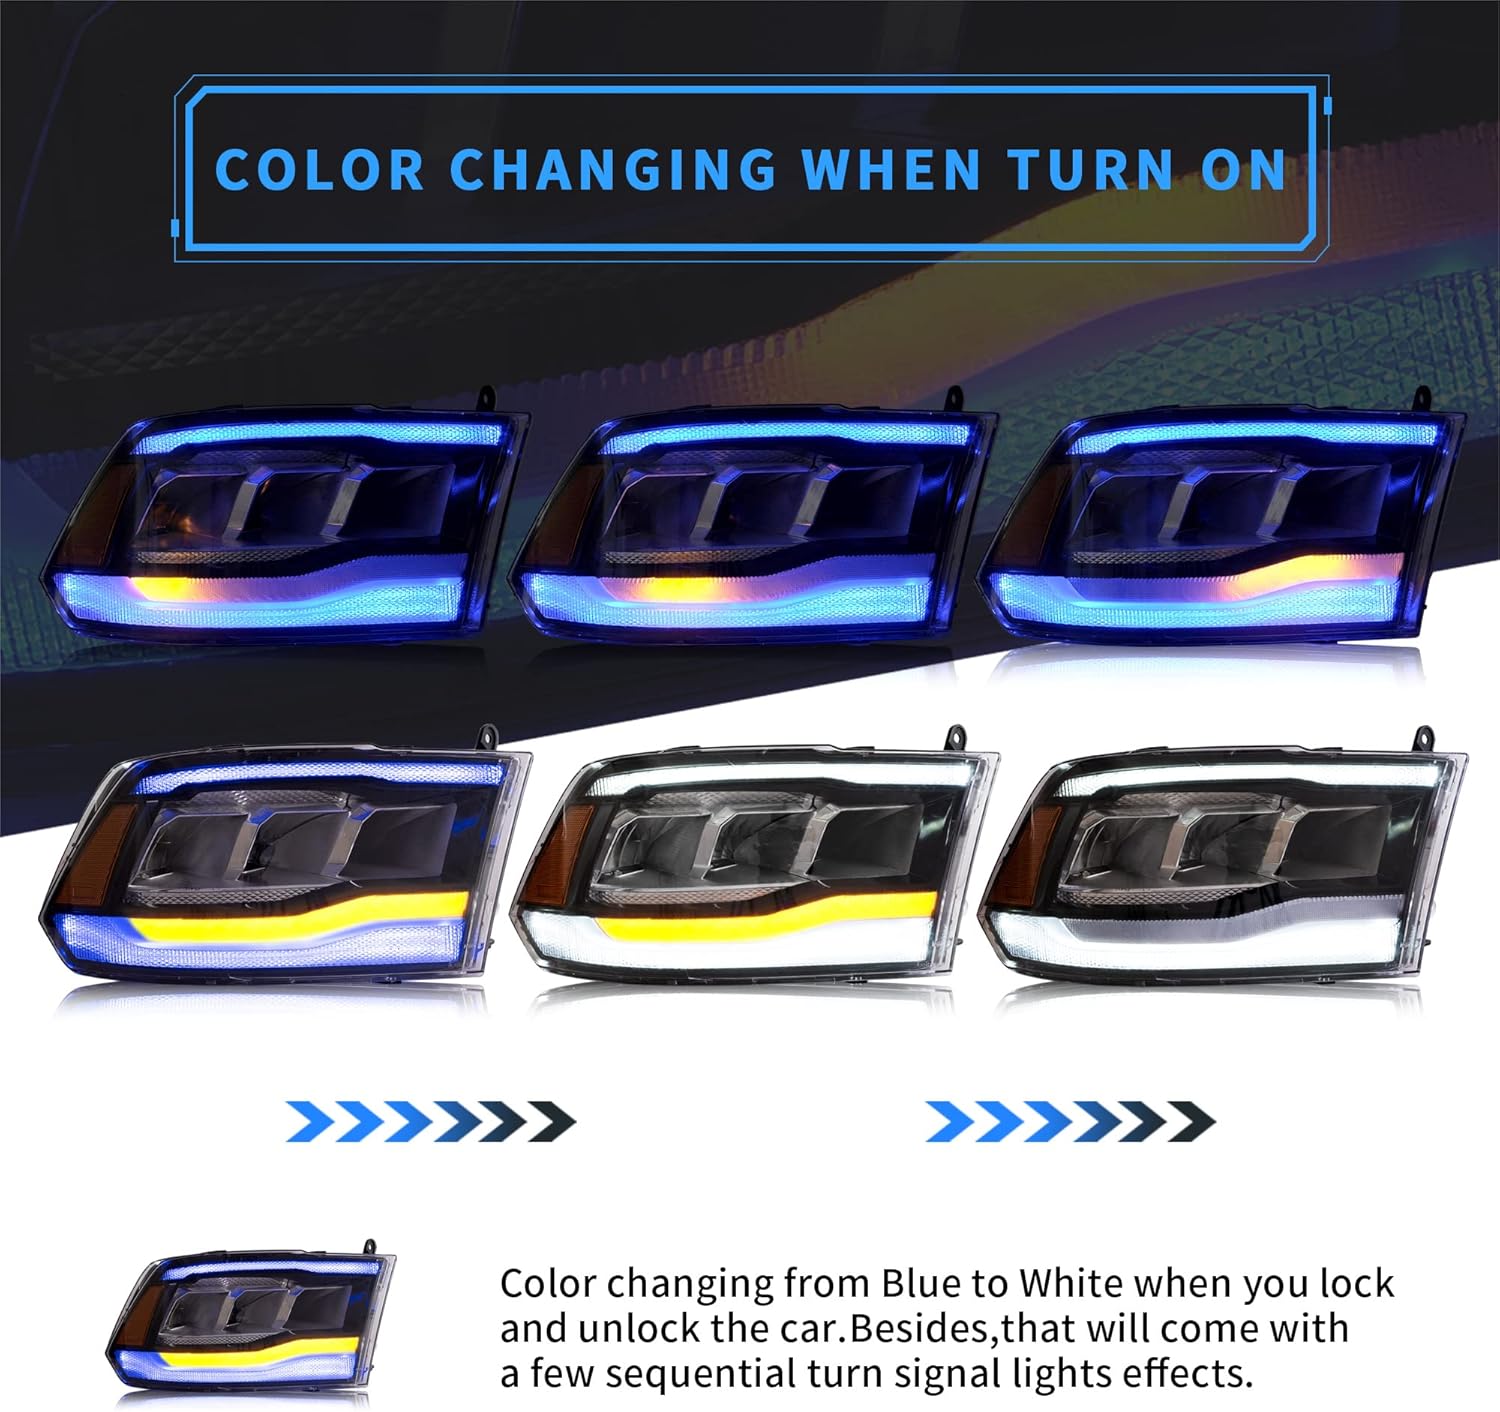
Image 5: Display of the headlight's dynamic animation, transitioning from blue to white upon vehicle lock/unlock, with sequential turn signal effects.
Beam Adjustment:
The high/low beam can be adjusted using the screws located on the back of the headlight assembly. Refer to Image 2 for screw locations. Adjust the beam height to ensure proper road illumination without blinding other drivers.
6. Maintenance
- Cleaning: Clean the headlight lenses regularly with a soft cloth and mild soap solution to maintain optimal light output. Avoid abrasive cleaners.
- Inspection: Periodically inspect the wiring and connections for any signs of wear or damage. Ensure all seals are intact to prevent moisture intrusion.
- Bulb Replacement: These headlights feature a full LED design, eliminating the need for traditional bulb replacements.
7. Troubleshooting
If you encounter any issues with your VLAND LED Headlights, refer to the following common problems and solutions:
| Problem | Possible Cause | Solution |
|---|---|---|
| Headlights not turning on | Loose wiring connection, blown fuse, incorrect installation. | Check all electrical connections. Inspect the fuse box for blown fuses (refer to your vehicle's manual for fuse locations). Re-verify installation steps. |
| Flickering lights | Loose connection, voltage fluctuation, incompatible wiring. | Ensure all connections are tight. Check vehicle's electrical system. Contact professional assistance if problem persists. |
| Moisture inside lens | Seal damage, improper installation. | Ensure the headlight is properly sealed and installed. If moisture persists, contact customer support. |
| Turn signals not sequential | Incorrect adapter cable connection. | Verify the green mini plugs are correctly inserted into the adapter cable as per installation instructions. |
8. Specifications
| Attribute | Detail |
|---|---|
| Model Number | YAX-RM-6002 |
| Manufacturer | VLAND |
| Light Source Type | LED |
| Voltage | 12 Volts (DC) |
| Wattage | 55 watts |
| Lens Material | Polycarbonate |
| Auto Part Position | Front |
| Special Features | 3D Scanning Animation, Blue Breathing Light, Amber Switchback Turn Signal, Easy Installation, Plug and Play, Waterproof |
| OEM Equivalent Part Numbers | 55277409AD, 55277409AF, 55277409AG, 55277410AD, 55277410AF, 55277410AG |
| Parcel Dimensions | 58 x 54 x 32 cm |
| Item Weight | 10.5 kg |
9. Warranty & Support
VLAND provides a comprehensive warranty and customer support for your product.
Warranty Information:
This product comes with a manufacturer warranty for one year from the date of purchase.
Customer Support:
In the event merchandise is damaged, becomes defective, or needs to be returned, please contact VLAND customer service. Provide the product label, video, and picture proof clearly showing the defect to facilitate the process.
Manufacturer Contact Information: C/O 5 Paget Rd, Brampton, Ontario, Canada, L6T 5S2