1. Setup
1.1 Package Contents
Verify that the following items are included in your package:
- Microsoft Xbox Wireless Controller - Project Scorpio Edition
- AA Batteries (may be included depending on retailer)
1.2 Installing Batteries
To power your controller:
- Open the battery compartment cover on the back of the controller.
- Insert two AA batteries, ensuring correct polarity (+ and -).
- Close the battery compartment cover securely.
1.3 Connecting to Xbox One
To connect your controller wirelessly to an Xbox One console:
- Turn on your Xbox One console.
- Press and hold the Xbox button
 on your controller to turn it on. The Xbox button will flash.
 - Press the Pair button on your Xbox One console (located on the front or side, depending on the model).
- Within 20 seconds, press and hold the Pair button
 on the top edge of your controller (next to the USB port). The Xbox button on the controller will flash more rapidly.
 - Once the Xbox button on the controller glows solid, it is connected.
1.4 Connecting to Windows 10 PC via Bluetooth
To connect your controller to a Windows 10 PC using Bluetooth:
- Ensure your Windows 10 PC has Bluetooth enabled.
- Press and hold the Xbox button on your controller to turn it on.
- Press and hold the Pair button on the top edge of your controller for three seconds. The Xbox button will flash rapidly.
- On your PC, go to Settings > Devices > Bluetooth & other devices.
- Select Add Bluetooth or other device > Bluetooth.
- Select Xbox Wireless Controller from the list.
- Once the Xbox button on the controller glows solid, it is connected.
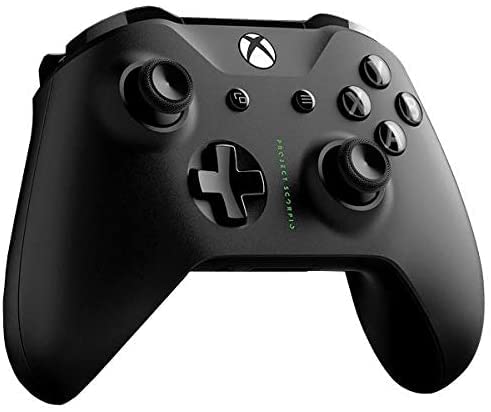
A black Xbox Wireless Controller, featuring the Project Scorpio Special Edition details, with textured grips and the Xbox logo button at the top center. This image illustrates the overall design of the controller.
2. Operating Your Controller
2.1 Controller Layout and Functions
The Xbox Wireless Controller features a standard layout for intuitive gameplay:
- Xbox button: Powers on the controller/console, opens the Guide, and indicates connection status.
- View button: Changes views or displays more information in games and apps.
- Menu button: Accesses game or app menus, such as Settings or Options.
- A, B, X, Y buttons: Action buttons for in-game commands.
- D-pad: Directional pad for precise input.
- Left and Right Thumbsticks: For movement and camera control. Pressing them down acts as a button.
- Left and Right Bumpers (LB, RB): Located on the top edge, typically used for quick actions.
- Left and Right Triggers (LT, RT): Analog triggers for variable input, such as acceleration or firing.
- 3.5mm Stereo Headset Jack: For connecting compatible headsets.
2.2 Using the 3.5mm Headset Jack
To use a headset with your controller:
- Plug any compatible 3.5mm stereo headset directly into the jack located at the bottom of the controller.
- Audio settings can be adjusted via the Xbox Guide or Windows sound settings.
3. Maintenance
3.1 Cleaning Your Controller
To maintain the appearance and functionality of your controller:
- Use a soft, dry, lint-free cloth to wipe the surface of the controller.
- For stubborn dirt, slightly dampen the cloth with water. Avoid excessive moisture.
- Do not use harsh chemicals, abrasive cleaners, or solvents, as these can damage the controller's finish.
3.2 Storage
When not in use, store your controller in a cool, dry place away from direct sunlight and extreme temperatures. Remove batteries if storing for extended periods to prevent leakage.
4. Troubleshooting
4.1 Controller Not Turning On
- Check Batteries: Ensure batteries are correctly inserted and have sufficient charge. Replace with fresh AA batteries if necessary.
- Power Cycle: Remove and reinsert the batteries, then try turning the controller on again.
4.2 Connection Issues
- Re-pair Controller: Follow the connection steps in Section 1.3 or 1.4 to re-pair the controller with your Xbox One or Windows 10 PC.
- Interference: Ensure there are no obstructions or other wireless devices causing interference between the controller and the console/PC.
- Update Firmware: Connect the controller to your Xbox One or PC via a USB cable and check for controller firmware updates.
- Bluetooth Driver (PC): Ensure your PC's Bluetooth drivers are up to date.
4.3 Button or Stick Malfunction
- Clean Controller: Ensure no debris is lodged around buttons or sticks. Refer to Section 3.1.
- Test in Different Games/Apps: Determine if the issue is specific to one application or system-wide.
- Reset Controller: In some cases, removing batteries for a few minutes can reset internal components.
5. Specifications
| Feature | Detail |
|---|---|
| Brand Name | Microsoft |
| Model Name | Project Scorpio |
| Compatible Devices | Xbox One, Windows 10 PCs and tablets |
| Controller Type | Gamepad |
| Connectivity Technology | Bluetooth, Wireless |
| Hardware Platform | Xbox One |
| Power Source | Battery Powered (AA) |
| Color | Green (Project Scorpio Edition) |
6. Warranty and Support
This product is a Certified Refurbished item. Certified Refurbished products are tested and certified to look and work like new, with limited to no wear, by a third-party refurbisher. The refurbishing process includes functionality testing, cosmetic inspection, and repackaging.
The product is backed by a minimum 90-day warranty from the date of purchase. For specific warranty details and claims, please refer to the documentation provided by the refurbisher or contact the seller directly.
For further technical assistance or support, please visit the official Microsoft Xbox support website or contact their customer service.