1. Introduction
This manual provides detailed instructions for the proper setup, operation, and maintenance of your Yuanshikj Biometric Fingerprint and Key Security Safe. This safe is designed to secure valuables using advanced fingerprint recognition technology and traditional key access, offering reliable protection for your belongings in various environments such as homes, offices, and hotels.
Please read this manual thoroughly before using the safe to ensure correct usage and to maximize its security features. Keep this manual for future reference.

Image 1.1: Front view of the Yuanshikj Biometric Fingerprint and Key Security Safe, showcasing the biometric scanner and emergency key access point.
2. Safety Information
- Emergency Keys: Always store the emergency keys in a secure location away from the safe. Do not store them inside the safe.
- Battery Safety: Use only the specified battery type (4 AA batteries). Do not mix old and new batteries, or different types of batteries. Replace all batteries at the same time. Remove batteries if the safe will not be used for an extended period.
- Placement: Ensure the safe is placed on a stable, level surface or securely mounted to a wall or floor to prevent tipping.
- Children: Keep the safe and its keys out of reach of children.
- Environmental Conditions: Avoid placing the safe in areas with extreme temperatures, high humidity, or direct sunlight.
3. Package Contents
Please check the package contents carefully. If any items are missing or damaged, contact customer support.
- Yuanshikj Biometric Security Safe
- Emergency Keys (2)
- Mounting Hardware (screws, expansion bolts)
- Instruction Manual
4. Setup
4.1 Initial Opening
- Locate the emergency keyhole, usually concealed behind a cover on the front panel.
- Insert one of the emergency keys into the keyhole and turn it counter-clockwise.
- While holding the key turned, rotate the knob on the safe door clockwise to open the safe.
- Remove the key and store it in a safe place outside the safe.
4.2 Battery Installation
The safe requires 4 AA batteries (not included) for the biometric system.
- Open the safe door using the emergency key (refer to Section 4.1).
- Locate the battery compartment on the inside of the safe door.
- Open the battery compartment cover.
- Insert 4 new AA batteries, ensuring correct polarity (+/-).
- Close the battery compartment cover.
4.3 Mounting the Safe
For enhanced security, it is recommended to mount the safe to a wall or floor.
- Choose a Location: Select a suitable location for mounting, considering accessibility and concealment.
- Mark Drilling Points: With the safe door open, use the pre-drilled holes on the back or bottom of the safe as a template to mark the drilling points on the wall or floor.
- Drill Holes: Use an appropriate drill bit to drill holes at the marked locations.
- Insert Anchors: Insert the expansion bolts or anchors into the drilled holes.
- Secure the Safe: Align the safe's mounting holes with the drilled holes and secure the safe using the provided screws and mounting hardware. Tighten all screws firmly.

Image 4.1: Step-by-step diagram illustrating the process of securing the safe by punching holes, installing screws, and completing the mounting.
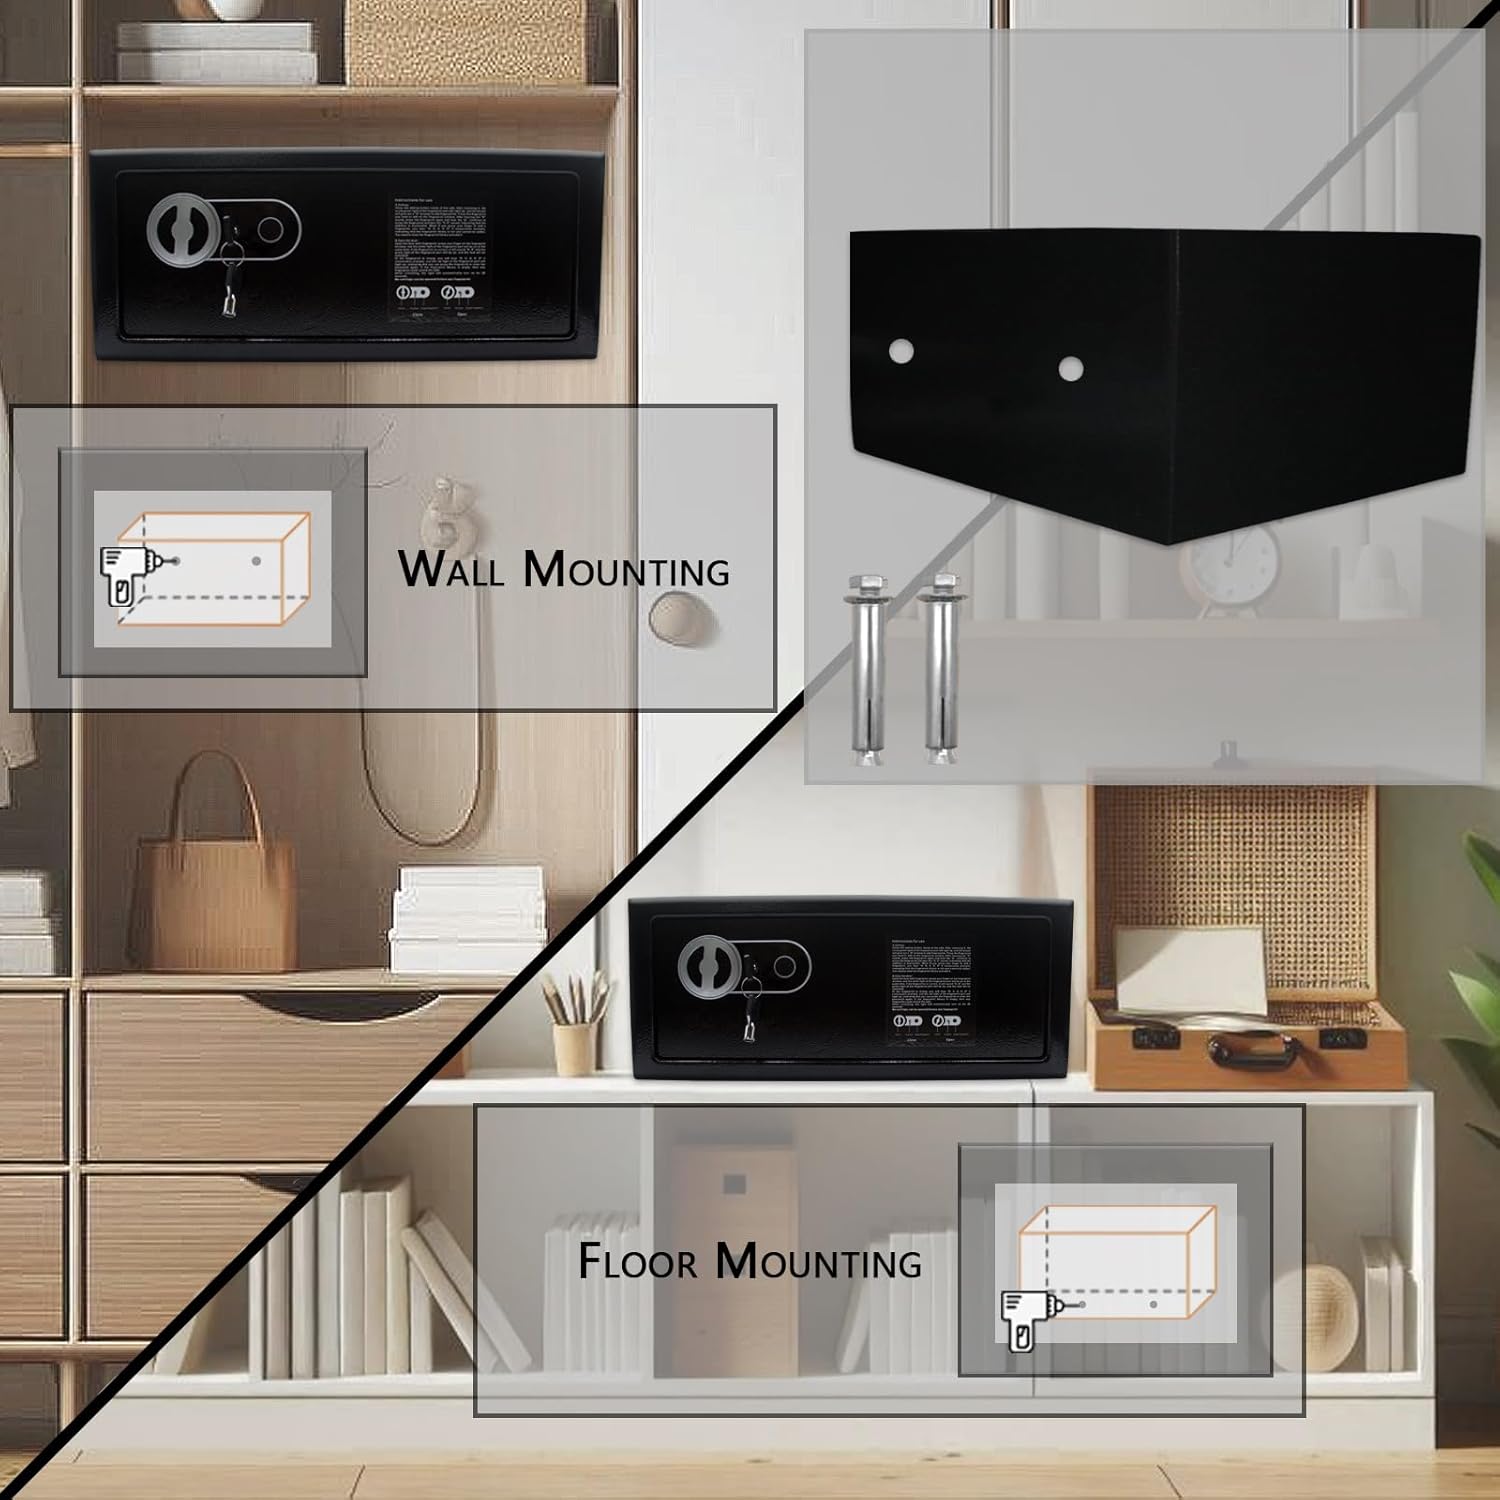
Image 4.2: Visual guide for wall and floor mounting options for the security safe.
5. Operating the Safe
5.1 Programming Fingerprints
It is crucial to program your fingerprints correctly for reliable access. The safe can store multiple fingerprints.
- With the safe door open, locate the programming button (often a small button inside the battery compartment or near the biometric scanner).
- Press the programming button. The indicator light on the biometric scanner will illuminate, indicating it's ready for fingerprint registration.
- Place the center of your finger firmly on the scanner. Lift and repeat this process several times (typically 3-5 times) from different angles to ensure a comprehensive scan of your fingerprint.
- The indicator light will change (e.g., turn green or beep) to confirm successful registration. If it flashes red or beeps differently, the registration failed; repeat the process.
- To register additional fingerprints, repeat steps 2-4 for each finger or user.
Important: After programming, always test the registered fingerprints multiple times with the safe door open to ensure they are recognized correctly before closing the safe.
5.2 Opening with Fingerprint
- Place a registered finger firmly on the biometric scanner.
- If the fingerprint is recognized, the indicator light will turn green, and you will hear a confirmation sound.
- Within a few seconds, rotate the knob on the safe door clockwise to open the safe.
5.3 Opening with Emergency Key
In case of battery failure or forgotten fingerprints, the emergency key provides access.
- Locate the emergency keyhole (refer to Section 4.1).
- Insert the emergency key and turn it counter-clockwise.
- While holding the key turned, rotate the knob on the safe door clockwise to open the safe.
5.4 Closing and Locking the Safe
- Close the safe door.
- Rotate the knob on the safe door counter-clockwise until it is fully locked.
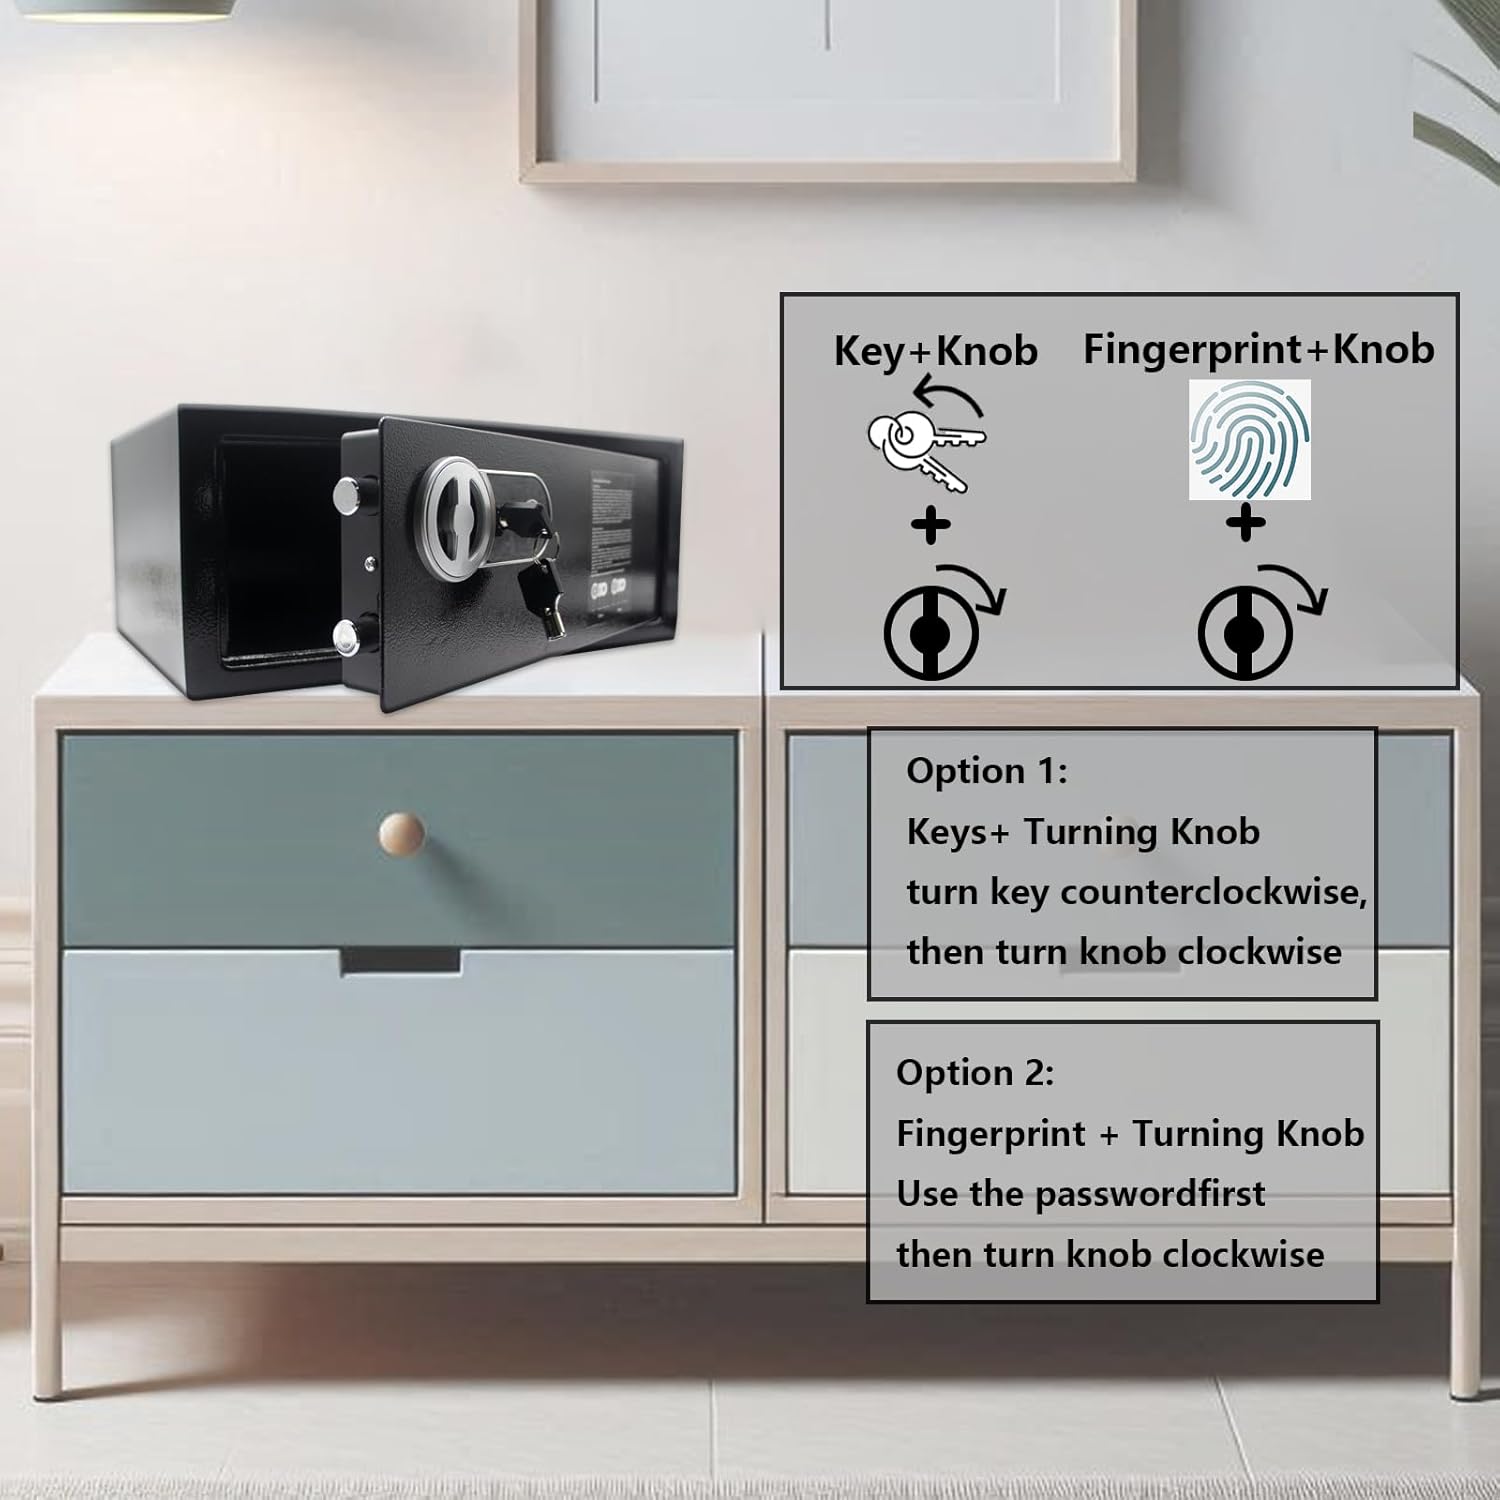
Image 5.1: Illustration of the two primary methods for opening the safe: using the emergency key and turning the knob, or using a registered fingerprint and turning the knob.
6. Maintenance
6.1 Battery Replacement
When the batteries are low, the safe may indicate this with a specific light pattern or sound during operation. Replace batteries promptly to avoid being locked out.
- Open the safe (using fingerprint or emergency key).
- Locate and open the battery compartment.
- Remove the old batteries and dispose of them responsibly.
- Insert 4 new AA batteries, ensuring correct polarity.
- Close the battery compartment cover.
6.2 Cleaning
Wipe the safe's exterior with a soft, damp cloth. Avoid using abrasive cleaners or solvents that could damage the finish or electronic components. Ensure the biometric scanner is clean and free of debris for optimal performance.
7. Troubleshooting
- Safe does not open with fingerprint:
- Ensure your finger is clean and dry.
- Place your finger firmly and completely on the scanner. Try different angles.
- Verify that the fingerprint is registered. If not, re-program it (Section 5.1).
- Check battery level. Replace batteries if low.
- Use the emergency key to open the safe if the issue persists.
- No power/lights:
- Check battery installation and polarity.
- Replace all batteries with new ones.
- Use the emergency key to open the safe.
- Safe beeps continuously:
- This may indicate low battery power. Replace batteries.
8. Specifications
| Feature | Detail |
|---|---|
| Brand | Yuanshikj |
| Model Number | 2d80ef8e-0e48-405f-abe3-9f8e5e8fa54c |
| Product Dimensions (Exterior) | 15.75"W x 10"D x 6.49"H (approx. 40cm W x 25.4cm D x 16.5cm H) |
| Product Dimensions (Interior) | 13.39"W x 10"D x 4.72"H (approx. 34cm W x 25.4cm D x 12cm H) |
| Lock Type | Biometric, Key |
| Capacity | 0.6 Cubic Feet |
| Material | Alloy Steel |
| Item Weight | 11 Pounds (approx. 5 kg) |
| Mounting Type | Wall Mount, Floor Mount |
| Batteries Required | 4 x AA (not included) |
| Special Feature | Portable |
| Water Resistance Level | Not Water Resistant |
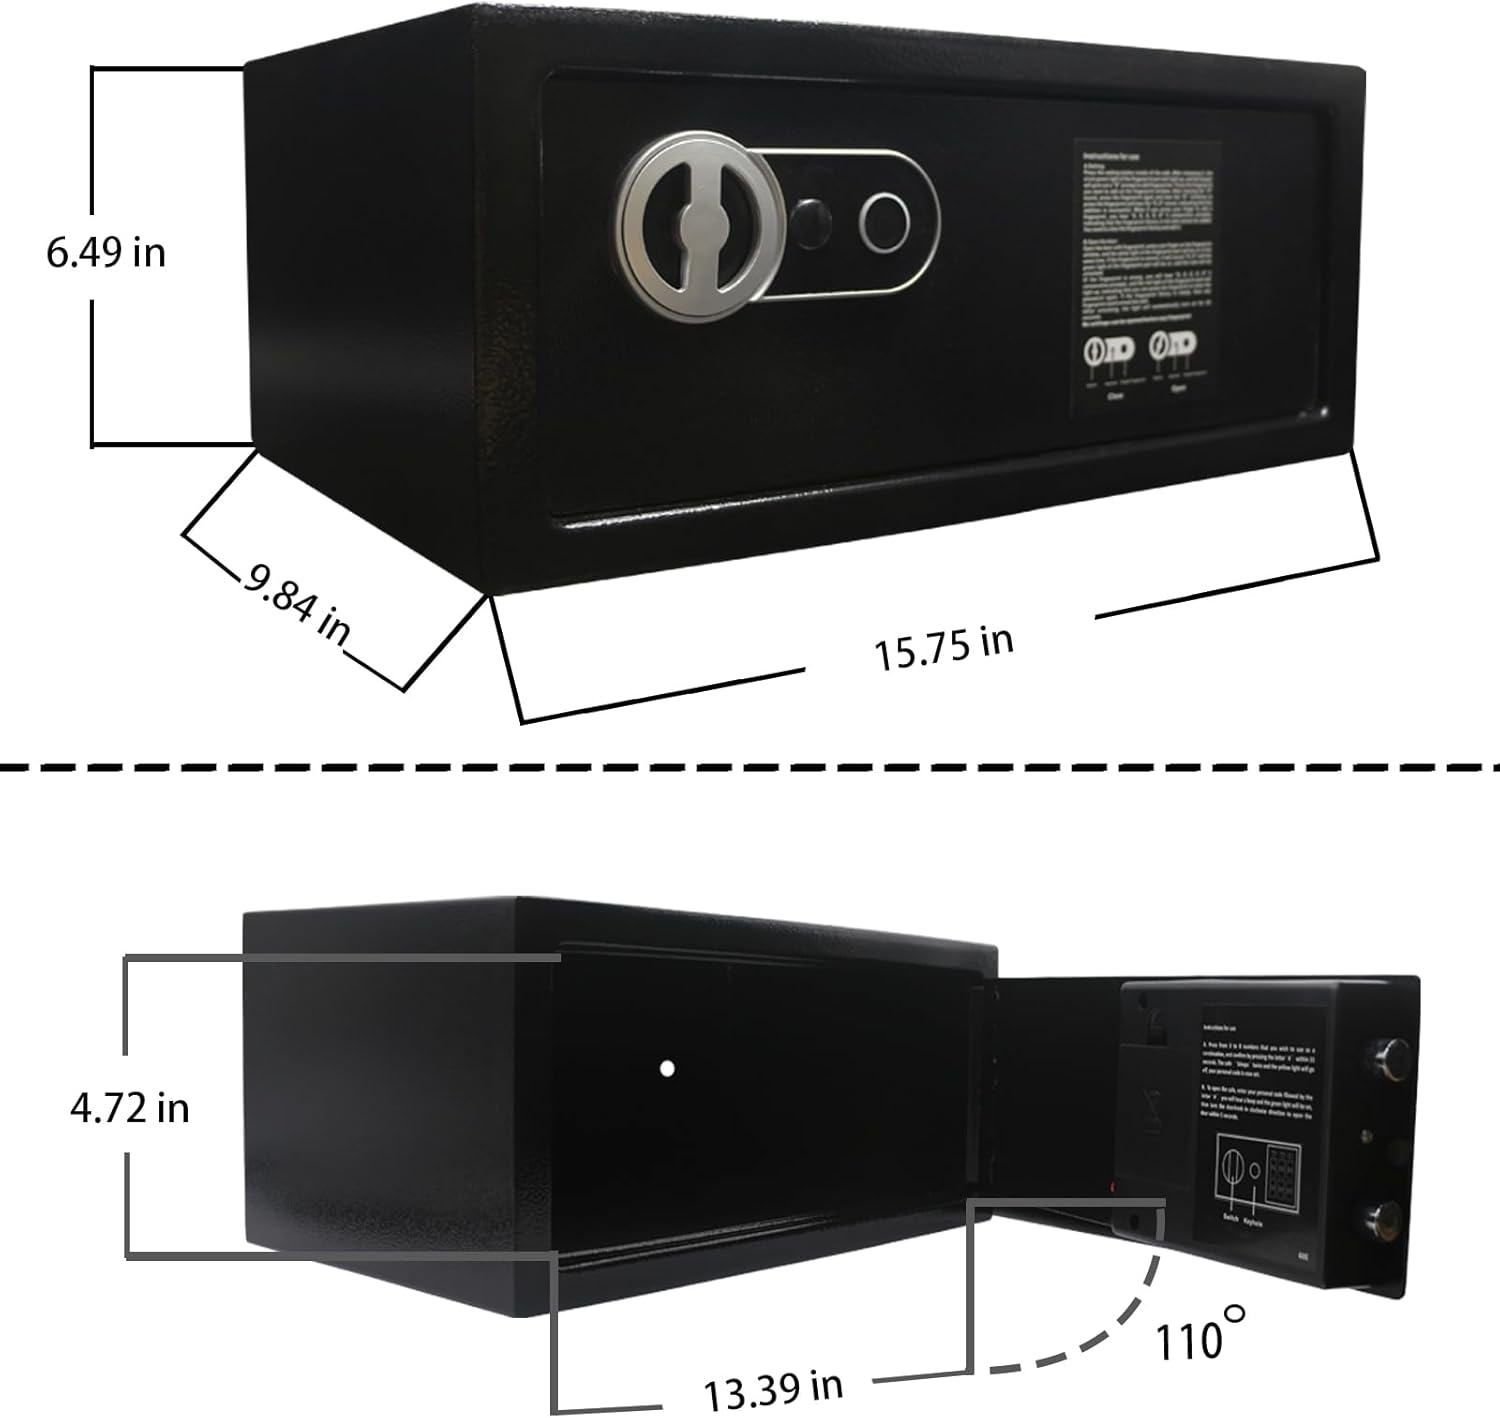
Image 8.1: Detailed diagram illustrating the exterior and interior dimensions of the safe.
9. Warranty and Support
For warranty information, technical support, or any questions not covered in this manual, please contact Yuanshikj customer service through your retailer or the official brand website. Please have your model number (2d80ef8e-0e48-405f-abe3-9f8e5e8fa54c) available when contacting support.