1. Introduction
Thank you for choosing the Keychron V1 Wired Custom Mechanical Keyboard. This keyboard features a 75% layout, QMK/VIA programmability, and hot-swappable Keychron K Pro Red switches, offering a highly customizable and comfortable typing experience. It is compatible with Mac, Windows, and Linux operating systems.
2. Package Contents
Before you begin, please ensure all items are present in your package:
- 1 x Fully Assembled Keychron V1 Keyboard
- 1 x Type-C to Type-C Cable
- 1 x Type-A to Type-C Adapter
- 1 x Switch Puller
- 1 x Keycap Puller
- 1 x Screwdriver
- 1 x Hex Key
- Additional Keycaps for Windows/macOS

Image: Contents of the Keychron V1 package.
3. Setup
Follow these steps to set up your Keychron V1 keyboard:
- Connect the Keyboard: Use the provided USB Type-C to Type-C cable (or Type-A to Type-C adapter) to connect the keyboard to your computer.
- Select Operating System: Locate the system toggle switch on the side of the keyboard. Slide it to the appropriate position for your operating system (Mac or Windows).

Image: System toggle switch for Mac and Windows compatibility.

Image: USB-C cable connection.
The keyboard is designed with an ergonomic angle for comfortable typing. You can adjust the feet on the underside of the keyboard to find your preferred typing angle.

Image: Adjustable feet for ergonomic angle.
4. Operating the Keyboard
The Keychron V1 offers extensive customization and features for an enhanced user experience.
4.1 QMK/VIA Programmability
The keyboard supports QMK and VIA software, allowing you to remap keys, create macros, and customize lighting effects. Download the VIA software from the official Keychron website for full customization. The open-source firmware provides endless possibilities for keyboard layouts and shortcuts.

Image: VIA software interface for customization.
4.2 Hot-swappable Switches
The Keychron V1 comes with pre-lubed Keychron K Pro Red linear switches, offering a smooth and responsive typing feel. The hot-swappable sockets allow you to easily change switches with almost all 3-pin and 5-pin MX mechanical switches on the market (e.g., Cherry, Gateron, Kailh, Panda) without soldering.
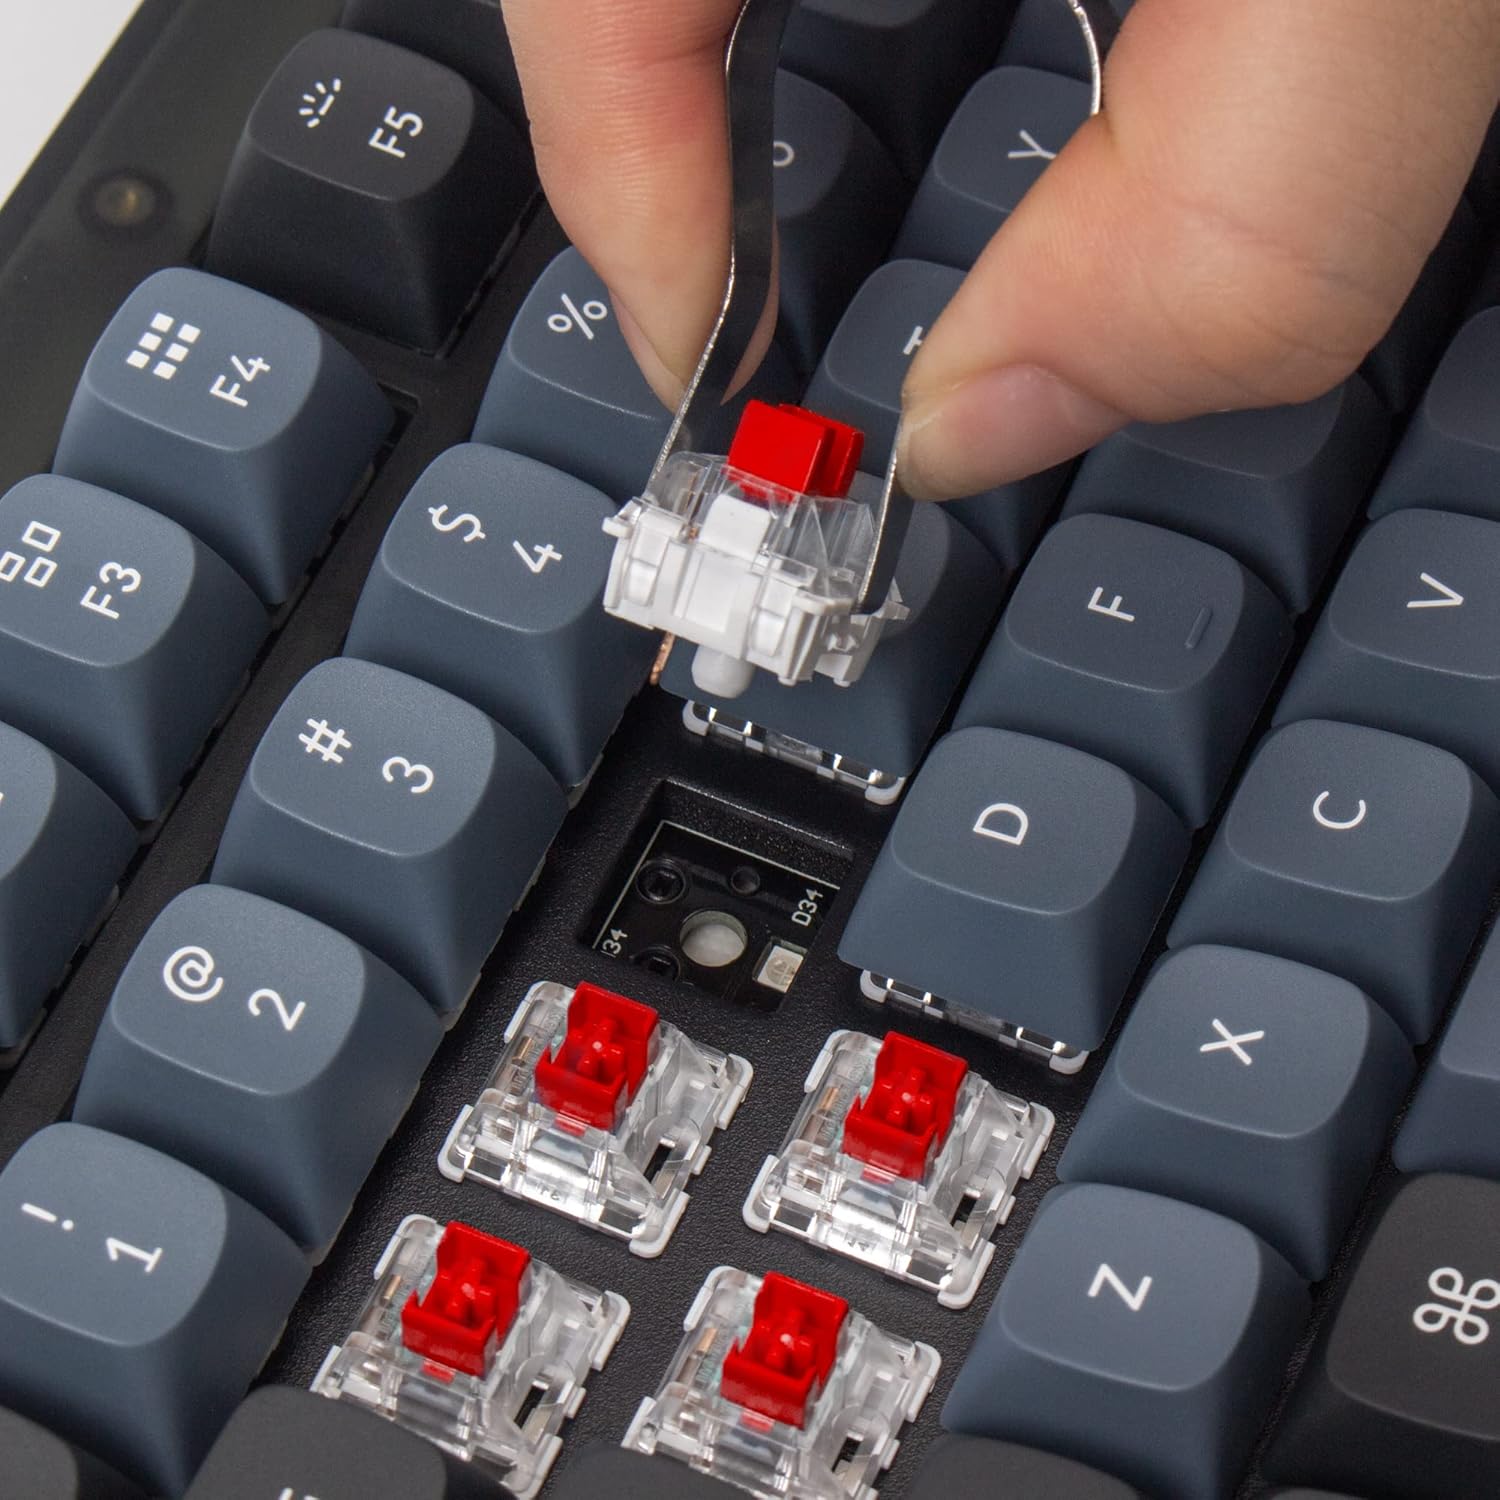
Image: Removing a hot-swappable switch.
4.3 Double-shot PBT Keycaps
The keyboard features durable OSA profile double-shot PBT keycaps. These keycaps provide a comfortable feel and excellent oil resistance for long-term use.

Image: Double-shot PBT keycaps.
4.4 RGB Backlighting
The V1 includes south-facing RGB backlighting, designed to better illuminate the keyboard from the typist’s angle and prevent interference when using Cherry-profile keycaps. Various lighting effects can be customized via the VIA software.

Image: RGB backlighting on switches.
4.5 Product Overview Video
Video: A user review highlighting the features and benefits of the Keychron V1 keyboard, including its customizable RGB lighting and mechanical key switches.
5. Maintenance
Proper maintenance ensures the longevity and performance of your keyboard.
5.1 Cleaning
Regularly clean your keyboard using a soft brush or compressed air to remove dust and debris from between the keycaps. For deeper cleaning, keycaps can be removed using the provided keycap puller.
5.2 Switch and Keycap Replacement
Thanks to the hot-swappable design, switches can be easily replaced without soldering. Use the switch puller to gently remove switches. Similarly, keycaps can be removed with the keycap puller for replacement or cleaning.

Image: Exploded view of Keychron V1 components for easy assembly/disassembly.
6. Troubleshooting
If you encounter issues with your Keychron V1 keyboard, refer to the following common solutions:
- VIA Software Not Detecting Keyboard: If the VIA software does not detect your keyboard, you may need to manually load the appropriate .json file for the Keychron V1. Refer to the Keychron website for detailed instructions on loading firmware and keymap files.
- USB Cable Connectivity Issues: Ensure the USB-C cable is securely connected to both the keyboard and your computer. Try using a different USB port or cable to rule out cable or port malfunctions.
- Incorrect Key Layout: Verify that the operating system toggle switch on the side of the keyboard is set to the correct position (Mac or Windows) for your system.
7. Specifications
| Brand | Keychron |
| Model Number | V1-A1 |
| Connectivity Technology | USB-C (Wired) |
| Keyboard Layout | 75% Layout (82 Keys) |
| Switch Type | Keychron K Pro Red (Linear) |
| Keycap Material | Double-shot PBT (OSA Profile) |
| Backlighting | RGB (South-facing) |
| Programmability | QMK/VIA Support |
| Compatible Operating Systems | macOS, Windows, Linux |
| Product Dimensions | 12.93"L x 5.85"W x 1.02"H |
8. Warranty and Support
For warranty information, technical support, or further assistance, please visit the official Keychron website or contact Keychron customer service directly. Keep your purchase receipt for warranty claims.