JideTech 64H2UA
JideTech 4-Port HDMI KVM Switch User Manual
Model: 64H2UA
Brand: JideTech
1. Product Overview
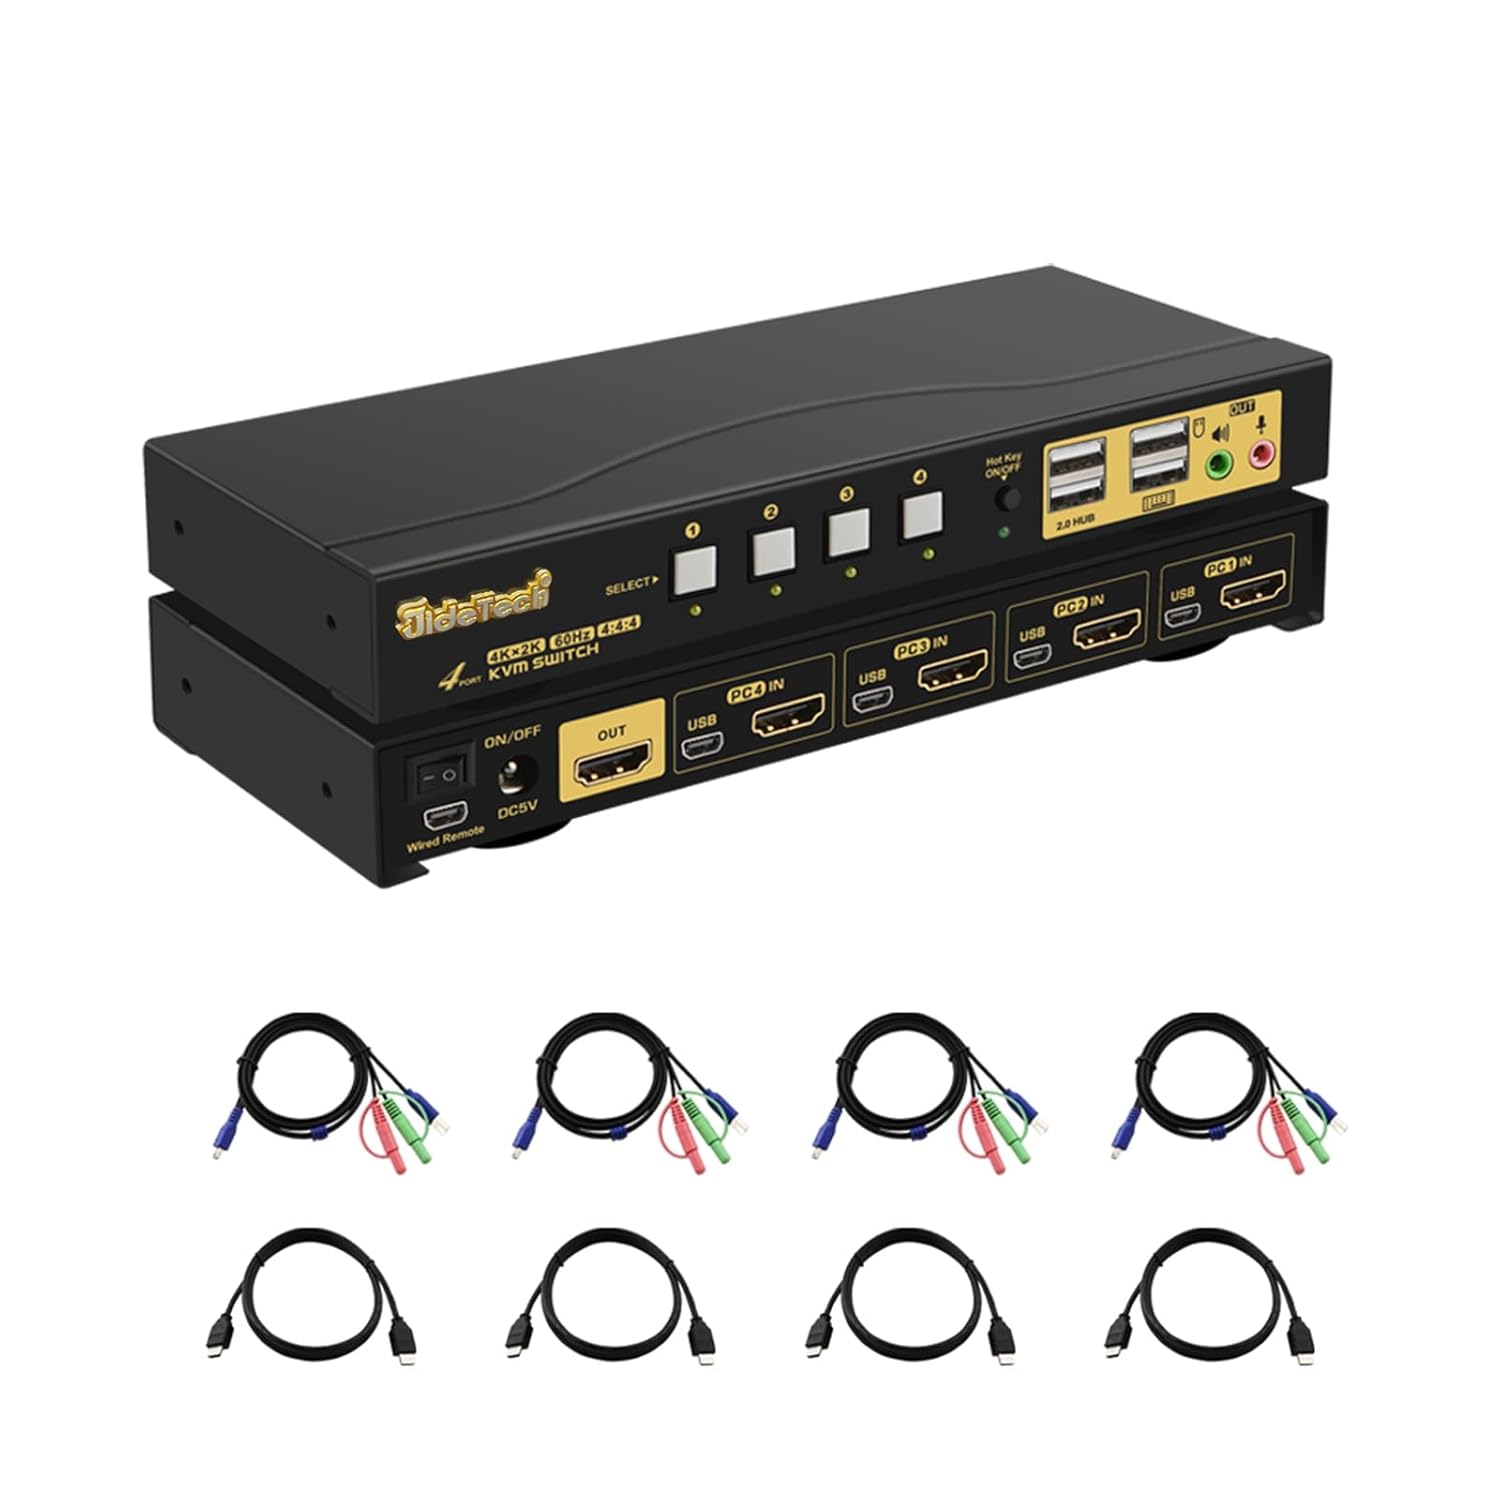
The JideTech 4-Port HDMI KVM Switch allows you to control up to four HDMI-enabled computers or devices using a single set of USB keyboard, USB mouse, and HDMI monitor. It supports Ultra HD 4K@60Hz resolution, ensuring high-quality video output. This switch is designed to streamline your workspace by reducing cable clutter and simplifying multi-system management.
Key Features:
- Supports 4 HDMI devices (PC, Servers, NVR, Game Consoles, AppleTV, etc.)
- Ultra HD 4K (4096x2160) @ 60Hz resolution support
- Compatible with HDMI 2.0, EDID, HDCP2.2, HDR10
- Integrated 2-port USB 2.0 hub for sharing peripherals (printers, scanners, USB drives)
- 3.5mm microphone and speaker ports for audio input/output
- Multiple switching methods: Front Panel Button, Wired Remote, Keyboard Hotkey, Mouse Switching
- Plug and Play functionality, driver-free for most operating systems
Package Contents:
- 1 x JideTech 4-Port HDMI KVM Switch
- 1 x USB Power Adapter
- 4 x USB 3.0 Cables
- 4 x HDMI Cables
- 1 x Wired Remote Control
- 1 x User Manual (this document)
2. Setup and Installation
Follow these steps to properly set up your KVM switch:
- Power Off Devices: Ensure all computers and the monitor are powered off before making any connections.
- Connect Monitor: Connect your HDMI monitor to the 'OUT' HDMI port on the KVM switch.
- Connect Computers (HDMI): Connect the HDMI output of each computer (PC1, PC2, PC3, PC4) to the corresponding 'PC IN' HDMI ports on the KVM switch.
- Connect Computers (USB): Connect the USB 3.0 cable from each computer's USB port to the corresponding 'USB IN' ports on the KVM switch. These cables transmit keyboard, mouse, and USB hub data.
- Connect Keyboard & Mouse: Plug your USB keyboard and USB mouse into the dedicated keyboard and mouse USB ports on the front panel of the KVM switch.
- Connect USB Peripherals: If desired, connect additional USB devices (e.g., printer, USB drive) to the '2.0 HUB' ports on the front panel.
- Connect Audio: Connect your speakers or headphones to the green audio output port and your microphone to the pink microphone input port on the front panel.
- Connect Power: Plug the provided USB power adapter into the 'DC5V' port on the KVM switch and then into a power outlet.
- Power On: Power on the KVM switch using the 'ON/OFF' switch, then power on your monitor and computers.


3. Operating Instructions
The JideTech KVM Switch offers multiple convenient ways to switch between connected computers:
3.1. Switching Modes

- Front Panel Button Switching:
Press the 'SELECT' buttons (1, 2, 3, 4) on the front panel of the KVM switch to directly switch to the corresponding computer input.

Figure 6: The Hotkey On/Off switch on the KVM. - Wired Remote Control Switching:
Use the included wired remote control to switch between inputs. Press the numbered buttons (1, 2, 3, 4) to select the desired computer. The 'AUTO' button can initiate an auto-scan function.
- Keyboard Hotkey Switching:
Ensure the 'Hot Key On/Off' switch on the front panel is in the 'ON' (green light) position. Use the following hotkey commands:
- Switch to PC1: Press Right CTRL twice, then 1, then Enter.
- Switch to PC2: Press Right CTRL twice, then 2, then Enter.
- Switch to PC3: Press Right CTRL twice, then 3, then Enter.
- Switch to PC4: Press Right CTRL twice, then 4, then Enter.
- Disable Beep Sound: Press Right CTRL twice, then B, then Enter.
- Enable Loudspeaker (Audio): Press Right CTRL twice, then P, then Enter.
Note: Hotkey functionality may vary with certain specialized keyboards (e.g., gaming or mechanical keyboards). If issues arise, try connecting the keyboard to a USB hub connected to the KVM's USB 2.0 hub port.
- Mouse Switching:
Move the mouse cursor to the far right edge of the screen and quickly move it right again. This will switch to the next active input. Repeat to cycle through inputs.
3.2. Audio Capabilities
The KVM switch includes 3.5mm audio input and output ports, allowing you to share speakers and a microphone across all connected computers. Simply plug your audio devices into the corresponding ports on the front panel.

4. Maintenance
To ensure the longevity and optimal performance of your JideTech KVM Switch, follow these maintenance guidelines:
- Cleaning: Use a soft, dry cloth to clean the exterior of the KVM switch. Avoid using liquid cleaners or aerosols, which may damage the device.
- Ventilation: Ensure the KVM switch is placed in a well-ventilated area to prevent overheating. Do not block any ventilation openings.
- Cable Management: Keep cables organized and untangled to prevent damage to ports and cables. Avoid excessive bending or pulling of cables.
- Power Supply: Always use the original power adapter provided with the KVM switch.
- Storage: If storing the device for an extended period, disconnect all cables and store it in a cool, dry place.
5. Troubleshooting
If you encounter issues with your KVM switch, please refer to the following common problems and solutions:
- No Display or Flickering Screen:
- Ensure all HDMI cables are securely connected to both the KVM switch and the computers/monitor.
- Verify that the KVM switch is powered on.
- Try using different HDMI cables, especially if they are not the ones provided.
- Check the display resolution settings on your computers. Ensure they are compatible with 4K@60Hz or a supported lower resolution.
- Power cycle the KVM switch and all connected devices.
- Keyboard or Mouse Unresponsive:
- Ensure the keyboard and mouse are plugged into the dedicated USB ports on the front panel.
- Try unplugging and replugging the keyboard/mouse.
- If using a specialized keyboard/mouse (e.g., gaming, mechanical, or wireless with a dongle), connect them to a powered USB 2.0 hub, then connect the hub to one of the KVM's '2.0 HUB' ports.
- Ensure the USB 3.0 cables from the computers to the KVM are securely connected.
- Disable hotkey switching if it interferes with your specific keyboard/mouse.
- No Audio or Distorted Audio:
- Check that speakers/headphones and microphone are correctly plugged into the 3.5mm audio ports.
- Verify audio output settings on your computer.
- Ensure the 'Loudspeaker' hotkey (Right CTRL twice, then P, then Enter) is enabled if needed.
- Loud Beep Sound When Switching:
- The beep sound can be disabled using the hotkey command: Press Right CTRL twice, then B, then Enter.
- Auto-Scan Not Working:
- Ensure all connected computers are powered on and sending a video signal.
- Check the wired remote control connection.
If the problem persists after trying these solutions, please contact JideTech customer support for further assistance.
6. Specifications
| Feature | Description |
|---|---|
| Model Number | 64H2UA |
| Product Dimensions | 2.95 x 0.97 x 8.07 inches |
| Weight | 2.93 Pounds |
| Video Resolution | Up to 4096x2160@60Hz (4K@60Hz) |
| HDMI Standard | HDMI 2.0 |
| HDCP Support | HDCP 2.2 |
| HDR Support | HDR10 |
| USB Ports | 2 x USB 2.0 Hub, Dedicated Keyboard/Mouse USB ports |
| Audio Ports | 3.5mm Stereo Audio Out, 3.5mm Microphone In |
| Switching Methods | Front Panel Button, Wired Remote, Keyboard Hotkey, Mouse Switching |
| Operating Voltage | 5 Volts |
| Compatible Operating Systems | Windows 10/7/2000/XP/Vista, Linux, Mac, Debian, Ubuntu, Fedora, Raspbian, etc. |


7. Warranty and Support
For warranty information and technical support, please refer to the official JideTech website or contact their customer service directly. Details regarding product registration, warranty claims, and technical assistance can typically be found on the manufacturer's support pages.
Contact Information: Please visit the JideTech Store on Amazon or their official website for the most up-to-date support contact details.
Related Documents - 64H2UA
 |
JideTech 4-Port HDMI 2.0 KVM Switch User Manual User manual for the JideTech 4-Port HDMI 2.0 KVM Switch, detailing features, setup, operation modes, hotkey commands, LED indicators, and troubleshooting for seamless control of multiple computers. |
 |
JideTech LC005 Multispectral Thermal Imaging Camera Specification Technical specifications and features for the JideTech LC005, a 4MP 70X optical zoom multispectral thermal imaging camera designed for professional surveillance, law enforcement, and emergency response. |
 |
JideTech POE Bullet Camera Quick Operation Guide This guide provides instructions for setting up and operating the JideTech POE Bullet Camera, covering installation, software download, viewing via IE browser and mobile app, system settings, and frequently asked questions. |
 |
JideTech PTZ Dome Camera Quick Operation Guide A comprehensive quick operation guide for the JideTech PTZ Dome Camera, detailing setup, connection, software installation, browser and mobile app viewing, and advanced configuration options. |
 |
JideTech 8MP 30X Zoom Thermal Image Camera with Temperature Measurement Detailed specifications and features of the JideTech P24-30X-8MP-TH(640) 8MP 30X Zoom Thermal Image Camera, including thermal and visible light capabilities, PTZ functions, and applications. |
 |
JideTech PTZ Dome Camera Quick Operation Guide A comprehensive quick operation guide for the JideTech PTZ Dome Camera, detailing setup, connection, software installation, video viewing via IE browser and HCMS, mobile app usage (HiSee), and frequently asked questions. This guide helps users install, configure, and operate their JideTech PTZ camera for enhanced security. |
Ask a question about this manual
Ask about setup, troubleshooting, compatibility, parts, safety, or missing instructions. Manuals+ will review the question and use this page’s manual context to help answer it.