Introduction
Thank you for choosing the Brick Shine Light Kit for your LEGO Architecture Statue of Liberty 21042. This kit is designed to illuminate your model, bringing it to life with vibrant LED lighting. Please read this manual carefully before installation to ensure proper setup and operation.
Important Note: The LEGO Architecture Statue of Liberty 21042 set is not included with this light kit. This product contains lighting components and a tweezer tool for installation.

Figure 1: The Brick Shine Light Kit illuminating the LEGO Architecture Statue of Liberty 21042.
Safety Information
- Keep small parts away from children under 3 years of age to prevent choking hazards.
- Do not expose the lighting components to water or excessive moisture. This product is not water resistant.
- Handle wires and LED lights with care to avoid damage.
- Ensure the power source is disconnected before performing any maintenance or adjustments.
- Recommended for ages 8 years and up.
Package Contents
Before beginning installation, please verify that all components are present:
- LED Light Strips and Wires
- Connection Boards
- Battery Box (or USB Power Cable, depending on kit version)
- Tweezer Tool for installation
- Adhesive Squares (if applicable)
- Instruction Manual (this document)
Note: External power bank or batteries are not included and must be supplied separately.
Setup and Installation
This section provides general guidance for installing your light kit. Specific steps may vary slightly based on the exact design of your LEGO model. Refer to any included diagrams or online resources for detailed placement.
- Prepare Your LEGO Model: Ensure your LEGO Architecture Statue of Liberty 21042 model is fully assembled and stable. You may need to carefully disassemble small sections to integrate the lights.
- Identify Light Placement: Review the intended light locations. Common areas include the torch, crown, and base of the statue.
- Install LED Lights:
- Carefully thread the small LED wires through gaps in the LEGO bricks. The included tweezer tool can assist with this.
- Secure LED light strips or individual LEDs in their designated positions. Use adhesive squares if provided and necessary.
- Ensure wires are not pinched or excessively bent, which can cause damage.
- Connect to Expansion Boards: Connect the LED wires to the appropriate ports on the expansion boards. Pay attention to polarity if indicated.
- Connect Power Source:
- If using a battery box, insert the required batteries (e.g., AA or AAA, not included) and connect the battery box to the main connection board.
- If using a USB power cable, connect it to the main connection board and then to an external power bank or USB wall adapter (not included).
- Test Lights: Before fully reassembling your LEGO model, connect the power source and test all lights to ensure they are functioning correctly.
- Final Assembly: Carefully reassemble any disassembled LEGO sections, ensuring wires are neatly tucked away and not visible or stressed.

Figure 2: Detail of the illuminated torch and crown.
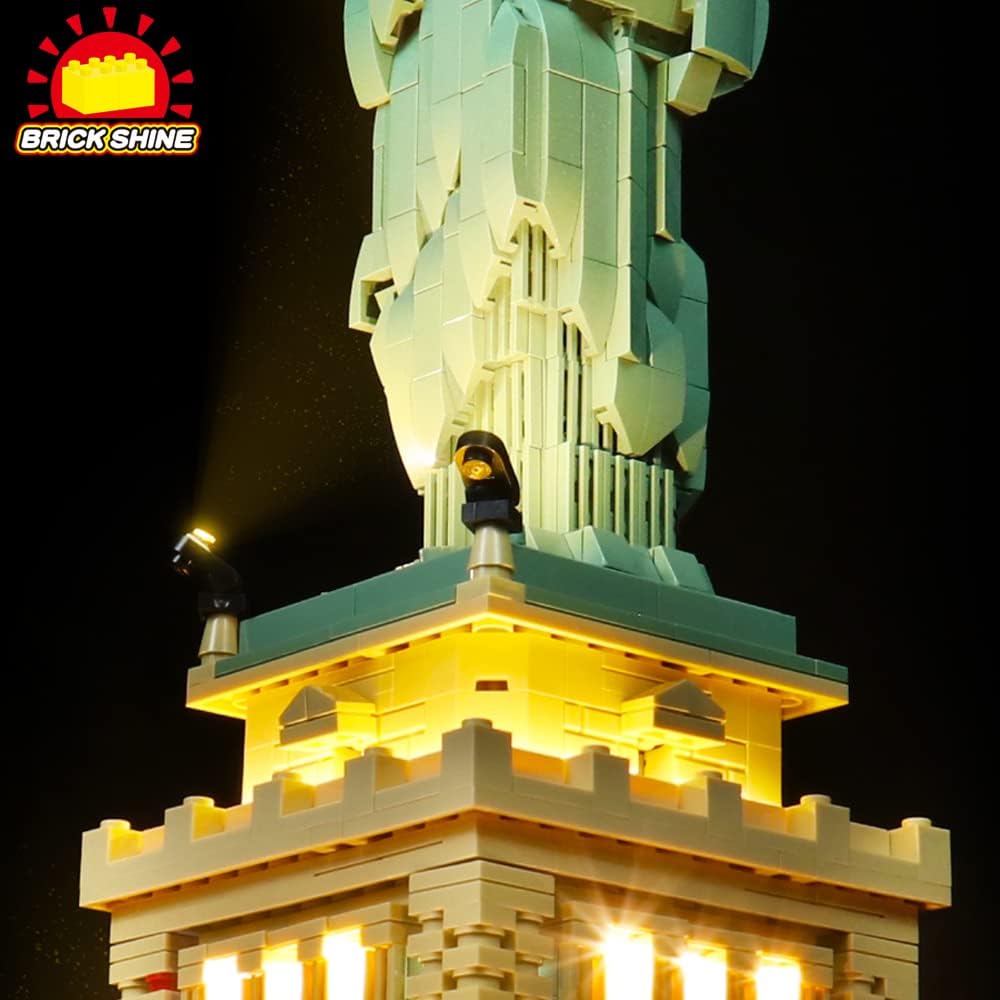
Figure 3: Detail of the illuminated base.
Operating Instructions
Once installed, operating your Brick Shine Light Kit is straightforward:
- Power On/Off: If your kit includes a touch switch (as per specifications), gently touch the designated area to turn the lights on or off. If using a battery box with a switch, use the switch to control power. For USB power, connect/disconnect the USB cable.
- Power Source: Ensure your external power bank or batteries are sufficiently charged for optimal brightness.
Maintenance
To ensure the longevity and optimal performance of your light kit:
- Cleaning: Gently dust the LED lights and wires with a soft, dry cloth. Avoid using liquid cleaners directly on the electronic components.
- Wire Management: Periodically check that all wires are securely in place and not exposed to undue stress or sharp edges.
- Battery Replacement: If using a battery box, replace batteries when lights dim or cease to function. Always use new batteries of the specified type.
- Storage: If storing the model for an extended period, disconnect the power source (remove batteries or unplug USB) to prevent drainage or potential damage.
Troubleshooting
If you encounter issues with your light kit, please refer to the following common solutions:
| Problem | Possible Cause | Solution |
|---|---|---|
| Lights do not turn on. |
|
|
| Lights are dim or flickering. |
|
|
| Some lights are not working. |
|
|
Specifications
- Product Model: Classic Version
- Brand: Brick Shine
- Compatibility: LEGO Architecture Statue of Liberty 21042
- Light Source Type: LED
- Control Method: Touch (if applicable to your specific kit)
- Power Source: Battery Powered (external batteries or power bank required, not included)
- Material: Plastic
- Water Resistance Level: Not Water Resistant
- Recommended Age: 8 years and up
- Manufacturer: FENGMA Technology Pty Ltd
- Product Dimensions (Light Kit Components): Approximately 6.7"D x 4.1"W x 1.6"H (This refers to the packaging or main control unit, not the assembled LEGO model)
Warranty and Support
For warranty information, please refer to the product packaging or contact the seller directly. Warranty terms may vary based on your region and point of purchase.
If you require further assistance, have questions about installation, or need to report a defective component, please contact the seller or manufacturer through the platform where you purchased this product. Provide your order number and a detailed description of the issue for prompt support.