1. Important Safety Information
Please read and understand all instructions before assembly and use of this product. Failure to follow these instructions may result in injury or damage.
- Keep all packaging materials away from children.
- Ensure all parts are present and undamaged before assembly. Do not use if any parts are missing or broken.
- Assemble the desk on a soft, clean surface to prevent scratches.
- Do not overtighten screws during assembly.
- Periodically check all fasteners to ensure they remain tight.
- Do not stand or sit on the desk.
- Distribute weight evenly on the tabletop and shelves.
- Keep liquids away from the desk surface to prevent damage to the engineered wood.
2. Setup and Assembly
This section provides general guidelines for assembling your HOMCOM Drafting Table. For detailed, step-by-step instructions, please refer to the assembly manual included in your product packaging.
2.1 Unpacking and Part Identification
Carefully unpack all components and lay them out on a clean, soft surface. Verify that all parts listed in the assembly manual are present.
2.2 Frame Assembly
Begin by assembling the solid steel frame components. Ensure all connections are secure but do not fully tighten screws until the entire frame is loosely assembled.

Figure 2.2.1: The desk features a solid steel frame for stability and adjustable non-marking feet to protect floors and ensure level placement.
2.3 Tabletop and Shelf Installation
Attach the engineered wood tabletop and the lower storage shelf to the assembled frame. Ensure the tiltable section of the tabletop is correctly oriented according to the manual.

Figure 2.3.1: Fully assembled HOMCOM Drafting Table, ready for use in a home office environment.
2.4 Final Tightening and Leveling
Once all components are in place, systematically tighten all screws. Adjust the non-marking feet to ensure the desk is stable and level on your floor.
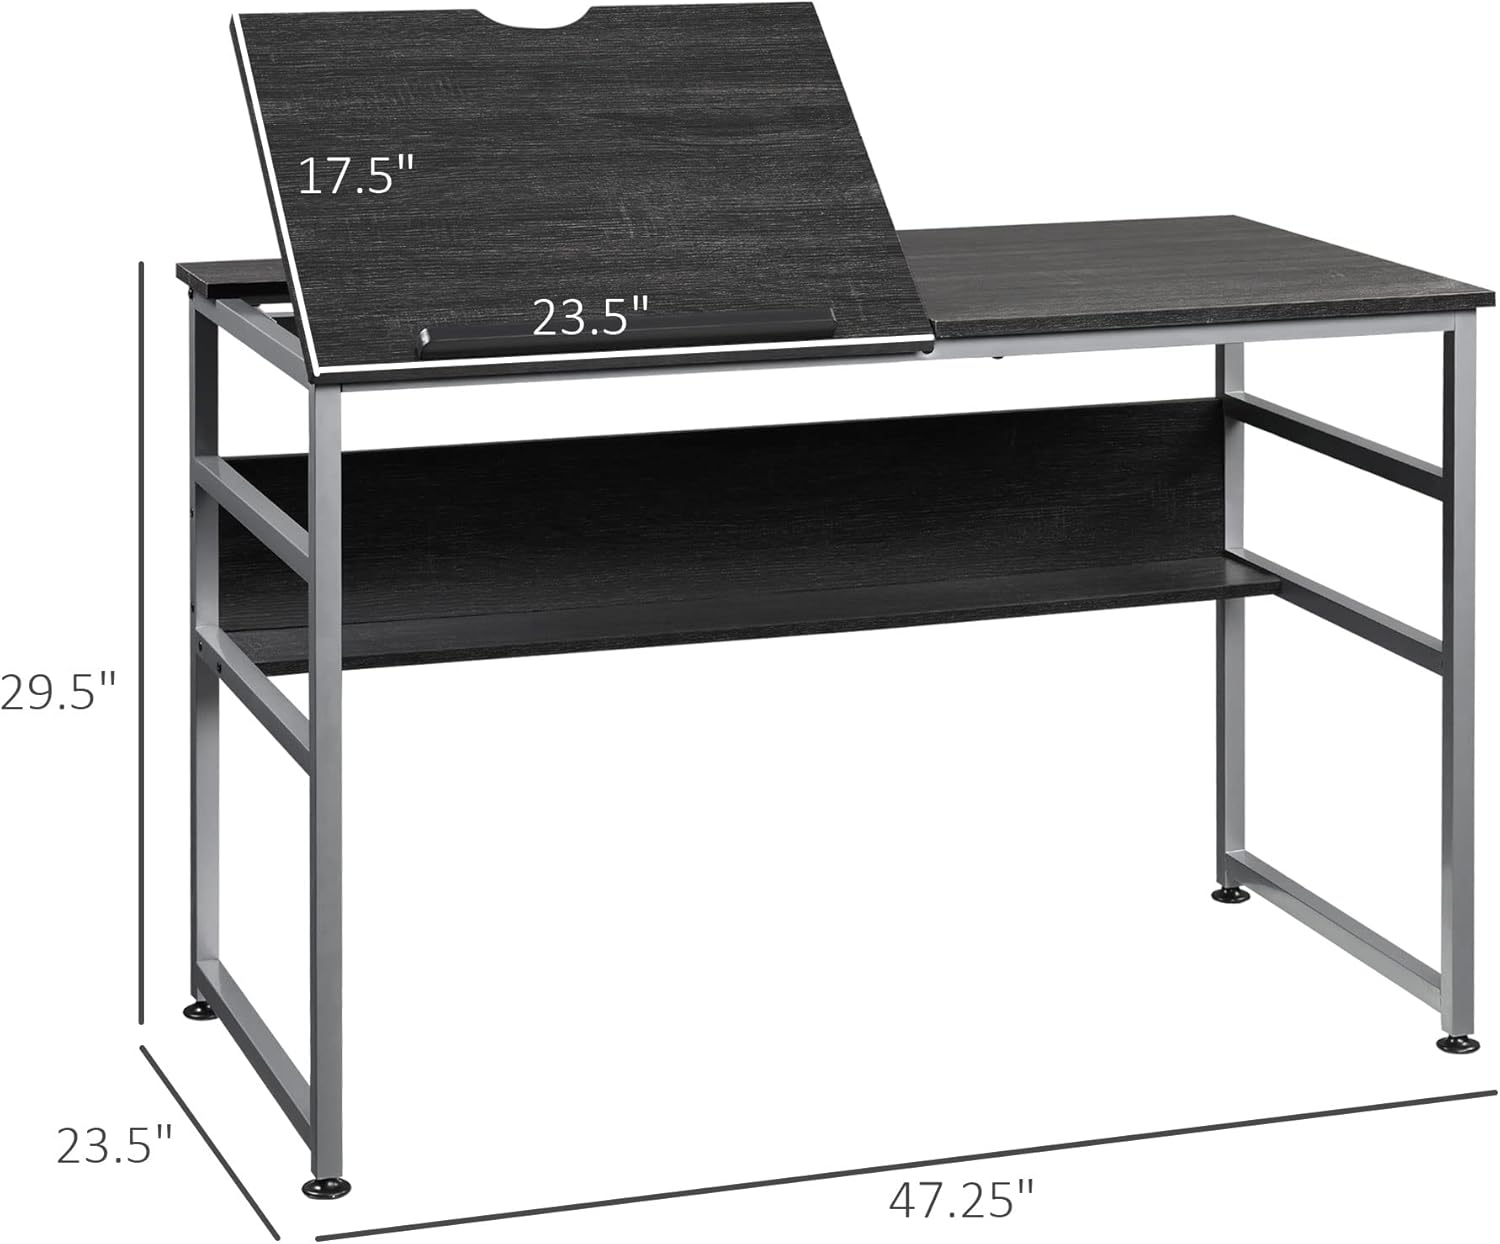
Figure 2.4.1: Key dimensions of the drafting table, including the tiltable section, for proper placement and space planning.
3. Operation
3.1 Adjusting the Tiltable Tabletop
The HOMCOM Drafting Table features a 15-level adjustable tabletop, allowing for angles from 0 to 70 degrees. To adjust, lift the tiltable section to the desired angle and ensure it locks securely into place. A paper stopper is integrated to prevent items from sliding off when tilted.

Figure 3.1.1: The tabletop can be adjusted to various angles up to 70 degrees, with a built-in paper stopper for convenience.

Figure 3.1.2: Recommended tilt angles for different activities: 0-20° for writing, 20-40° for reading, and 40-70° for drawing.
3.2 Utilizing the Storage Shelf
The desk includes an open storage shelf located beneath the main tabletop. This shelf is designed to hold books, art supplies, or other office essentials, keeping your workspace organized.

Figure 3.2.1: The open shelf provides convenient storage space for various items, enhancing workspace organization.
4. Maintenance
4.1 Cleaning the Desk Surfaces
To clean the engineered wood tabletop and shelves, wipe with a soft, damp cloth. Avoid using harsh chemicals, abrasive cleaners, or excessive moisture, as these can damage the finish. Dry immediately with a clean, dry cloth.
4.2 Care for the Steel Frame
The steel frame can be cleaned with a soft, damp cloth. For stubborn marks, a mild soap solution can be used, followed by wiping with a clean, damp cloth and drying thoroughly to prevent rust.
4.3 Regular Inspections
Periodically inspect all screws and connections to ensure they are tight. Retighten any loose fasteners to maintain the desk's stability and structural integrity.
5. Troubleshooting
5.1 Tabletop Does Not Lock When Elevated
If the tiltable tabletop does not securely lock into its elevated positions, check the adjustment mechanism for any obstructions or damage. Ensure the locking pins or levers are fully engaged. If a part appears broken, refer to the support section.
5.2 Desk Wobbles or is Unstable
Ensure all assembly screws are fully tightened. Adjust the non-marking feet on the bottom of the desk legs to compensate for uneven floor surfaces. Rotate each foot until the desk is stable and level.
5.3 Difficulty During Assembly
If you encounter difficulties during assembly, double-check the included assembly manual for detailed diagrams and instructions. Ensure all parts are correctly oriented before tightening screws. Sometimes, a second person can assist with aligning components.
6. Specifications
| Feature | Detail |
|---|---|
| Brand | HOMCOM |
| Model Number | 836-395V80BK |
| Product Dimensions (D x W x H) | 23.5" x 47.25" x 29.5" |
| Maximum Tilt Angle | 70 Degrees |
| Number of Open Shelves | 1 |
| Base Material | Engineered Wood |
| Top Material Type | Engineered Wood |
| Furniture Leg Material | Metal |
| Finish Type | Steel (Frame) |
| Required Assembly | Yes |
| Includes All Assembly Tools | Yes |
| GTIN | 196393064023 |
7. Warranty and Support
For warranty information, replacement parts, or technical assistance, please contact HOMCOM customer service. Keep your purchase receipt and model number (836-395V80BK) readily available when contacting support.
You can typically find contact information on the HOMCOM official website or through the retailer where you purchased the product.


