1. Product Overview
The Woibugee Single Din Car Stereo is an advanced in-dash audio receiver featuring a 10-inch adjustable QLED touchscreen. It integrates seamlessly with Apple CarPlay and Android Auto, offering enhanced navigation, communication, and entertainment functionalities. This unit is designed for a wide range of vehicles, providing a modern upgrade to your car's infotainment system.

Image: The main interface of the Woibugee car stereo showing Apple CarPlay and Android Auto integration.
2. What's in the Box
Verify that all components are present before beginning installation.
- 1 x Single Din Car Stereo Unit
- 1 x USB Cable (4-pin)
- 1 x USB Cable (6-pin)
- 1 x Video Input Cable + 1 x RCA Cable
- 1 x Bracket Set (screws included)
- 1 x GPS Antenna
- 1 x External Microphone

Image: A visual representation of the car stereo unit, cables, GPS antenna, and installation brackets included in the package.
3. Setup and Installation
Proper installation is crucial for optimal performance. It is recommended to have this unit installed by a professional if you are unfamiliar with car audio wiring.
3.1 Detaching the Screen Panel
The 10-inch QLED screen is detachable for easier installation and adjustment.
- Pull the two clips on both sides of the screen.
- Move the screen upwards to detach it from the main unit.
- Press clips A and B towards the center and unplug the cable connecting the screen to the main unit.

Image: A four-panel image illustrating the process of detaching the screen panel from the main head unit.
3.2 Screen Adjustment
The screen offers multiple adjustment options for optimal viewing angles and to prevent glare.
- Vertical Movement: Adjust the screen up or down by ±2.36 inches.
- Forward and Back Tilt: Tilt the screen forward or backward by ±30°.
- Left and Right Tilt: Tilt the screen left or right by ±30°.

Image: A diagram showing the various ways the screen can be adjusted for optimal viewing, including vertical movement and tilting.
3.3 Vehicle Fit Considerations
The unit is a universal single DIN size (Length: 150mm, Width: 180mm, Height: 50mm). The distance between the panel and body is 1.97 inches. It fits most standard single-DIN dashboard openings. For double-DIN openings, an additional double-DIN bracket may be required. Some vehicles may require extra wiring harnesses, dash kits, or antenna adapters for a perfect fit.
Important: Before installation, disconnect the battery's negative terminal. The working voltage is 12V; exceeding 14V can cause a short circuit. For large trucks (24V systems), a DC24V to DC12V car voltage regulator is necessary.
Video: Instructions on how to remove the screen for mounting the head unit.
4. Operating Instructions
4.1 Apple CarPlay and Android Auto
Connect your smartphone to access features like GPS navigation, music, voice control (Siri/Google Assistant), and more directly on the car stereo screen.
Video: Demonstrates connecting a smartphone for Apple CarPlay, including music playback and steering wheel control functionality.
Video: Shows the wireless Android Auto connection process and its interface on the car stereo.
4.2 UI Customization and App Management
You can customize the home screen and manage applications. To change the UI home screen, navigate to Settings > Factory > 3368 > Home Launcher Selection. To change apps on the home screen, drag the apps you wish to replace to the top of the screen, then drag your desired apps to the empty positions. Note that only UI12 and UI06 support app changing.
Video: Demonstrates how to change the UI home screen, manage apps, and switch between KM/H and MPH.
4.3 Speed Unit Conversion (KM to MPH)
To switch the speed display from Kilometers per Hour (KM/H) to Miles per Hour (MPH), long-press on the KM/H display for approximately 3 seconds. The unit will automatically convert to MPH.
4.4 Mute Function
To mute the stereo, press the power button for about 1 second. The stereo will enter mute status. Short-press the power button again to unmute.
4.5 Digital Sound Processor (DSP)
The built-in DSP with 15-band EQ allows for precise audio customization. Adjust frequency bands, sound field, surround effects, stereo sound enhancement, and bass enhancement to optimize your listening experience.

Image: A screenshot of the DSP interface, highlighting the equalizer and various sound enhancement settings.
4.6 Steering Wheel Control (SWC)
The unit supports steering wheel controls, allowing you to manage audio playback, calls, and other functions without taking your hands off the wheel. Configuration may be required in the settings menu.

Image: A visual guide demonstrating the integration of steering wheel controls with the car stereo.
4.7 GPS Navigation
Utilize built-in Wi-Fi and GPS to access online and offline navigation apps such as Waze and Google Maps. The unit supports 3D maps and voice guidance, allowing you to listen to AM/FM radio while navigating.

Image: A screenshot of the GPS navigation system in action, showing a map with route information.
4.8 Front and Rear View Camera Support
The stereo supports both front dash cameras and rear view cameras, enhancing driving safety and convenience. Ensure correct connection for proper functionality. If the front camera does not work after installation, go to Settings > Factory > 3368 > Open Front View Function.
Video: Demonstrates the front view and live rear view camera functionality of the car stereo.
4.9 YouTube Playback
Access YouTube directly from the unit's interface for video streaming. Ensure a stable Wi-Fi connection for optimal performance.
Video: A user demonstrating YouTube video playback on the car stereo, including volume adjustment.
5. Specifications
| Feature | Detail |
|---|---|
| Brand | Woibugee |
| Model | B09MZ66R3M |
| Screen Size | 10 Inches |
| Display Type | QLED |
| Resolution | 1280 x 720 |
| Operating System | Android |
| Memory Storage Capacity | 32 GB ROM, 2 GB RAM |
| Processor | 4 Cores CPU |
| Connectivity Technology | Wi-Fi, Bluetooth |
| Special Features | Apple CarPlay, Android Auto, Detachable/Adjustable Touchscreen, GPS Navigation, Voice Control, DSP, SWC, Support TPMS, OBDII, Front Dash Cam, Rear View Camera |
| Mounting Type | Dashboard Mount (Single Din) |
| Audio Output Mode | 2-CHR RCA Audio Out (2v) + Subwoofer Output |
| Map Type | North America (supports online/offline apps) |

Image: Visual representation of the internal hardware specifications, including processor, RAM, and ROM.
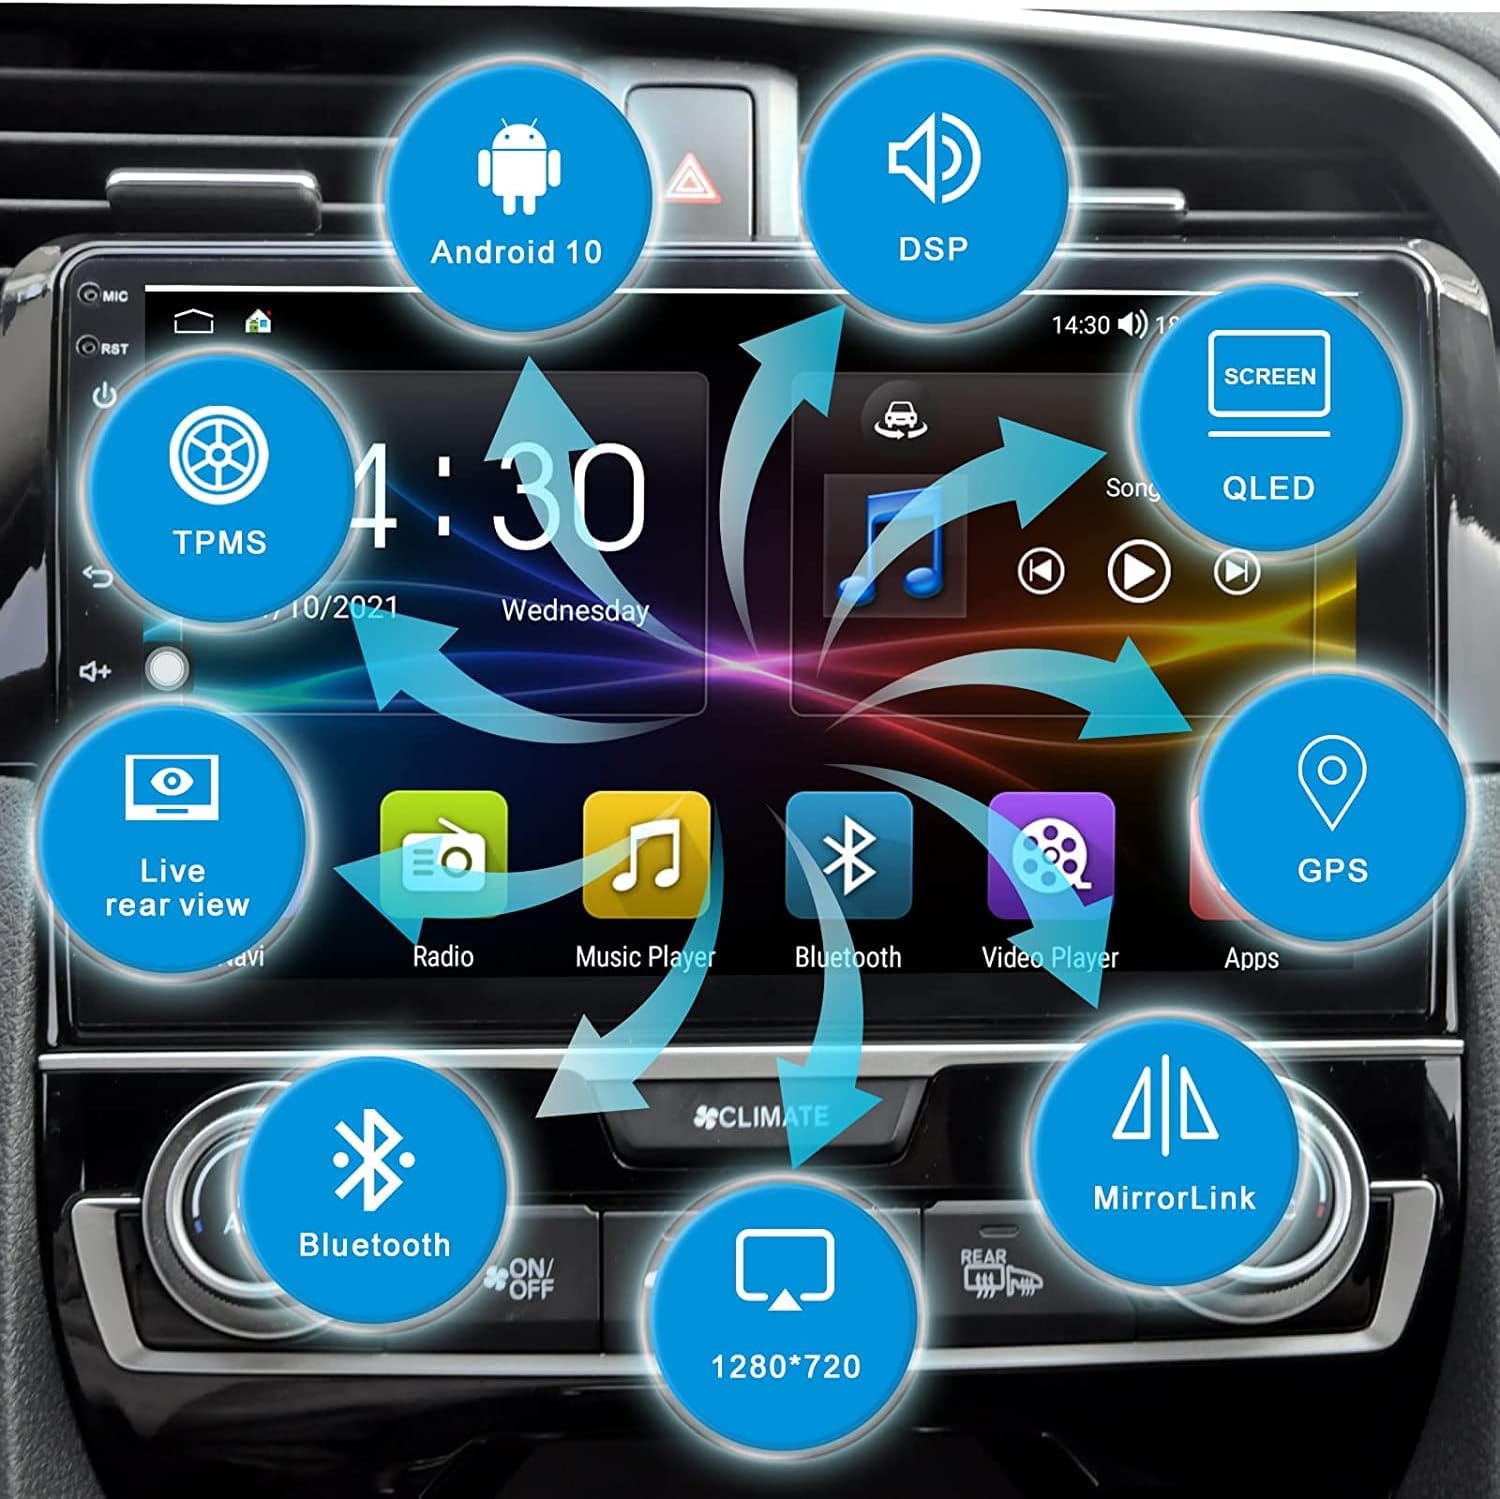
Image: An overview of the car stereo's key features and capabilities, including Android OS, DSP, QLED display, and connectivity options.
6. Maintenance
To ensure the longevity and optimal performance of your car stereo, follow these maintenance guidelines:
- Screen Cleaning: Use a soft, lint-free cloth to gently wipe the touchscreen. Avoid abrasive cleaners or solvents that could damage the display.
- Software Updates: Periodically check for software updates to ensure the system runs efficiently and has the latest features and security patches.
- Cable Connections: Ensure all cables are securely connected. Loose connections can lead to intermittent issues.
- Environmental Conditions: Avoid exposing the unit to extreme temperatures or direct sunlight for prolonged periods, as this can affect performance and lifespan.
7. Troubleshooting
If you encounter issues with your Woibugee car stereo, refer to the following common troubleshooting steps:
- No Power: Check all power connections and ensure the car battery is properly connected. Verify the unit's fuse is intact.
- No Sound: Check speaker connections and volume settings. Ensure the unit is not in mute mode. Verify DSP settings are correctly configured.
- CarPlay/Android Auto Not Connecting: Ensure your phone's Bluetooth and Wi-Fi are enabled. For wired connections, check the USB cable. Restart both the phone and the car stereo.
- Screen Issues: If the screen is unresponsive, try restarting the unit. If the screen is detached, ensure the LCD wire is properly connected.
- GPS Inaccuracy: Ensure the GPS antenna is installed in a location with a clear view of the sky. Update navigation apps if necessary.
- Bluetooth Connection Problems: Ensure your phone is in Bluetooth pairing mode and the car stereo's Bluetooth is enabled. Delete previous pairings and try reconnecting.
8. Warranty and Support
The Woibugee Single Din Car Stereo comes with a 1-Year Warranty from the date of purchase. This warranty covers manufacturing defects and malfunctions under normal use.
For technical support, warranty claims, or any operational questions not covered in this manual, please contact Woibugee customer service through the retailer where the product was purchased or visit the official Woibugee website for contact information.