1. Introduction
This manual provides detailed instructions for the proper use, maintenance, and calibration of your Mxmoonfree Digital Leeb Metal Hardness Tester Kit. Please read this manual thoroughly before operating the device to ensure accurate measurements and safe operation.
2. Package Contents
Your Mxmoonfree Digital Leeb Metal Hardness Tester Kit includes the following components:
- Digital Hardness Tester Host Unit
- Type D Sensor (Impact Device)
- Standard Hardness Block for Calibration
- USB Cable
- Small Support Ring
- User Manual
- Rugged Carrying Case
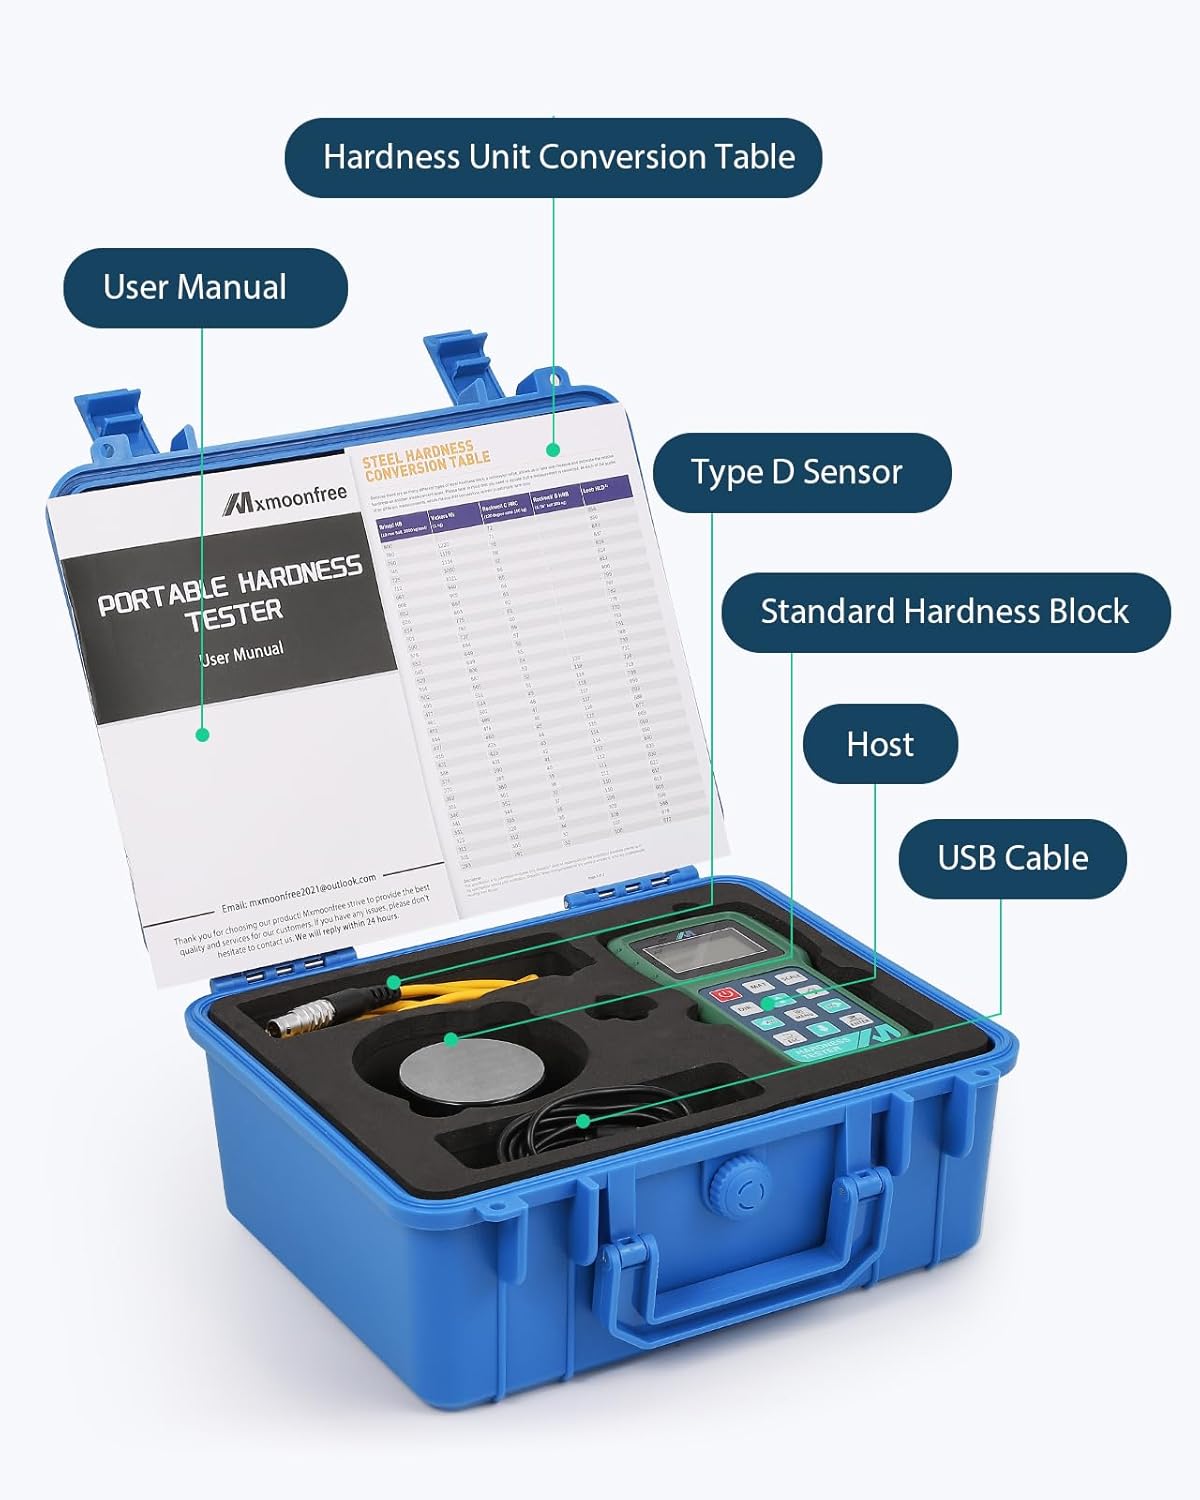
Image 2.1: The complete Mxmoonfree Digital Leeb Metal Hardness Tester Kit, including the main unit, sensor, calibration block, USB cable, and carrying case.
3. Setup
Follow these steps to set up your hardness tester for initial use:
- Unpack the Kit: Carefully remove all components from the rugged carrying case.
- Connect the Sensor: Insert the sensor cable into the designated 3-pin interface on the top of the main tester unit. Ensure a secure connection.
- Power On: Press the POWER button to turn on the device. The LCD display will illuminate.

Image 3.1: The Mxmoonfree Digital Leeb Metal Hardness Tester with the sensor (impact device) connected to the main unit.
4. Operating Instructions
4.1 Basic Hardness Measurement
The Mxmoonfree hardness tester utilizes the Leeb rebound principle for non-destructive testing. A small impact body is propelled onto the test surface, and the rebound velocity is measured to determine hardness.

Image 4.1: Diagram illustrating the Leeb rebound hardness testing principle, showing the impact body and rebound.
To perform a measurement:
- Prepare the Sample: Ensure the test surface is clean, smooth, and free from scale, oil, or other contaminants. The sample should be stable and have sufficient mass to prevent movement during impact. For small objects, use the included support ring to stabilize the tester.
- Select Material and Scale: Use the MAT button to select the material type (e.g., Steel and Cast Steel). Use the SCALE button to choose the desired hardness scale (e.g., HL, HB, HRC, HV, HS, HRB, HRA).
- Position the Sensor: Place the sensor firmly and perpendicularly on the test surface.
- Initiate Measurement: Press the button on the sensor to release the impact body. The hardness value will be displayed on the screen. Repeat measurements as needed for accuracy.
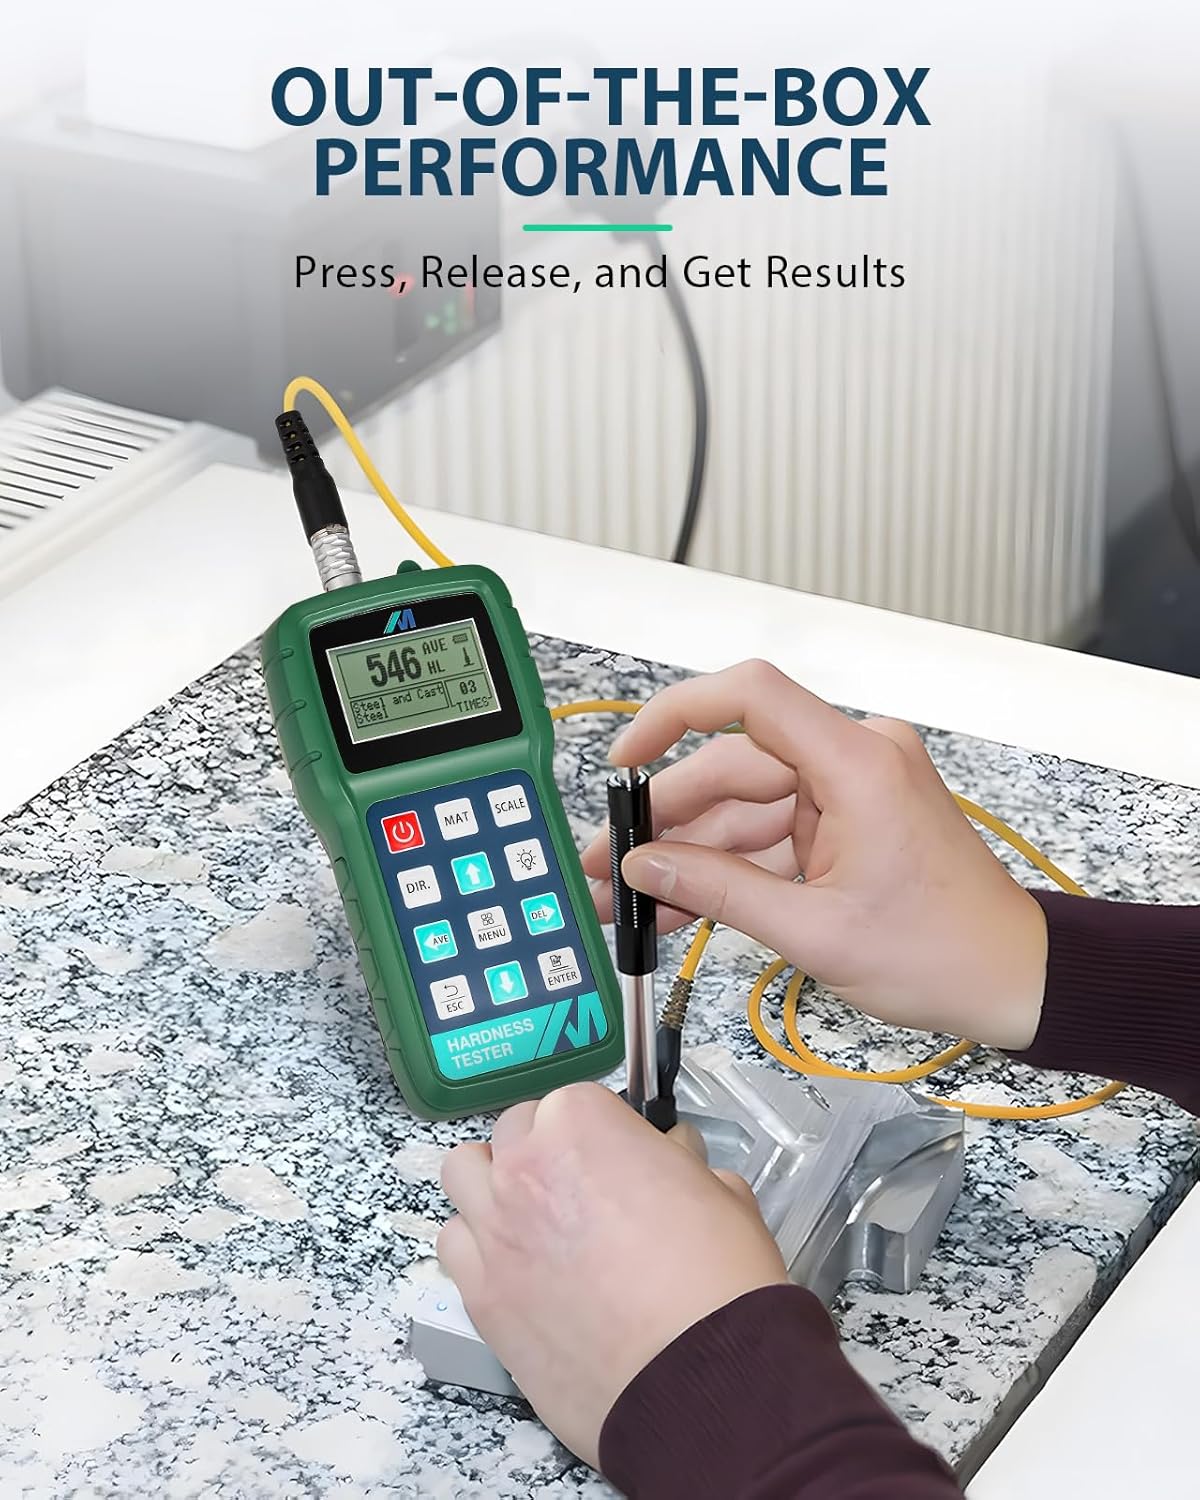
Image 4.2: A user demonstrating the ease of use by performing a hardness test on a metal workpiece.
4.2 Multi-Hardness Unit Conversion
The device supports instant conversion between up to 7 different hardness scales. After a measurement, press the SCALE button to cycle through the available units (HL, HB, HRC, HV, HS, HRB, HRA).

Image 4.3: The tester's display showing the ability to convert between multiple hardness units.
4.3 Data Output to PC Software
The Mxmoonfree hardness tester can connect to a PC for data analysis using the provided free software. Connect the device to your computer using the USB cable. The software allows for detailed analysis, storage, and reporting of your measurement data.
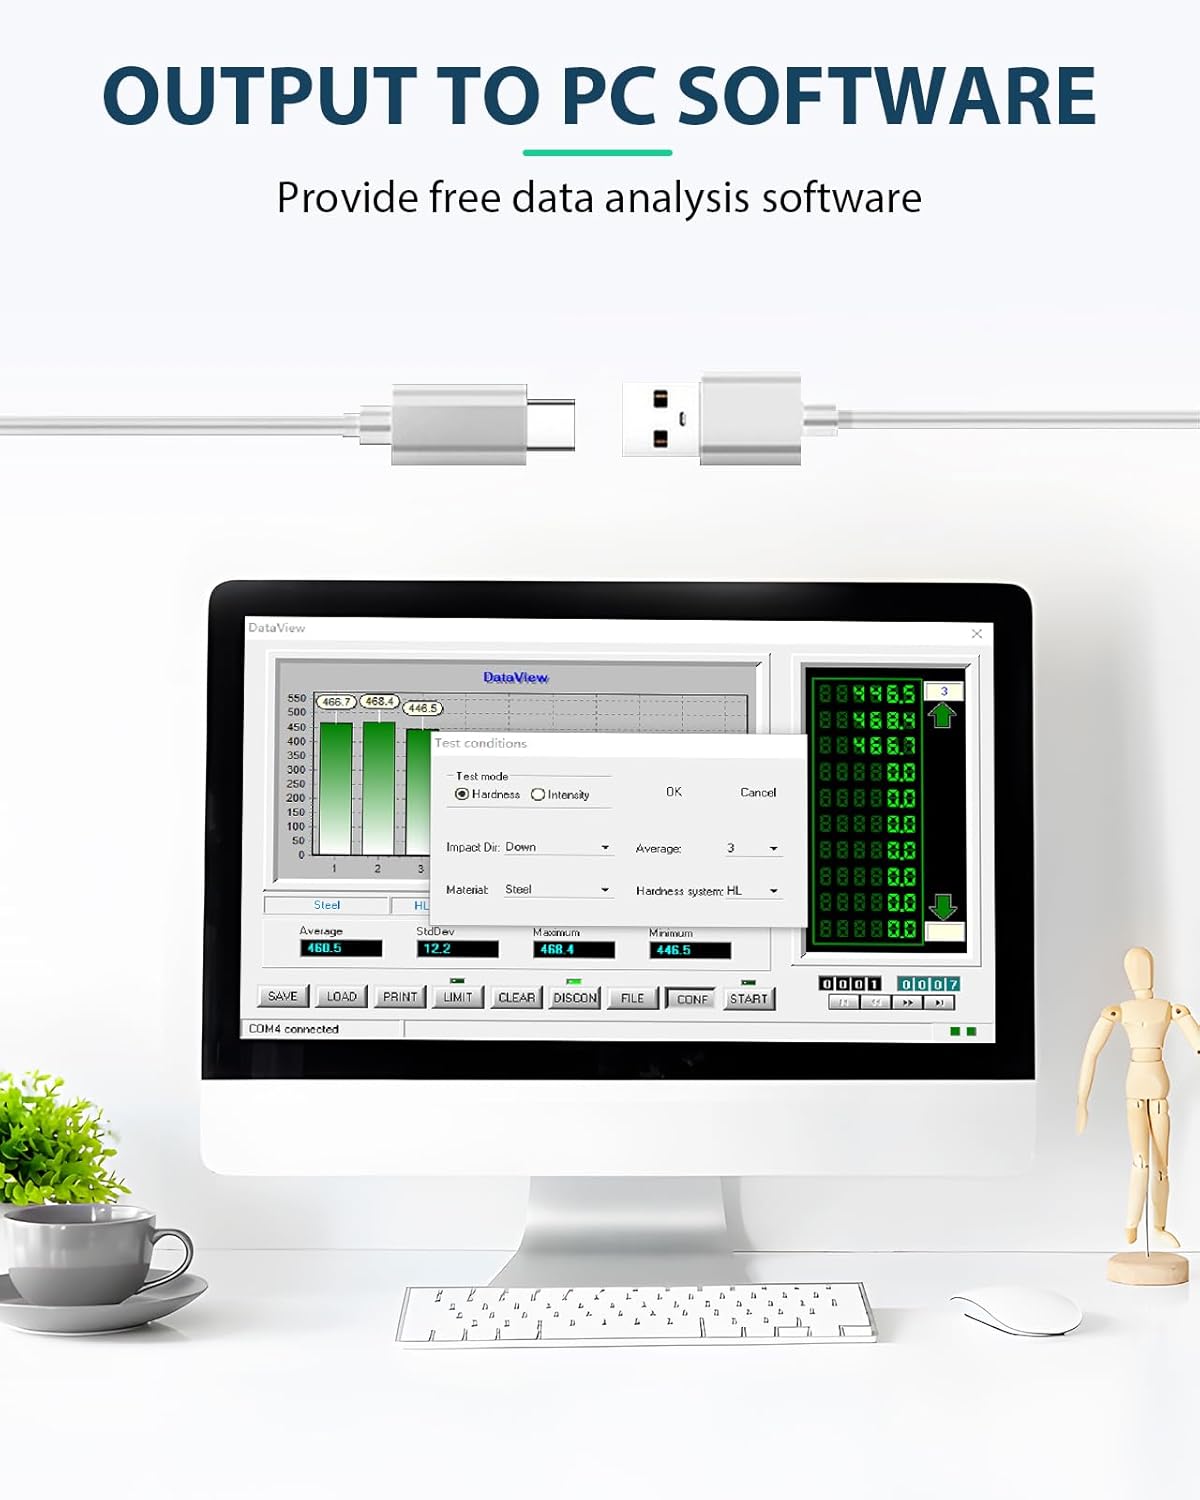
Image 4.4: The Mxmoonfree Hardness Tester connected via USB to a computer running the data analysis software.
5. Calibration
Regular calibration ensures the accuracy of your hardness tester. The kit includes a standard hardness block for this purpose. The device features a built-in software calibration function.
- Enter Calibration Mode: To access calibration mode, press and hold both the POWER button and the ENTER button simultaneously.
- Perform Measurements: Follow the on-screen prompts to perform a series of measurements (typically five) on the standard hardness block.
- Confirm Calibration: The device will display the average and nominal values. Confirm the calibration to save the settings.

Image 5.1: The standard hardness block used for calibrating the Mxmoonfree Digital Leeb Metal Hardness Tester.
Video 5.1: This video demonstrates the process of performing measurements and calibrating the Mxmoonfree Digital Leeb Metal Hardness Tester using the standard hardness block.
6. Maintenance
Proper maintenance ensures the longevity and accuracy of your device.
- Cleaning: Regularly wipe the device and sensor with a soft, dry cloth. Avoid using abrasive cleaners or solvents.
- Storage: Store the hardness tester and its accessories in the provided rugged carrying case when not in use. Keep it in a dry environment, away from extreme temperatures and direct sunlight.
- Impact Device Care: Ensure the impact device is clean and free of debris. Do not lubricate the impact device unless specifically instructed by Mxmoonfree support.
7. Troubleshooting
If you encounter issues with your Mxmoonfree Digital Leeb Metal Hardness Tester, consider the following:
- Inaccurate Readings: If you suspect inaccurate readings, perform a calibration using the standard hardness block as described in Section 5. Ensure the test surface is properly prepared and the sensor is positioned correctly.
- Device Not Powering On: Check the battery level. If the device uses replaceable batteries, ensure they are inserted correctly and are not depleted.
- Connectivity Issues (PC Software): Ensure the USB cable is securely connected to both the tester and the PC. Verify that the PC software is installed correctly. If you experience issues with USB connectivity, contact customer support, as some units may have had manufacturing variations.
- Sensor Malfunction: If the sensor does not impact or rebound correctly, ensure it is clean and properly connected. Avoid dropping or subjecting the sensor to harsh impacts.
For persistent issues or technical support, please refer to Section 9: Warranty and Support.
8. Specifications
Key specifications for the Mxmoonfree Digital Leeb Metal Hardness Tester Kit:
- Package Dimensions: 11.73 x 10.12 x 6.26 inches
- Weight: 5.95 Pounds
- Hardness Scales: HL, HB, HRC, HV, HS, HRB, HRA
- Impact Device Type: D-type (standard)
- Connectivity: 3-pin interface for sensor, USB for PC data output
8.1 Measurement Range
The device supports hardness measurements across various materials as detailed in the table below:

Image 8.1: Table detailing the measurement ranges for different materials and hardness scales.
| Materials | HRC | HRB | HRA | HB | HV | HS |
|---|---|---|---|---|---|---|
| Steel and Cast Steel | 17.9-68.5 | 59.6-99.6 | 59.1-85.8 | 80-651 | 83-976 | 33.1-110.1 |
| Stainless Steel | 46.5-101.7 | 85-655 | 85-802 | |||
| Cold Work Tool Steel | 20.4-67.1 | 80-898 | ||||
| Hammered Steel | 143-650 | |||||
| Cast Aluminum Alloys | 23.8-84.6 | 19-164 | ||||
| Grey Cast Iron | 93-334 | |||||
| Nodular Cast Iron | 131-387 | |||||
| Brass | 13.5-95.3 | 40-173 | ||||
| Bronze | 60-290 | |||||
| Wrought Copper Alloys | 45-315 |
9. Warranty and Support
Mxmoonfree is committed to providing high-quality products and excellent customer service.
- Warranty: Your Mxmoonfree Digital Leeb Metal Hardness Tester Kit comes with a two-year warranty, covering free parts and ongoing maintenance.
- Technical Support: Our dedicated support team is available to assist you with any questions, concerns, or issues you may encounter. We also provide free PC analysis software and guides to support your testing process.
- Contact: For assistance, please refer to the contact information provided in your product packaging or visit the official Mxmoonfree website.