1. Introduction
Thank you for choosing the Audiocrazy AM/FM/SW1-2 Shortwave Transistor Radio. This manual provides essential information for the safe and efficient operation of your new radio. Please read it thoroughly before use and retain it for future reference.
2. Important Safety Instructions
- Do not expose the radio to rain, moisture, or extreme temperatures.
- Avoid dropping the radio or subjecting it to strong impacts.
- Do not disassemble the radio. Refer all servicing to qualified personnel.
- Use only specified power sources (AC adapter or D-size batteries).
- Keep the radio away from strong magnetic fields.
- Dispose of batteries responsibly according to local regulations.
3. Package Contents
Ensure all items are present upon unpacking:
- Audiocrazy AM/FM/SW1-2 Shortwave Transistor Radio
- AC Power Cord
- User Manual (this document)
4. Product Overview
Familiarize yourself with the radio's components:
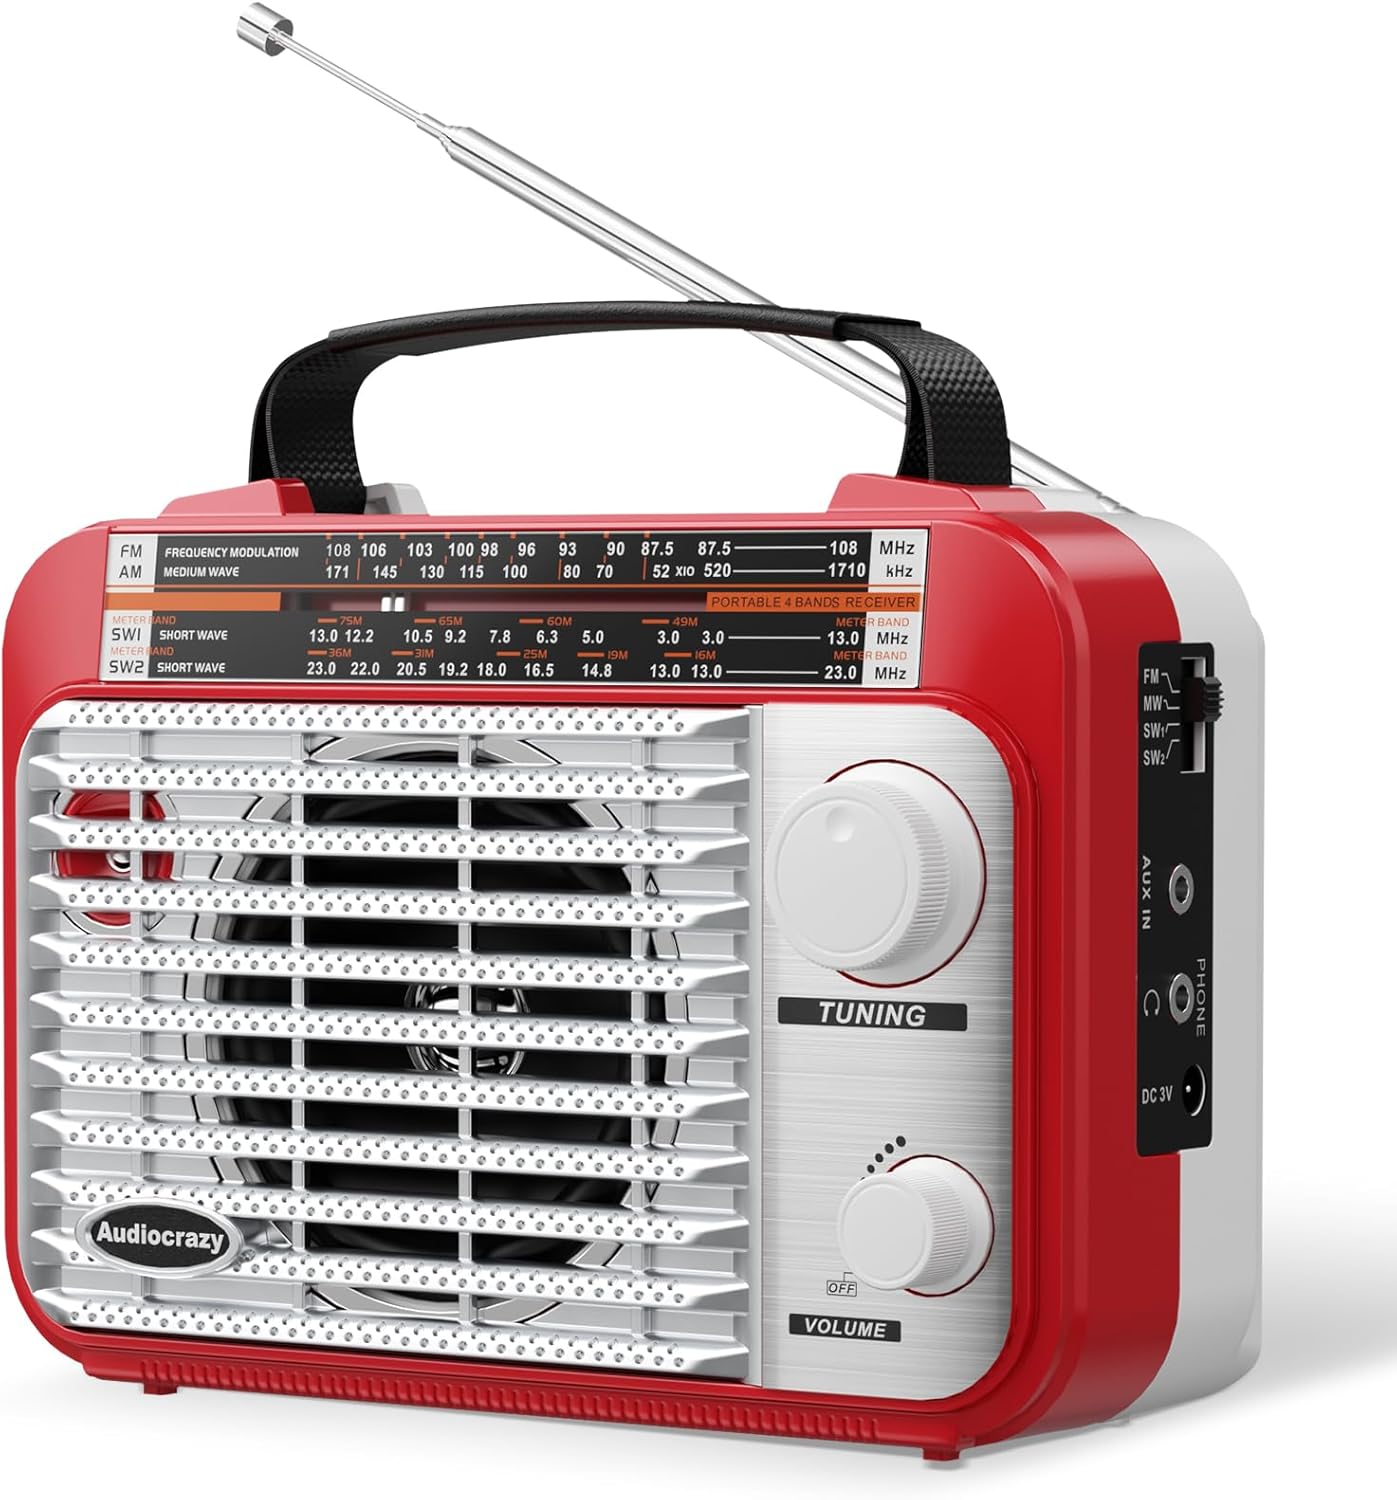
Figure 1: Front view of the Audiocrazy AM/FM/SW1-2 Shortwave Transistor Radio. It features a large speaker grille, a tuning dial, and volume and tuning knobs.
- Telescopic Antenna: Extend for optimal reception.
- Band Selector Switch: Selects FM, AM, SW1, or SW2 bands.
- Tuning Knob: Adjusts frequency to find radio stations.
- Volume Knob: Controls audio output level and power ON/OFF.
- Speaker: Provides audio output.
- Tuning Dial: Displays the current frequency.
- AUX In Jack: For connecting external audio devices.
- 3.5mm Earphone Jack: For private listening.
- AC Power Input: For connecting the AC power cord.
- Battery Compartment: Holds 2 x D-size batteries.

Figure 2: Detailed view of the tuning knob, AUX in port, and 3.5mm earphone jack on the side of the radio.
5. Setup
5.1 Power Options
Your radio can be powered by three methods:
- AC Power: Connect the provided AC power cord to the radio's AC input and a standard 120V AC wall outlet.
- D-Size Batteries: Open the battery compartment on the back of the radio and insert 2 x D-size batteries (not included), ensuring correct polarity.
- Built-in Rechargeable Battery: The radio includes a built-in rechargeable battery for portable use. It charges automatically when connected to AC power.

Figure 3: Illustration of the three power options available for the radio: AC adapter, internal rechargeable battery, and external D-size batteries.
6. Operating Instructions
6.1 Turning On/Off and Volume Control
- To turn the radio ON, rotate the Volume Knob clockwise until you hear a click and the volume increases.
- To adjust the volume, continue rotating the Volume Knob.
- To turn the radio OFF, rotate the Volume Knob counter-clockwise until it clicks.
6.2 Radio Reception
- Extend the Telescopic Antenna: For best reception, fully extend the telescopic antenna and adjust its direction.
- Select a Band: Use the Band Selector Switch to choose between FM, AM, SW1, or SW2.
- Tune to a Station: Slowly rotate the Tuning Knob to scan for available radio stations. The tuning dial will indicate the frequency.

Figure 4: The radio's antenna extended, illustrating its capability for 360-degree signal capture across multiple bands.
6.3 Using the AUX In Jack
Connect an external audio device (e.g., smartphone, MP3 player) to the radio using a 3.5mm audio cable (not included) plugged into the AUX In Jack. The radio will automatically switch to AUX input mode.
6.4 Using the Earphone Jack
For private listening, plug 3.5mm earphones (not included) into the 3.5mm Earphone Jack. The radio's speaker will be muted automatically.

Figure 5: A user enjoying private listening with headphones connected to the radio's earphone jack.
6.5 Video Demonstration
For a visual guide on the radio's features and operation, please watch the official product video:
Video 1: Official Audiocrazy product video demonstrating the radio's features and ease of use.
7. Maintenance
- Cleaning: Wipe the radio with a soft, dry cloth. Do not use liquid cleaners or abrasive materials.
- Storage: If storing the radio for an extended period, remove the D-size batteries to prevent leakage. Store in a cool, dry place.
- Antenna Care: Handle the telescopic antenna gently to prevent bending or breakage.
8. Troubleshooting
| Problem | Possible Cause | Solution |
|---|---|---|
| No power | Batteries are depleted or incorrectly inserted; AC cord not connected. | Replace batteries, check polarity, or ensure AC cord is securely plugged in. |
| Poor reception | Antenna not extended or positioned correctly; weak signal area. | Fully extend and adjust the telescopic antenna. Try moving the radio to a different location. |
| No sound from speaker | Volume too low; earphones connected; radio in AUX mode without external device. | Increase volume. Disconnect earphones. Ensure an external device is connected to AUX or switch to a radio band. |
| Sound distorted | Weak signal; volume too high. | Adjust antenna and tuning. Lower the volume. |
9. Specifications
| Feature | Detail |
|---|---|
| Model | AC-Q2AR-RW |
| Frequency Range | FM: 87.5-108MHz, AM: 520-1710KHz, SW: 3.5-23MHZ |
| Power Source | AC 120V, 2 x D-size batteries (not included), Built-in rechargeable battery |
| Audio Output | Integrated speaker, 3.5mm earphone jack |
| Connectivity | AUX In (3.5mm) |
| Dimensions (L x H x W) | 16 cm x 11 cm x 5.5 cm (approx. 6.3 x 4.33 x 2.16 inches) |
| Weight | Approx. 500g (1.1 lbs) |
| Material | Plastic |
10. Warranty and Support
For warranty information or technical support, please refer to the contact details provided with your purchase or visit the official Audiocrazy website. Keep your proof of purchase for warranty claims.


