1. Introduction
The WEESTA 21QT Air Fryer Toaster Oven Pro is a versatile 5-in-1 countertop appliance designed to simplify your cooking experience. It combines the functions of an air fryer, toaster oven, convection oven, broiler, and baker, allowing you to prepare a wide variety of meals with ease. This manual provides essential information for safe operation, maintenance, and optimal use of your appliance.
2. Important Safety Instructions
When using electrical appliances, basic safety precautions should always be followed to reduce the risk of fire, electric shock, and injury to persons, including the following:
- Read all instructions before using the appliance.
- Do not touch hot surfaces. Use handles or knobs.
- To protect against electric shock, do not immerse cord, plugs, or the appliance in water or other liquid.
- Close supervision is necessary when any appliance is used by or near children.
- Unplug from outlet when not in use and before cleaning. Allow to cool before putting on or taking off parts.
- Do not operate any appliance with a damaged cord or plug, or after the appliance malfunctions or has been damaged in any manner.
- The use of accessory attachments not recommended by the appliance manufacturer may cause injuries.
- Do not use outdoors.
- Do not let cord hang over edge of table or counter, or touch hot surfaces.
- Do not place on or near a hot gas or electric burner, or in a heated oven.
- Extreme caution must be used when moving an appliance containing hot oil or other hot liquids.
- To disconnect, turn any control to 'off', then remove plug from wall outlet.
- Do not use appliance for other than intended use.
- Ensure proper ventilation around the appliance during operation.
- The oven features a Double Glass Door and 1 Inch Thick Heat Insulation to help maintain internal temperature and prevent accidental burns. Always exercise caution when opening the door.
- The Anti-Slip Suction Base helps keep the oven stable on the counter.

Image: Safety features of the WEESTA Air Fryer Toaster Oven Pro, including the double glass door, thick heat insulation, wall protection support, and anti-slip suction base.
3. Product Components
Your WEESTA Air Fryer Toaster Oven Pro comes with the following accessories:
- Air Fryer Basket: Ideal for air frying foods like fries, chicken wings, and vegetables, allowing hot air to circulate evenly.
- Oven Gripper: A tool designed to safely remove hot racks and pans from the oven.
- Oven Rack: Used for baking, roasting, or toasting items.
- Baking Pan: Suitable for baking cakes, cookies, or catching drips from items on the oven rack.
- Crumb Tray (pre-installed): Collects crumbs and food debris for easy cleaning. Ensure it is always in place during operation.

Image: The WEESTA Air Fryer Toaster Oven Pro and its various accessories, including the air fryer basket, oven gripper, oven rack, baking pan, and crumb tray.
4. Setup
- Unpack: Carefully remove all packaging materials, including any internal packing and accessories.
- Placement: Place the oven on a stable, level, heat-resistant surface. Ensure there is at least 4 inches (10 cm) of space on all sides of the oven for proper air circulation. Do not place it directly against a wall or under cabinets without adequate clearance.
- Initial Cleaning: Before first use, wipe the interior and exterior of the oven with a damp cloth. Wash all accessories (Air Fryer Basket, Oven Rack, Baking Pan, Oven Gripper) in warm, soapy water, rinse thoroughly, and dry completely.
- First Use Burn-Off: It is recommended to run the oven empty for about 15 minutes at 400°F (200°C) on the 'Bake' function to burn off any manufacturing residues. A slight odor or smoke may be present during this process; this is normal. Ensure the area is well-ventilated.
5. Operating Instructions
The WEESTA Air Fryer Toaster Oven Pro features three control knobs for temperature, function, and timer.

Image: The control panel and various cooking functions (Broil, Air Roast, Air Fry, Toast, Bake) of the WEESTA Air Fryer Toaster Oven Pro.
Control Knobs:
- Temperature Knob: Adjusts the cooking temperature from 150°F to 450°F.
- Function Knob: Selects the desired cooking mode: Toast, Air Fry, Air Roast, Broil, or Bake.
- Timer Knob: Sets the cooking time up to 60 minutes. The oven will automatically turn off when the timer reaches zero. For continuous cooking, turn the timer past the 60-minute mark to the 'Stay On' position.
Cooking Functions:
The oven utilizes Cubic Hot Wind Circulation Technology and ALL-Direction Hot Air Circulation for efficient and even cooking, often eliminating the need for preheating or flipping food.

Image: Visual representation of the ALL-Direction Hot Air Circulation technology within the oven, ensuring fast, even, and tasty cooking.
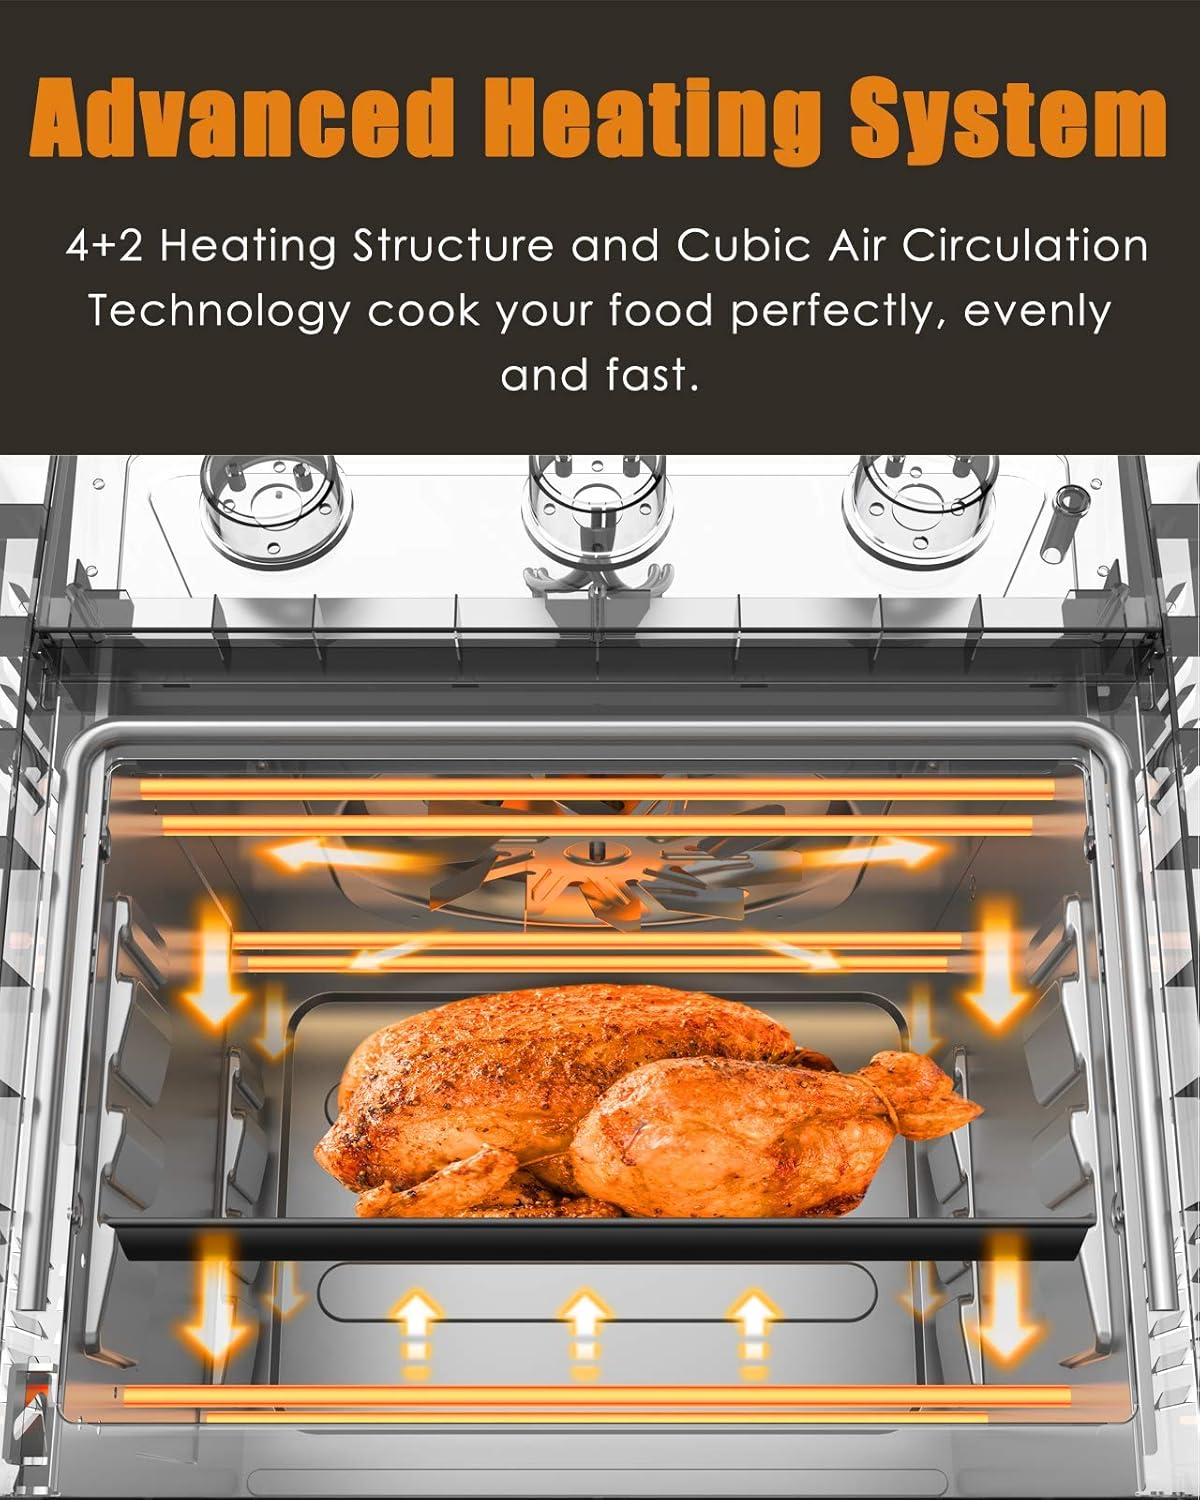
Image: Detailed view of the oven's advanced heating system, highlighting the 4+2 heating structure and cubic air circulation for perfect, even, and fast cooking.
- Air Fry: Use the Air Fryer Basket. This function is ideal for achieving crispy results with minimal oil, such as for fries, chicken wings, and vegetables. Set the Function knob to 'Air Fry', adjust Temperature, and set Timer.
- Air Roast: Use the Oven Rack or Baking Pan. Perfect for roasting meats like chicken, beef, or vegetables with a crispy exterior and tender interior. Set the Function knob to 'Air Roast', adjust Temperature, and set Timer.
- Toast: Use the Oven Rack. For toasting bread, bagels, or waffles. Set the Function knob to 'Toast', adjust Temperature (typically 350-400°F), and set Timer according to desired browning.
- Broil: Use the Oven Rack or Baking Pan. Best for quick cooking of thinner cuts of meat, browning the top of casseroles, or melting cheese. Place food closer to the top heating elements. Set the Function knob to 'Broil', adjust Temperature (usually high), and set Timer. Monitor closely to prevent burning.
- Bake: Use the Oven Rack with a Baking Pan. Suitable for baking cakes, cookies, casseroles, and other dishes that require even heat. Set the Function knob to 'Bake', adjust Temperature, and set Timer.
6. Cleaning and Maintenance
Regular cleaning ensures optimal performance and extends the life of your appliance. Always unplug the oven and allow it to cool completely before cleaning.

Image: The interior of the oven being cleaned, demonstrating the easy-clean galvanized steel material of the inner tank and crumb tray.
- Interior: The inner tank and crumb tray are made of Galvanized Steel, which is an easy-clean material. Wipe the interior walls with a damp cloth and mild detergent. For stubborn stains, a non-abrasive cleaner can be used. Avoid abrasive pads or harsh chemicals.
- Exterior: Wipe the exterior with a damp cloth. Do not use abrasive cleaners or scourers as they may damage the finish.
- Accessories: Wash the Air Fryer Basket, Oven Rack, Baking Pan, and Oven Gripper in warm, soapy water. Rinse thoroughly and dry completely before storing or reusing. The Crumb Tray should be emptied and cleaned regularly.
- Heating Elements: Do not attempt to clean the heating elements. If food splatters on them, they will burn off during subsequent use.
7. Troubleshooting
| Problem | Possible Cause | Solution |
|---|---|---|
| Appliance does not turn on. | Not plugged in; power outlet not working; timer not set. | Ensure the power cord is securely plugged into a working outlet. Set the timer to the desired cooking duration or 'Stay On'. |
| Food is not cooking evenly. | Overcrowding the basket/rack; incorrect temperature/time. | Avoid overcrowding; cook in smaller batches if necessary. Ensure correct temperature and time settings for the food type. |
| Smoke coming from the oven. | Food residue on heating elements; excessive oil/grease; fatty food. | Clean the crumb tray and interior thoroughly. Trim excess fat from food. A small amount of smoke during initial use is normal. |
| Food is not crispy when air frying. | Too much moisture in food; overcrowding; insufficient cooking time/temperature. | Pat food dry before air frying. Do not overcrowd the basket. Increase cooking time or temperature slightly. |
8. Specifications
- Model Name: Air Fryer Toaster Oven Pro
- Brand: WEESTA
- Capacity: 19 Quarts (21QT stated in title refers to overall capacity, inner tank is 19QT)
- Inner Tank Size: 11.4" (Width) x 10.2" (Depth) x 9.8" (Height) inches
- Product Dimensions: 9.8"D x 11.4"W x 9.8"H (Note: These dimensions appear to be for the inner tank based on context, not external product dimensions)
- Wattage: 1300 watts
- Control Type: Knob
- Material: Galvanized Steel (inner tank and crumb tray)
- Door Style: Dropdown Door

Image: The WEESTA Air Fryer Toaster Oven Pro displaying its 19-quart capacity and external dimensions of approximately 15.07 inches wide and 14.13 inches high.
9. Warranty and Support
WEESTA provides a 1-year quality warranty for all customers. This warranty covers defects in materials and workmanship under normal use. Please retain your proof of purchase for warranty claims.
For technical assistance, troubleshooting not covered in this manual, or warranty inquiries, please contact WEESTA customer support through the retailer where the product was purchased or refer to the official WEESTA website for contact information.