1. Introduction
This manual provides instructions for the safe and efficient operation of your SENDERPICK Thermal Copier Tattoo Stencil Machine. This professional thermal copier is designed for creating high-quality tattoo stencils quickly and easily, significantly improving work efficiency for tattoo artists and enthusiasts. Please read this manual thoroughly before use and retain it for future reference.
2. Safety Information
- Ensure the power supply matches the machine's requirements (AC 110-220V).
- Do not operate the machine in wet or damp conditions.
- Keep the machine away from heat sources and direct sunlight.
- Avoid touching the thermal print head (TPH) immediately after use, as it may be hot.
- If an error warning sounds or the error indicator lights up, the machine will stop copying immediately. Disconnect power and allow the machine to cool down before inspecting. This indicates TPH overheating protection.
- Do not attempt to disassemble or repair the machine yourself. Contact qualified service personnel.
3. Product Overview
The SENDERPICK Thermal Copier is a compact and lightweight device, weighing only 1.8 kg, making it suitable for various workspaces. It is constructed from durable ABS material for long-term use. The machine supports A4 size paper for fast and low-noise stencil printing.
Components and Controls

Figure 3.1: Front view of the thermal copier with stencil paper being fed. The original design is placed on top, and the stencil paper is fed through the slot.

Figure 3.2: The thermal copier with its lid open, revealing the paper feed mechanism. A smaller inset shows the machine in operation with paper.
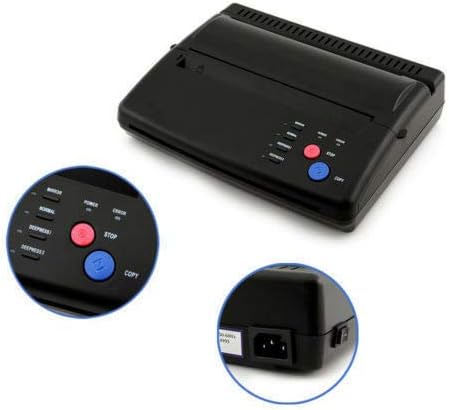
Figure 3.3: Detailed view of the control panel with buttons for Mirror, Normal, Photo, Deepness I, Deepness II, Stop, and Copy. Also shown is the power input port and power switch on the side.

Figure 3.4: A comparison demonstrating the original design on the right and the thermal stencil copy on the left, highlighting the transfer quality.
The control panel features buttons for various settings, including Mirror and Normal copy modes, Photo and Fine resolution, and two depth settings (Deepness I and Deepness II) for stencil intensity. It also includes Stop and Copy buttons for operation control. Two indicator lights are present: a Power light that illuminates when the machine is operating, and an Error light that indicates issues such as TPH overheating.
4. Setup
- Unpacking: Carefully remove the thermal copier from its packaging. Ensure all components, including the power cable and user manual, are present.
- Placement: Place the machine on a stable, flat surface with adequate ventilation.
- Power Connection: Connect the provided power cable to the machine's power input port (refer to Figure 3.3) and then plug it into a compatible AC 110-220V power outlet.
- Power On: Flip the power switch located near the power input port to the 'ON' position. The Power indicator light should illuminate.
5. Operating Instructions
- Prepare Your Design: Ensure your original design is clear and on standard A4 paper. For best results, use high-quality black and white designs.
- Select Copy Mode:
- Press the Mirror button for a mirrored copy (essential for tattoo stencils).
- Press the Normal button for a standard, non-mirrored copy.
- Select Resolution:
- Press the Photo button for designs with shading or photographic elements.
- Press the Fine button for line art or designs requiring high detail.
- Adjust Deepness:
- Press Deepness I for lighter stencil transfers.
- Press Deepness II for darker, more pronounced stencil transfers.
- Load Original Document: Open the top cover of the machine. Carefully insert your original design face down into the input slot. Ensure it is aligned straight.
- Load Stencil Paper: Insert the thermal stencil paper (A4 size, 0.06mm-0.15mm thickness) into the paper feed slot. The glossy side of the stencil paper should face up.
- Start Copying: Press the Copy button. The machine will feed the original document and stencil paper, creating the transfer. The process typically takes about one minute.
- Stop Copying: To stop the copying process at any time, press the Stop button.
- Retrieve Stencil: Once the copying is complete, carefully remove the original document and the newly created stencil from the output tray.
6. Maintenance
- Cleaning: Regularly clean the exterior of the machine with a soft, dry cloth. Do not use abrasive cleaners or solvents.
- Internal Cleaning: Periodically open the top cover and gently clean any dust or paper residue from the paper path and around the thermal print head using a soft brush or compressed air. Ensure the machine is unplugged before cleaning.
- Thermal Print Head (TPH): The TPH is a sensitive component. Avoid touching it directly. If an error occurs due to overheating, allow the machine to cool down completely before resuming operation.
- Storage: When not in use, store the machine in a cool, dry place, away from direct sunlight and excessive humidity.
7. Troubleshooting
| Problem | Possible Cause | Solution |
|---|---|---|
| Machine does not power on. | Power cable not connected; power switch off; power outlet malfunction. | Check power cable connection. Ensure power switch is ON. Test power outlet with another device. |
| Error indicator lights up / Machine stops copying. | Thermal Print Head (TPH) overheating. | Press the Stop button if not already stopped. Disconnect power and allow the machine to cool down for at least 10-15 minutes before resuming operation. Ensure adequate ventilation. |
| Poor copy quality (too light/dark, blurry). | Incorrect deepness setting; low-quality original design; incorrect resolution setting; dirty TPH. | Adjust Deepness I/II settings. Use a clear, high-contrast original. Select appropriate Photo/Fine resolution. Clean the TPH as per maintenance instructions. |
| Paper jams. | Improper paper loading; paper too thick/thin; foreign object in paper path. | Ensure paper is loaded straight and within specified thickness (0.06mm-0.15mm). Open cover and carefully remove any jammed paper or obstructions. |
8. Specifications
| Feature | Detail |
|---|---|
| Brand | SENDERPICK |
| Model | A4 |
| Color | Black |
| Effective Scanning Width | 210 mm |
| Document Type | Photo |
| Document Thickness | 0.06 mm - 0.15 mm |
| Power | AC 110-220V, 0.46A |
| Weight | 1.80 kg |
| Scanning Mode | CIS |
| Scanning Resolution (H) | 8 dots/mm |
| Scanning Resolution (V) | 7.7 lines/mm |
| Document Size | A4 |
| Recording Mode | TPH |
| Power Consumption (Standby) | 5 W |
| Operating Temperature | 5 - 35 °C |
| Relative Humidity | 20 - 80 % |
| Package Dimensions | 290 x 280 x 80 mm |
| UPC | 723509051372 |
| GTIN | 723509051372 |
9. Warranty and Support
For warranty information and technical support, please refer to the documentation provided at the time of purchase or contact your retailer or the manufacturer directly. Keep your proof of purchase for warranty claims.