1. Introduction
Thank you for choosing the HOMCOM Floor Standing Jewelry Cabinet. This elegant and functional piece of furniture is designed to organize your jewelry and accessories efficiently, featuring a full-length mirror with integrated LED lighting and a secure, lockable design. Please read this manual thoroughly before assembly and use to ensure proper installation and safe operation.

Image: The HOMCOM Floor Standing Jewelry Cabinet, showcasing its full-length mirror with LED lights and the interior storage when open.
2. Safety Information
- Always assemble the product on a soft, clean surface to prevent scratches.
- Ensure all parts are present and undamaged before beginning assembly.
- Do not overtighten screws during assembly to avoid damaging the material.
- Keep small parts and packaging materials away from children and pets.
- Place the cabinet on a flat, stable surface to prevent tipping.
- Do not hang on the cabinet door or apply excessive force to the mirror.
- Disconnect power to the LED lights before cleaning or maintenance.
3. Package Contents
Please verify that all components listed below are included in your package. If any parts are missing or damaged, please contact HOMCOM customer support.
- Jewelry Cabinet Body with Mirror
- Base/Stand Components
- Assembly Hardware (screws, bolts, etc.)
- Keys (2 included for lockable design)
- Instruction Manual
4. Assembly Instructions
Assembly is required for this product. Please follow these general steps. Refer to the detailed assembly diagram included in your package for specific part identification and sequence.
- Unpack and Identify Parts: Carefully remove all components from the packaging. Lay them out on a soft, clean surface. Identify each part using the provided parts list.
- Assemble the Base: Connect the base components according to the diagram, ensuring all connections are secure.
- Attach the Cabinet Body to the Base: Carefully lift the main cabinet body and align it with the assembled base. Secure it using the designated hardware. It is recommended to have two people for this step to prevent damage or injury.
- Adjust Mirror Angle Mechanism: Ensure the adjustable angle mechanism at the back of the mirror is correctly installed and allows for smooth adjustment.
- Final Checks: Once assembled, gently test the stability of the cabinet. Ensure the door opens and closes smoothly and the lock functions correctly.

Image: Illustration demonstrating the adjustable angles of the full-length mirror for optimal viewing.
5. Features
- Freestanding Design: This jewelry armoire is designed to stand freely, allowing flexible placement within your room. The mirror offers three adjustable angles for a customized view.
- Integrated LED Lights: The full-length mirror features built-in LED strips, providing bright illumination for dressing and makeup application. The lights are controlled by a touch-sensitive switch.
- Ample Storage Capacity: The interior is thoughtfully designed to accommodate a wide range of jewelry and accessories:
- 100 earring slots
- 1 bracelet hanger
- 24 necklace hooks
- 105 ring slots
- 5-tier storage shelves for cosmetics and other essentials

Image: Detailed view of the interior storage, highlighting the various compartments for earrings, rings, necklaces, and shelves.
- Lockable Design: The cabinet door is equipped with a lock and comes with two keys, ensuring the security of your valuables.
6. Setup
- Choose Location: Select a flat, stable surface for the cabinet, preferably against a wall to prevent accidental tipping. Ensure there is enough space for the door to open fully.
- Adjust Mirror Angle: Use the adjustable mechanism at the back of the mirror to set your preferred viewing angle.
- Connect Power (for LED): Plug the power cord for the LED lights into a standard electrical outlet. Ensure the cord is not a tripping hazard.

Image: The jewelry cabinet positioned in a room, demonstrating its aesthetic and functional integration.
7. Operating Instructions
- Using the LED Lights: Locate the touch-sensitive switch on the mirror surface. Gently touch the switch to turn the LED lights on or off.
- Locking and Unlocking: Insert one of the provided keys into the lock located on the side of the cabinet door. Turn the key to lock or unlock the cabinet. Always remove the key after locking to prevent loss or unauthorized access.
- Organizing Jewelry: Utilize the various compartments for their intended purpose (earring slots, necklace hooks, ring slots, shelves) to keep your items organized and easily accessible.

Image: A close-up of the circular touch switch on the mirror, used to control the LED lights.

Image: A detailed view of the lock and key, demonstrating the security feature of the cabinet.
8. Maintenance
- Cleaning the Mirror: Use a soft, lint-free cloth and a glass cleaner to wipe the mirror surface. Avoid abrasive cleaners that may scratch the mirror or damage the LED components.
- Cleaning the Cabinet: Wipe the exterior and interior surfaces with a soft, damp cloth. For stubborn marks, a mild soap solution can be used, followed by drying with a clean cloth.
- Hardware Check: Periodically check all screws and connections to ensure they remain tight and secure. Tighten if necessary.
- Avoid Moisture: Keep the cabinet away from excessive moisture or direct sunlight to prevent warping or damage to the engineered wood.
9. Troubleshooting
| Problem | Possible Cause | Solution |
|---|---|---|
| LED lights do not turn on. | Not plugged in; power outage; faulty connection; touch switch issue. | Ensure power cord is securely plugged in. Check power outlet. Verify all internal connections are secure. Gently touch the switch again. |
| Cabinet door does not close properly. | Misalignment; obstruction; loose hinges. | Check for any items obstructing the door. Inspect hinges for looseness and tighten if needed. Ensure the cabinet is on a level surface. |
| Cabinet feels unstable or wobbly. | Uneven floor; loose assembly hardware. | Relocate to a level surface or use shims under the base. Retighten all assembly screws and bolts. |
| Lock mechanism is stiff or not working. | Key not fully inserted; internal mechanism issue. | Ensure the key is fully inserted and turned correctly. Do not force the key. If issues persist, contact customer support. |
10. Specifications
- Brand: HOMCOM
- Model: 831-463V80GY
- Color: Grey
- Material: Engineered Wood
- Overall Dimensions (W x D x H): 18" x 14.25" x 59.75"
- Mirror Dimensions (L x W): 42.25" x 14"
- Item Weight: Approximately 25.96 lbs
- Special Features: Lockable, LED Light, Adjustable Angles
- Assembly: Required
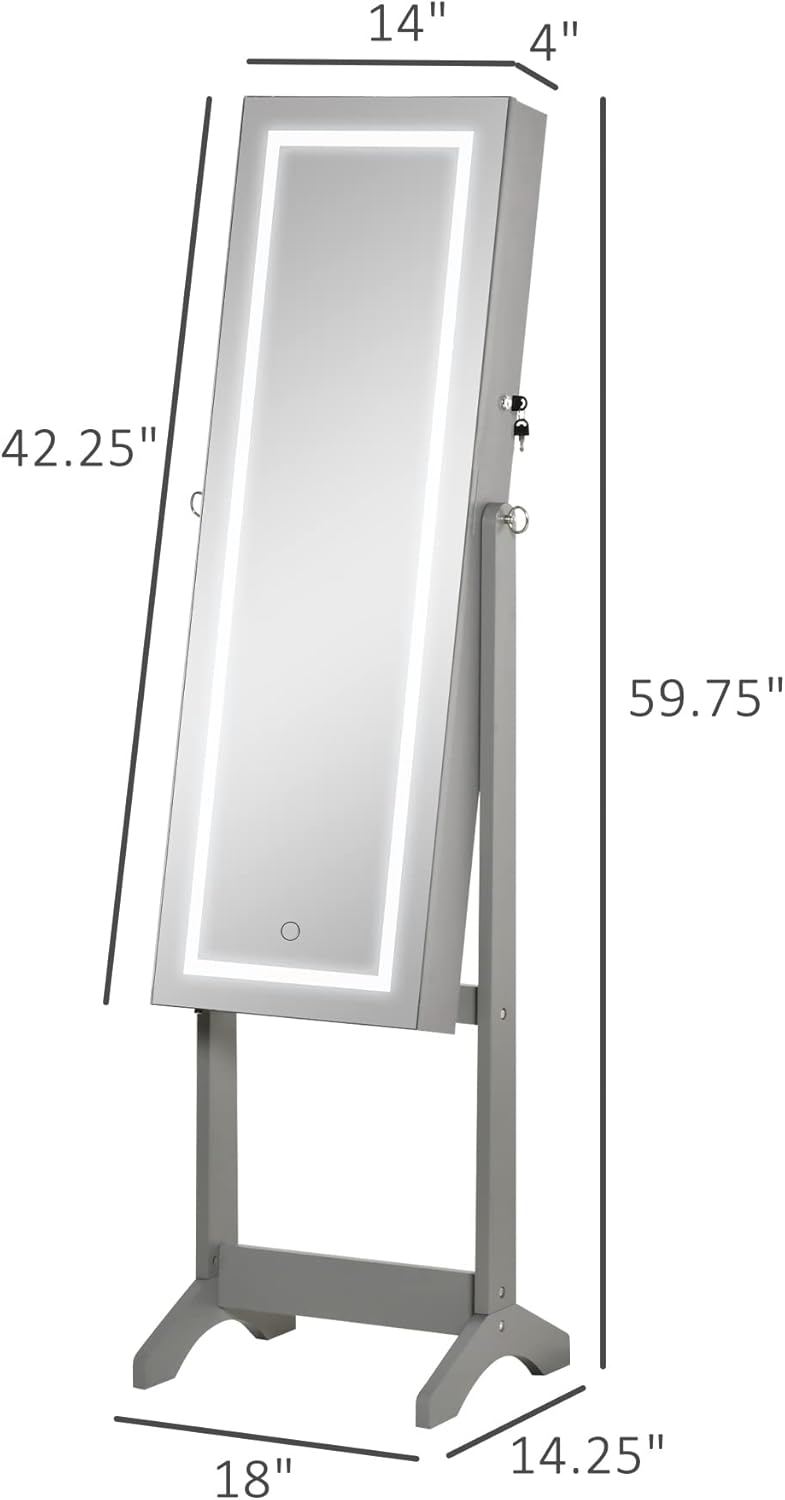
Image: Technical drawing illustrating the key dimensions of the HOMCOM jewelry cabinet.
11. Warranty and Support
HOMCOM products are designed for quality and durability. For warranty information, technical support, or to order replacement parts, please contact HOMCOM customer service. Keep your purchase receipt and model number handy for faster service.
Customer Service Contact: Please refer to the contact information provided on the HOMCOM official website or your purchase documentation.