1. Introduction
Thank you for choosing the Sanyipace S891DSRTC Self-Leveling Sewer Camera. This manual provides essential information for the safe and efficient operation, maintenance, and troubleshooting of your device. Please read this manual thoroughly before use and retain it for future reference.
2. Product Overview and Components
The Sanyipace S891DSRTC is a professional drain pipe inspection camera designed for identifying issues within various piping systems. Key features include a self-leveling camera head, a 512Hz transmitter for precise location, clear meter markings on the cable, and a high-definition display for detailed visualization.
Key Components:
- Control Console with 9-inch HD Color Screen
- Self-Leveling Camera Probe (0.9in / 23mm diameter)
- Flexible Cable (0.2in / 5mm diameter) with Meter Markings
- Cable Reel
- 4500mAh Rechargeable Battery Pack
- 16GB TF Card (expandable up to 128GB)
- Pipe Pulley and Roller Guide Wheel
- Charger and Connection Cables
Product Features:
- High-Definition Imaging: Provides clear visuals for detailed inspection.
- Self-Leveling Camera: Automatically corrects image orientation for consistent viewing.
- 512Hz Transmitter: Built-in transmitter for precise fault location with a compatible locator (sold separately).
- Meter Markings: Numeric markers on the cable for accurate distance measurement.
- IP68 Waterproof Camera: Suitable for submerged inspections.
- Adjustable LED Lights: 12 high-brightness LEDs for optimal illumination in dark environments.
- DVR Function: Capture images and videos directly to the TF card.
- Long Battery Life: 4500mAh battery supports up to 10 hours of continuous operation.
- Versatile Access: Flexible cable and included accessories (pipe pulley, roller guide wheel) for various pipe sizes and configurations.
3. Setup Instructions
- Unpack the System: Carefully remove all components from the carrying case.
- Connect the Screen: Open the control console. Plug the power and video cables from the screen into the corresponding interfaces on the top of the battery pack. Ensure connections are secure.
Video: Demonstrates connecting the screen's power and video cables to the battery pack. This video shows the initial setup steps for the Sanyipace S891DSRTC sewer camera system.
- Connect the Cable Coil: Use the provided connection cable to link the battery pack to the cable coil. This supplies power to the camera probe.

Image: A close-up of the battery pack, highlighting the coil port where the cable reel connects. This image helps identify the correct connection point.
- Insert TF Card: Insert the TF memory card into the designated slot on the control console for recording. The system supports up to 128GB.
- Power On: Turn on the power switch on the battery pack. The screen should illuminate.
- Adjust Camera Lights: Use the light adjustment knob on the battery pack to control the brightness of the camera's LEDs.

4. Operating Instructions
4.1 Preparing for Inspection
- Ensure the battery is sufficiently charged.
- Select appropriate accessories (pipe pulley or roller guide wheel) based on pipe diameter. For pipes over 1.57in (40mm), use the pipe pulley. For pipes larger than 5.12in (130mm), use the roller guide wheel.
- Before operating the cable reel, ensure the cable is properly placed on the hook to prevent tangling and ensure smooth deployment.
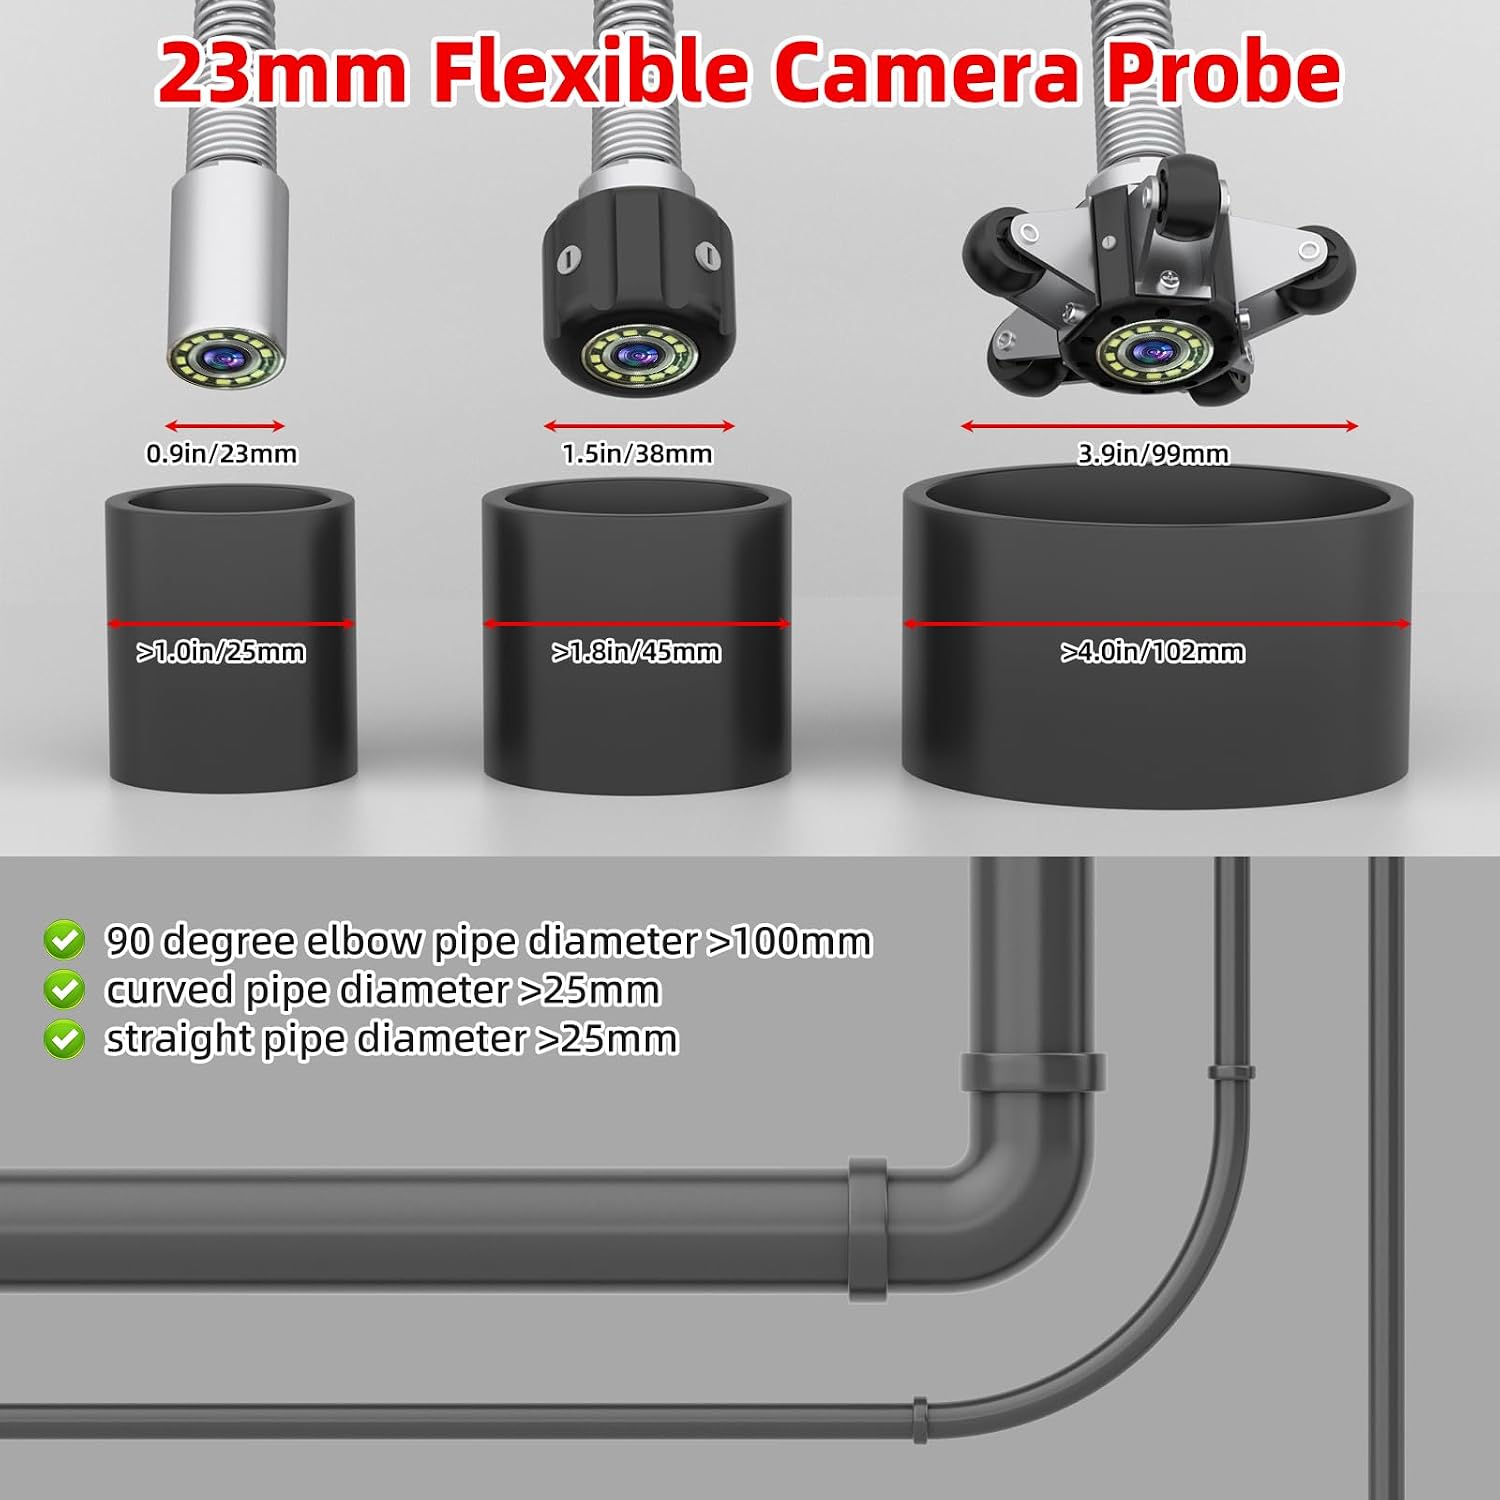
Image: Illustrates the flexible camera probe and guides for selecting appropriate pipe centering accessories based on pipe diameter.
4.2 Performing an Inspection
- Deploy the Camera: Gently pull the camera cable from the reel to extend the camera into the pipe. Avoid forcing the cable.

Image: Shows the yellow camera cable with clear meter markings, indicating the depth of inspection.
- Monitor the Display: Observe the 9-inch HD screen for real-time video feedback. The self-leveling feature ensures the image remains upright regardless of camera orientation.

Image: Compares high-definition imaging from the Sanyipace camera with a less clear image from another system, demonstrating clarity.
- Record Video/Capture Photos: Use the 'REC/-' button to start/stop video recording and the 'PLAY/+' button to take photos.
- Measure Depth: Utilize the meter markings on the cable to accurately determine the distance to any identified issues.
- Locate Faults (with optional locator): If using a 512Hz signal locator (sold separately), the built-in 512Hz transmitter in the camera head will emit a signal, allowing you to pinpoint the exact location of the camera from above ground.

Image: A man using a 512Hz locator above ground to detect the signal from the sewer camera, illustrating fault location.
- Retrieve the Camera: Once the inspection is complete, carefully push the cable backward to coil it back onto the reel.
5. Maintenance
- Cleaning: After each use, clean the camera head and cable with a damp cloth. Do not use harsh chemicals. Ensure the camera head is dry before storage.
- Battery Care: Fully charge the battery after each use. Store the battery in a cool, dry place. If storing for extended periods, charge the battery every 3 months to maintain its lifespan.
- Cable Management: Always coil the cable neatly onto the reel to prevent kinks or damage.
- Storage: Store the entire system in its original carrying case in a dry, temperature-controlled environment.
6. Troubleshooting
| Problem | Possible Cause | Solution |
|---|---|---|
| No image on screen | Loose cable connection, low battery, camera not powered on. | Check all cable connections. Ensure battery is charged. Turn on the power switch. |
| Image is blurry or dark | Dirty camera lens, insufficient LED brightness. | Clean the camera lens. Adjust LED brightness using the knob on the battery pack. |
| Cannot record video/take photos | TF card full, TF card not inserted correctly, TF card corrupted. | Check TF card storage. Reinsert TF card. Format or replace TF card if corrupted. |
| Camera stuck in pipe | Obstruction, incorrect accessory used for pipe size. | Gently try to retrieve the camera. Do not force it. Re-evaluate pipe diameter and accessory choice for future inspections. |
7. Specifications
- Model: S891DSRTC
- Camera Head Diameter: 0.9in (23mm)
- Cable Diameter: 0.2in (5mm)
- Cable Length: 65ft (20m)
- Display: 9-inch HD Color Screen
- Viewing Angle: 145°
- LED Lights: 12 adjustable high-brightness LEDs
- Waterproof Rating: IP68
- Battery Capacity: 4500mAh
- Continuous Use: Up to 10 hours
- Storage: Supports TF card up to 128GB (16GB included)
- Transmitter: Built-in 512Hz
- Product Dimensions: 14.57 x 7.28 x 16.14 inches
- Item Weight: 11.68 pounds
8. Warranty and Support
Sanyipace sewer cameras are designed for reliability and performance. We offer 24/7 after-sales service and lifetime technical support to ensure your satisfaction. For any inquiries, technical assistance, or warranty claims, please contact Sanyipace customer support through the vendor's contact information or the official Sanyipace website.