1. Important Safety Information
Please read and understand all safety instructions before operating the MARIG FHSM-505 sewing machine. Failure to follow these instructions may result in injury or damage to the machine.
- Always disconnect the machine from the power supply when changing the needle, presser foot, or performing any maintenance.
- Children should only use this device under direct adult supervision. This machine is not a toy.
- Never operate the machine with thread in the needle but no fabric under the presser foot. This can cause damage to the machine's internal mechanisms.
- When the sewing machine is not in use, ensure it is switched off and unplugged from the power outlet.
- Store the machine in a dry and well-ventilated area, away from direct sunlight and moisture.
- Do not attempt to disassemble or repair the machine unless you are a qualified professional.
- Turn off the switch and unplug the adapter when the device is not in use for extended periods.
2. Package Contents
Upon unpacking, please verify that all items listed below are included in your package:
- MARIG FHSM-505 Sewing Machine (x1)
- AC/DC Power Supply Adapter (x1)
- Foot Pedal (x1)
- Sewing Machine Accessories (52 PCS total, including 5 interchangeable presser feet, 17 lower metal bobbins, 17 upper bobbins, 6 needles, 2 needle threaders, 1 tape measure, 1 seam ripper, 1 metal thimble)
- User Guide (available in five languages) (x1)
- Instructional DVD (x1)

Figure 2.1: The MARIG FHSM-505 sewing machine shown with its comprehensive set of 52 accessories, including various threads, bobbins, needles, and tools, along with the power adapter and user manual.
3. Product Overview and Components
Familiarize yourself with the main parts of your MARIG FHSM-505 sewing machine:
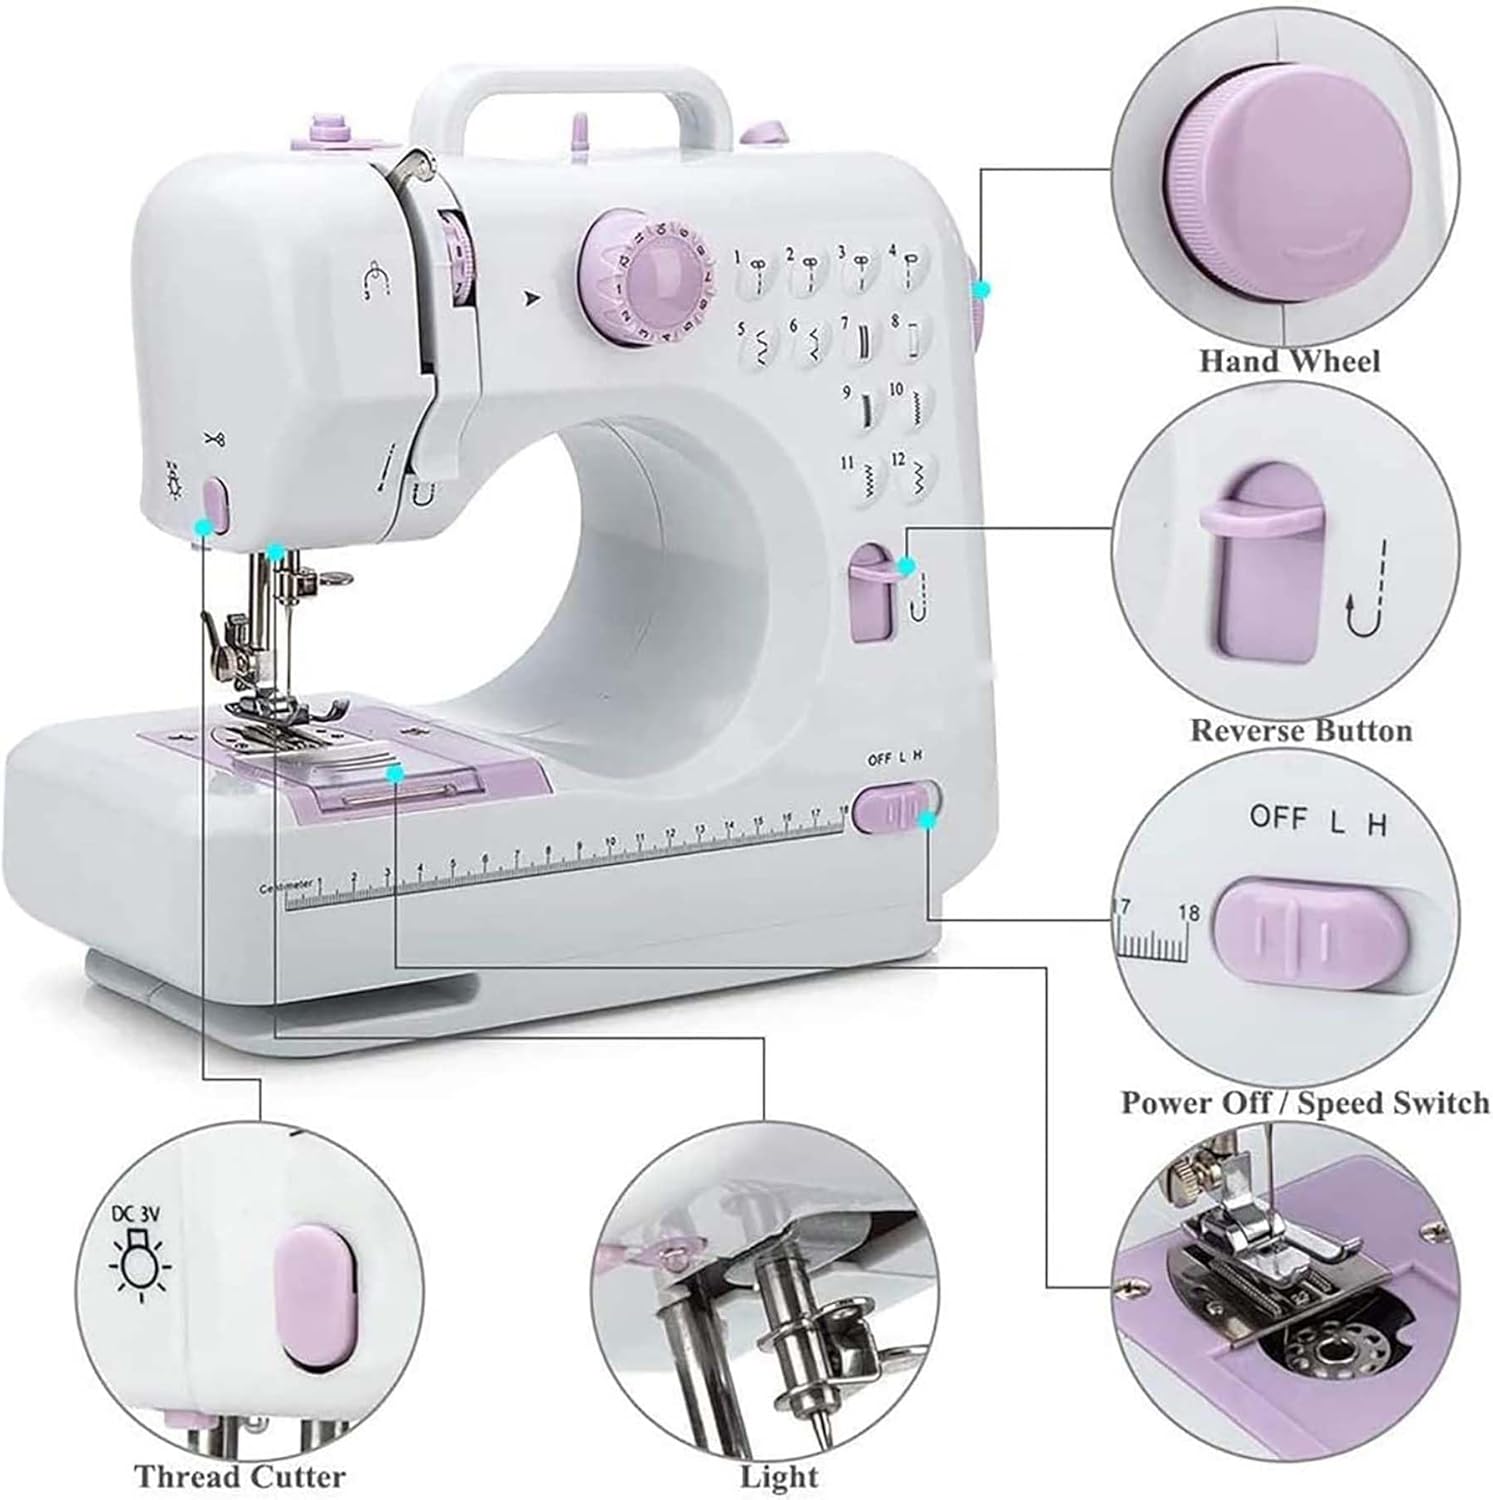
Figure 3.1: Side view of the sewing machine with key components labeled, including the Hand Wheel, Reverse Button, Power Off/Speed Switch, Thread Cutter, and Light.

Figure 3.2: Front and back views of the sewing machine highlighting components such as the Thread Tension Dial, Take Up Lever, Stitch Selector Dial, Bottom Bobbin compartment, Bobbin Winder Shaft, Spool Pin, Thread Guide, Presser Foot Lever, Presser Foot, Foot Pedal Input, and AC/DC Input.
The machine features a compact design with clearly marked controls for ease of use. The stitch selector dial allows for choosing between 12 different stitch patterns, while the hand wheel provides manual control over needle movement. A built-in LED light illuminates the sewing area, and a thread cutter is conveniently located for quick thread trimming.

Figure 3.3: An overview of the machine's features, including 12 stitches, foot pedal operation, replaceable presser foot, anti-slip bottom pad, thread spool, mini hidden drawer, adjustable needle spacing, reverse sewing function, and LED night light.
4. Setup
4.1 Powering the Machine
The MARIG FHSM-505 sewing machine can be powered by either the included AC/DC power adapter or four (4) AA batteries (not included).
- AC/DC Adapter: Insert the small end of the power adapter into the DC input jack on the back of the machine. Plug the other end into a standard electrical outlet.
- Batteries: Open the battery compartment on the bottom of the machine and insert four AA batteries, ensuring correct polarity.
Important: The AC/DC adapter and batteries cannot be used at the same time. Ensure one power source is disconnected before using the other.
4.2 Threading the Machine
Correct threading is crucial for proper machine operation. Follow these steps carefully:
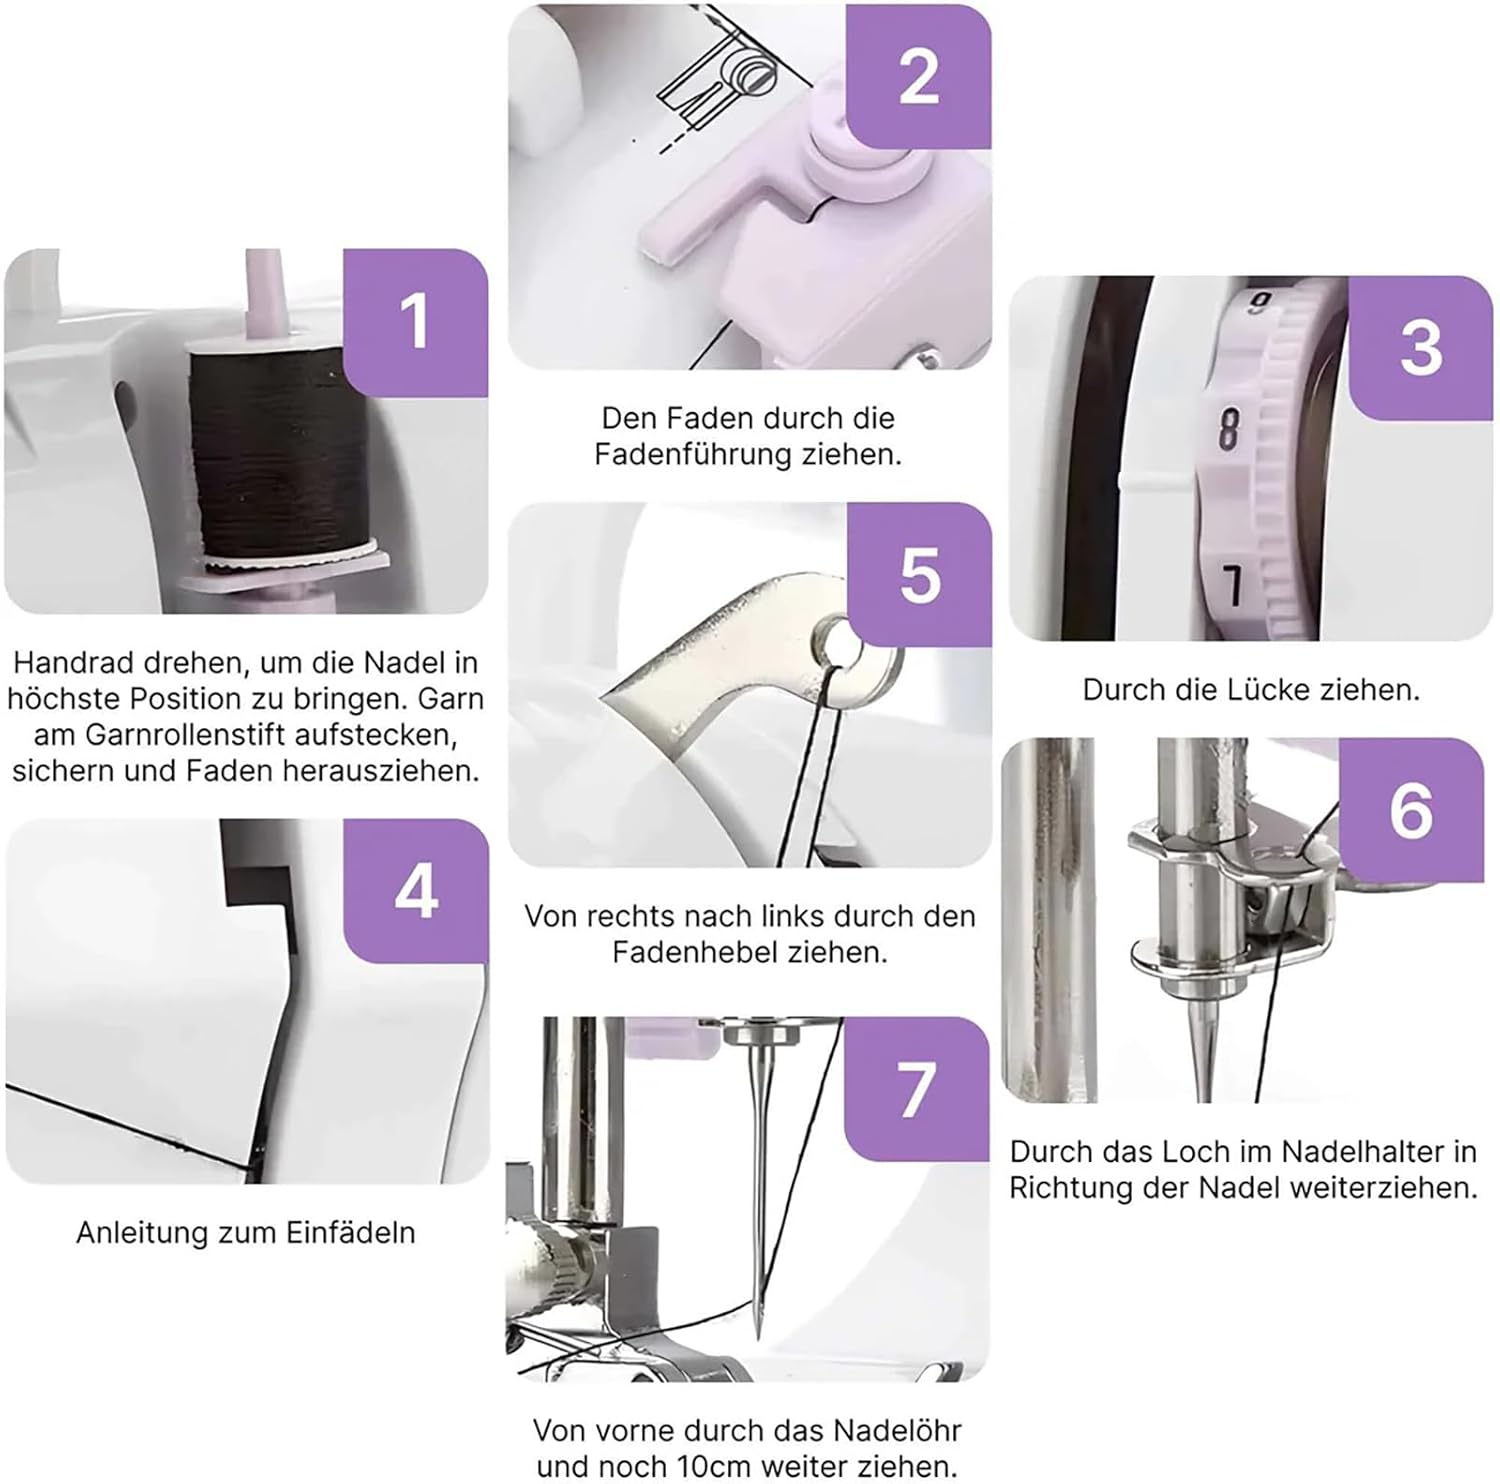
Figure 4.1: Step-by-step visual guide for threading the upper thread of the sewing machine, showing the path from the spool to the needle eye.
- Raise the Needle: Turn the hand wheel towards you to bring the needle to its highest position.
- Place Spool: Place a spool of thread onto the spool pin.
- Guide Thread: Pull the thread from the spool and pass it through the first thread guide.
- Tension Discs: Guide the thread down and around the tension discs, ensuring it is seated correctly.
- Take-Up Lever: Bring the thread up and through the eye of the take-up lever, from right to left.
- Lower Thread Guide: Guide the thread down through the lower thread guide.
- Needle Threading: Use the needle threader (if available) or manually thread the needle eye from front to back. Pull about 10cm of thread through the needle.
4.3 Bobbin Winding and Insertion
For detailed instructions on winding the bobbin and inserting it into the bobbin case, please refer to the instructional DVD or the specific section in your multi-language user guide.
5. Operating Instructions
5.1 Stitch Selection
The MARIG FHSM-505 offers 12 unique built-in stitches, including decorative, blind hem, zigzag, and stretch stitches. To select a stitch, turn the Stitch Selector Dial (refer to Figure 3.2) to the desired stitch number.
5.2 Speed Control
The machine features two speed settings: Low (L) and High (H). Use the Power Off/Speed Switch (refer to Figure 3.1) to select your preferred sewing speed. Beginners are advised to start with the 'L' (Low) speed setting.
5.3 Reverse Sewing
To reinforce stitches at the beginning and end of a seam, press and hold the Reverse Button (refer to Figure 3.1) while sewing. The machine will sew backward as long as the button is held.
5.4 Changing Presser Feet and Needles
The machine comes with 5 interchangeable presser feet (overlock, quilting, zipper, invisible zipper, buttonhole) and 2 types of needles (75/11# and 90/14#). Always ensure the machine is turned off and unplugged before changing any parts.
- Changing Presser Foot: Lift the presser foot lever. Press the release button on the back of the presser foot holder to detach the current foot. Align the new presser foot with the holder and lower the presser foot lever until it snaps into place.
- Changing Needle: Loosen the needle clamp screw. Remove the old needle. Insert the new needle with the flat side facing the back of the machine, pushing it up as far as it will go. Tighten the needle clamp screw securely. Select the appropriate needle size (75/11# for lighter fabrics, 90/14# for heavier fabrics).

Figure 5.1: Detailed views of the replaceable presser foot mechanism, the integrated thread cutter, and the LED light illuminating the sewing area.
6. Maintenance
Regular maintenance ensures the longevity and optimal performance of your sewing machine.
- Cleaning: Periodically clean lint and dust from the bobbin area and under the needle plate using a small brush. Always unplug the machine before cleaning.
- Needle Replacement: Replace needles regularly, especially if they become bent, dull, or if you notice skipped stitches. A fresh needle prevents fabric damage and ensures smooth sewing.
- Storage: When not in use, cover the machine to protect it from dust. Store it in a dry, stable environment.
7. Troubleshooting
If you encounter issues with your sewing machine, try these common troubleshooting steps:
| Problem | Possible Cause | Solution |
|---|---|---|
| Machine not turning on | No power, loose connection, batteries depleted | Check power adapter connection, ensure outlet is working, replace batteries if using battery power. Confirm adapter and batteries are not used simultaneously. |
| Skipped stitches | Bent or dull needle, incorrect needle size, improper threading | Replace needle, ensure correct needle for fabric type, re-thread the machine carefully. |
| Thread breaking | Incorrect tension, poor quality thread, needle bent/dull, improper threading | Adjust thread tension dial, use good quality thread, replace needle, re-thread both upper and lower threads. |
| Fabric not feeding | Presser foot not lowered, feed dogs obstructed | Ensure presser foot is lowered before sewing. Clean any lint or debris from the feed dog area. |
| Machine jamming | Thread tangled in bobbin area, fabric pulled too hard | Turn off and unplug the machine. Carefully remove the bobbin case and clear any tangled threads. Do not force fabric through the machine. |
If the problem persists after attempting these solutions, please refer to the instructional DVD or contact customer support.
8. Specifications
Detailed technical specifications for the MARIG FHSM-505 sewing machine:
- Item Name: Sewing machine
- Brand: MARIG
- Model Number: FHSM-505
- Input Voltage: 100V-240V, 50 / 60Hz
- Output: 6V 1200mA
- Material: Stainless steel + ABS
- Product Size: 275 x 120 x 260mm (10.83 x 4.76 x 10.24 inches)
- Item Weight: 4.28 lbs
- Color: Purple
- Power Supply: 4 AA batteries (not included) or AC/DC power supply (included)
- Number of Stitches: 12
- Speeds: 2 (Low, High)
- UPC: 718893775171
9. Warranty and Support
Specific warranty details for the MARIG FHSM-505 sewing machine are not provided in this manual. For information regarding warranty coverage, terms, and conditions, please refer to the documentation included with your purchase or contact MARIG customer support directly.
For technical assistance, troubleshooting beyond the scope of this manual, or to inquire about replacement parts, please reach out to the manufacturer's customer service department. Contact information can typically be found on the product packaging or the official MARIG website.