1. Safety Information
Please read all safety instructions carefully before installation and operation. Failure to follow these instructions may result in electric shock, fire, or other injuries.
- Turn off power: Always disconnect power at the circuit breaker or fuse box before installing, servicing, or removing the switch.
- Qualified Electrician: Installation should be performed by a qualified electrician in accordance with all local and national electrical codes.
- Voltage: Ensure the operating voltage of your electrical system matches the switch's specifications (250V).
- Wiring: Verify all wire connections are secure and correctly identified (Live, Neutral, Load).
- Environment: Do not install in wet or damp locations. This product is rated IP65 for protection against dust and low-pressure water jets, but it is not submersible.
- Children: Keep packaging materials and small parts away from children.
2. Product Overview
The CNBINGO Double Rocker Switch (Model M1-P105) is designed for controlling lighting circuits from one or two locations. It features a modern crystal glass panel and phosphorescent dots for visibility in low light.
2.1 Components

Image: Exploded view showing the luxury crystal glass panel, integrated security module, and metal frame of the switch.
- Luxury Crystal Glass Panel: Provides a modern aesthetic and is easy to clean.
- Integrated Security Module: Houses the electrical components and ensures safe operation.
- Metal Frame: Provides structural support and facilitates secure mounting.
2.2 Key Features
- Phosphorescent Dots: Three green dots on each rocker glow faintly in the dark after absorbing light, aiding visibility without disturbing sleep.
- Two-Way Control: Can be used as a two-way switch or a 1-pole ON/OFF switch to control lights from one or two locations.
- Durable Construction: Features a fire-protective PC plate, glass panel, and modular housing. Internal components use fluorescent copper and metal for extended lifespan (up to 25 years).
- Standard Size: Designed to fit standard 86 x 86mm flush-mounted boxes with a 21mm mounting depth.
3. Specifications
| Brand | CNBINGO |
| Model Number | M1-P105 |
| Product Dimensions (L x W x H) | 8.6 x 8.6 x 3 cm |
| Item Weight | 180 grams |
| Operating Mode | ON-OFF |
| Current Rating | 10 A |
| Operating Voltage | 250 Volts |
| Contact Type | Normally Closed |
| Connector Type | Screw |
| Switch Type | Rocker |
| Terminal | Screw |
| Material | Polycarbonate |
| Circuit Type | 2-way |
| Mounting Type | Indoor Mounting |
| Actuator Type | Push Button |
| Number of Positions | 2 |
| Control Method | Push Button |
| Connectivity Protocol | Wi-Fi, RF433 (Note: This specific model M1-P105 is a mechanical rocker switch, not Wi-Fi/RF433 enabled. This specification might refer to other CNBINGO products.) |
| Color | White |
| Contact Material | Copper |
| International Protection Rating | IP65 |
4. Installation
4.1 Before Installation
- Ensure the power supply to the circuit is completely OFF at the main breaker.
- Confirm you have all necessary tools (screwdriver, wire strippers, voltage tester).
- Verify the existing wall box is suitable for the switch dimensions.
4.2 Mounting Dimensions

Image: Standard dimensions of the switch, indicating it fits standard flush-mounted boxes (86x86mm with 21mm mounting depth).
The switch is designed for standard flush-mounted boxes. The front panel measures 86mm x 86mm, and the module requires a mounting depth of 21mm.
4.3 Wiring Diagram
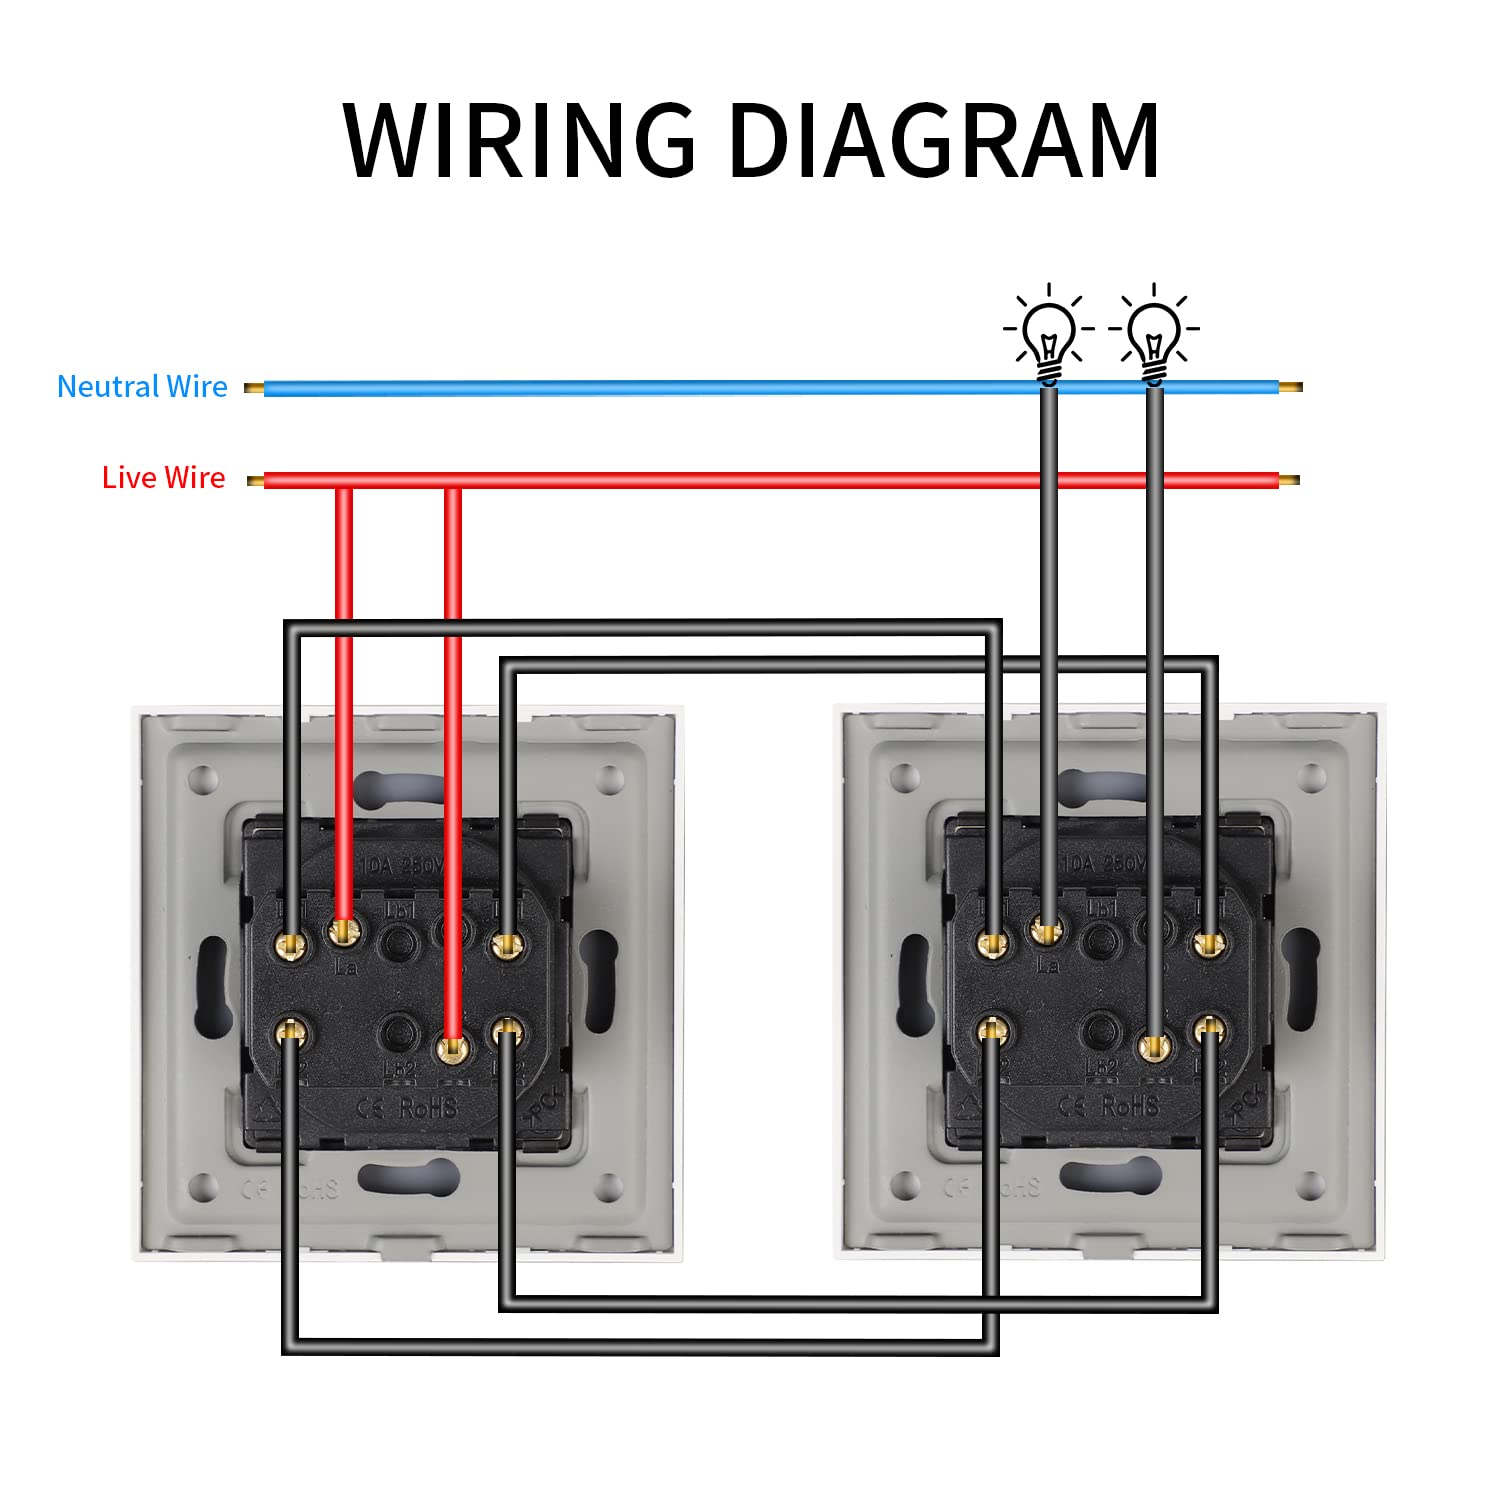
Image: Wiring diagram illustrating connections for a double rocker switch in both 1-way and 2-way configurations. Blue indicates Neutral, Red indicates Live, and Black indicates Load wires to the lights.
The switch supports both 1-way (single location control) and 2-way (multiple location control) wiring. Refer to the diagram for correct connections.
- Live Wire (L): Connect the incoming live wire to the 'L' terminal.
- Load Wires (L1, L2): Connect the load wires going to your light fixtures to the 'L1' and 'L2' terminals for each respective switch.
- Two-Way Wiring (L1, L2, L3): For 2-way control, connect the common live wire to 'L' and the two traveler wires between the switches to 'L1' and 'L2' (or 'L1' and 'L3' depending on the specific terminal layout). Consult a qualified electrician if unsure.

Image: Rear view of the switch, detailing the screw terminals for electrical connections.
4.4 Installation Steps
- Power Off: Ensure the main power supply is turned off.
- Remove Old Switch: Carefully remove the existing switch from the wall box.
- Wire Connections: Connect the wires to the appropriate terminals on the CNBINGO switch as per the wiring diagram. Ensure all connections are tight.
- Mount Switch: Gently push the switch module into the wall box. Secure it using the provided screws.
- Attach Glass Panel: Snap the crystal glass panel onto the switch module. The design is screwless for a clean finish.
- Restore Power: Turn the main power supply back on.
- Test: Test the functionality of the switch.
5. Operating Instructions
5.1 Basic Operation
To operate the switch, simply press the top or bottom of the rocker panel to toggle the connected light fixture ON or OFF. Each rocker controls an independent circuit.

Image: The CNBINGO Double Rocker Switch seamlessly integrated into various room settings, highlighting its modern design and ease of use.
5.2 Fluorescent Dots
The three green dots on each rocker are phosphorescent. They absorb ambient light during the day and glow faintly in the dark, making the switch visible at night without being overly bright or disruptive to sleep.

Image: Side profile of the switch, showcasing the elegant crystal glass panel and the subtle phosphorescent dots.
5.3 Two-Way Control
If wired for two-way control, the switch can be used in conjunction with another two-way switch to control a single light fixture from two different locations (e.g., at the top and bottom of a staircase).
6. Maintenance
- Cleaning: The crystal glass panel can be cleaned with a soft, damp cloth. Avoid abrasive cleaners or harsh chemicals that may damage the finish.
- Inspection: Periodically inspect the switch for any signs of damage or loose connections. If any issues are found, disconnect power and consult a qualified electrician.
- No User Serviceable Parts: Do not attempt to disassemble the switch module. There are no user-serviceable parts inside.
7. Troubleshooting
| Problem | Possible Cause | Solution |
|---|---|---|
| Light does not turn ON/OFF. | No power to the switch; Loose wiring connection; Faulty light bulb; Incorrect wiring. | Check circuit breaker; Ensure all wires are securely connected; Replace light bulb; Verify wiring against diagram, consult electrician if needed. |
| Switch feels loose in the wall. | Mounting screws are not tight. | Turn off power, then tighten mounting screws. |
| Phosphorescent dots do not glow. | Insufficient exposure to light. | Ensure the switch is exposed to ambient light during the day to charge the phosphorescent material. |
| Switch makes a buzzing sound. | Loose connection; Incompatible load (rare for mechanical switches). | Turn off power and check all wiring connections. If the issue persists, consult a qualified electrician. |
8. Warranty and Support
CNBINGO switches are manufactured with high-quality materials and are designed for a long operational life, up to 25 years under normal use conditions.
For technical support or warranty inquiries, please contact your retailer or visit the official CNBINGO website. Please have your model number (M1-P105) and purchase details ready.