1. Introduction
The COOLMUSIC UNIQUE 15G is a versatile 15-watt portable amplifier designed for both acoustic and electric guitars. It features built-in effects, Bluetooth connectivity, and a rechargeable battery, making it suitable for practice, travel, and small performances. This manual provides essential information for setting up, operating, and maintaining your amplifier.
2. Product Overview
Familiarize yourself with the main components and controls of your COOLMUSIC UNIQUE 15G amplifier.

Figure 2.1: Front view of the amplifier, showing the speaker grille and COOLMUSIC logo.
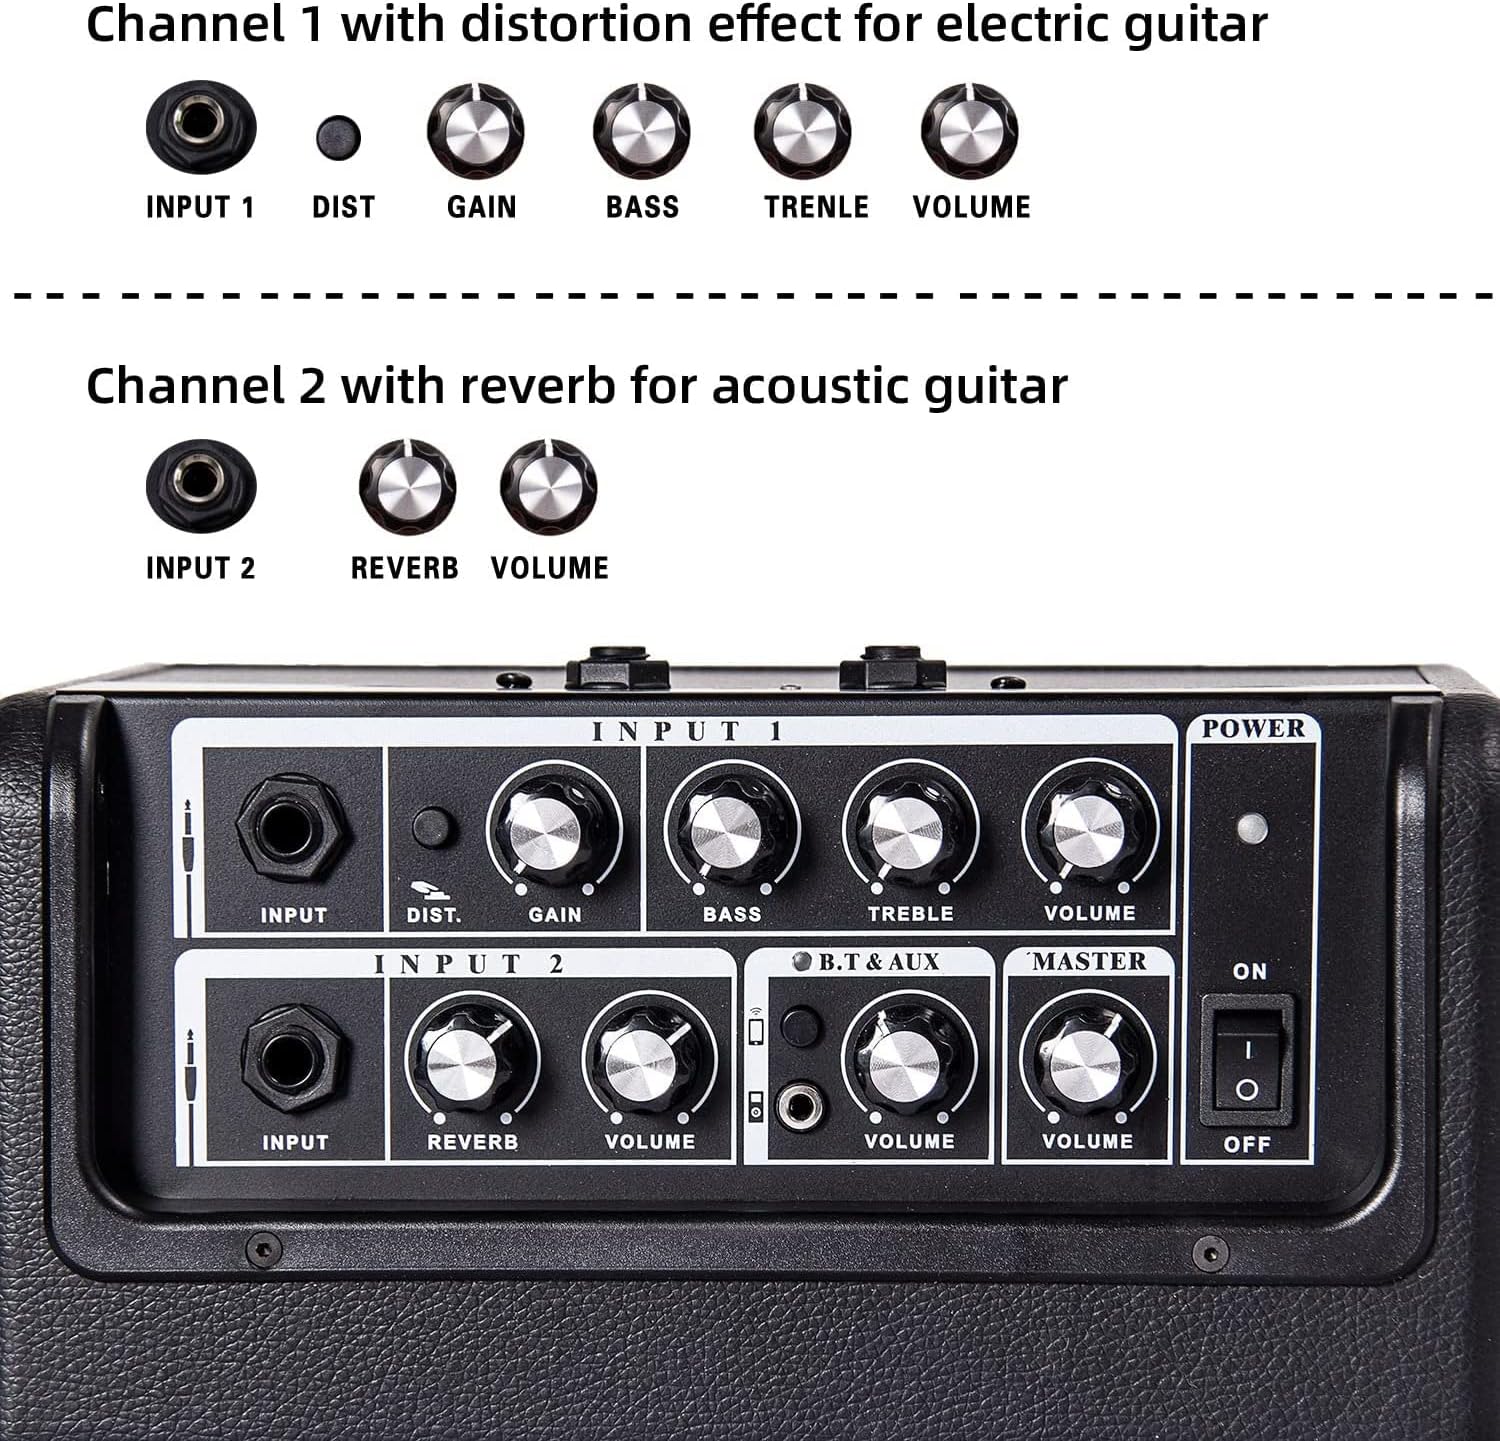
Figure 2.2: Top control panel with Input 1 (electric guitar) and Input 2 (acoustic guitar) sections, Bluetooth/AUX controls, and Master Volume.

Figure 2.3: Rear panel showing D.I. OUT, Type-C CHARGE port, and PHONES output.
Controls and Ports:
- Input 1 (Electric Guitar): 1/4" jack for electric guitar. Includes controls for DISTORTION, GAIN, BASS, TREBLE, and VOLUME.
- Input 2 (Acoustic Guitar): 1/4" jack for acoustic guitar. Includes controls for REVERB and VOLUME.
- B.T & AUX: Section for Bluetooth and auxiliary input. Includes a button for Bluetooth pairing and a VOLUME control.
- Master Volume: Overall volume control for the amplifier.
- Power Switch: On/Off toggle switch.
- D.I. OUT: 1/4" output for connecting to external mixing consoles or audio interfaces.
- CHARGE (Type-C): USB Type-C port for charging the internal battery.
- PHONES: 1/4" headphone output for silent practice.
3. Setup
3.1 Charging the Amplifier
- Locate the Type-C CHARGE port on the rear panel of the amplifier.
- Connect a compatible USB Type-C charging cable (not included) to the port and to a 5V USB power adapter (not included).
- The power indicator light will show charging status. A full charge typically takes approximately 5 hours and provides 5-8 hours of usage depending on volume levels.
3.2 Connecting an Instrument
- Ensure the amplifier is powered off.
- For electric guitars, connect your instrument cable to the Input 1 1/4" jack.
- For acoustic guitars, connect your instrument cable to the Input 2 1/4" jack.
- Power on the amplifier using the Power Switch.
3.3 Bluetooth Pairing
The amplifier supports Bluetooth connectivity for playing backing tracks or music from your device.

Figure 3.1: Amplifier ready for Bluetooth connection with various mobile devices.
- Power on the amplifier.
- Press the Bluetooth button in the B.T & AUX section. The indicator light will flash, indicating it's in pairing mode.
- On your mobile device (phone, tablet, etc.), go to Bluetooth settings and select "COOLMUSIC" from the list of available devices.
- Once paired, the Bluetooth indicator light on the amplifier will remain solid.
- Adjust the B.T & AUX VOLUME control to set the desired level for your backing track.
3.4 Using the AUX Input
For non-Bluetooth devices, you can use the 3.5mm AUX input.
Figure 3.2: The AUX input is integrated into the B.T & AUX section on the top panel, allowing connection of external audio sources.
- Connect a 3.5mm audio cable from your external audio device to the AUX input jack in the B.T & AUX section.
- Adjust the B.T & AUX VOLUME control to set the desired level.
4. Operating
4.1 Electric Guitar Channel (Input 1)
- DISTORTION: Engages or disengages the distortion effect.
- GAIN: Controls the amount of input signal and distortion intensity.
- BASS: Adjusts the low-frequency response.
- TREBLE: Adjusts the high-frequency response.
- VOLUME: Controls the output level of Input 1.
4.2 Acoustic Guitar Channel (Input 2)
- REVERB: Controls the amount of reverb effect applied to the acoustic guitar signal.
- VOLUME: Controls the output level of Input 2.
4.3 Master Volume
The MASTER VOLUME knob controls the overall output level of the amplifier, affecting all inputs (Input 1, Input 2, and B.T & AUX).
4.4 Headphone Output
For silent practice, connect 1/4" headphones to the PHONES jack on the rear panel. This will mute the main speaker output.

Figure 4.1: Headphone jack on the rear panel for private listening.
4.5 D.I. Out
The D.I. OUT (Direct Injection Output) allows you to send your amplified signal directly to a mixing console, audio interface, or another amplifier for recording or larger sound systems.
5. Maintenance
- Cleaning: Use a soft, dry cloth to clean the amplifier's exterior. Avoid using abrasive cleaners or solvents.
- Storage: Store the amplifier in a cool, dry place away from direct sunlight and extreme temperatures.
- Battery Care: To prolong battery life, avoid fully discharging the battery frequently. Charge the amplifier regularly, even if not in use for extended periods.
- Handling: Always use the integrated handle for transport. Avoid dropping or subjecting the amplifier to strong impacts.

Figure 5.1: The amplifier features a sturdy handle for easy portability.
6. Troubleshooting
- No Sound:
- Check if the amplifier is powered on and charged.
- Ensure instrument cables are securely connected to the correct input.
- Verify that the individual channel volume and Master Volume knobs are turned up.
- If using headphones, ensure they are properly plugged into the PHONES jack.
- Bluetooth Not Connecting:
- Ensure the amplifier's Bluetooth button is pressed and flashing.
- Turn off and on Bluetooth on your mobile device.
- Move your device closer to the amplifier.
- Forget the device in your phone's Bluetooth settings and try pairing again.
- Distortion/Unwanted Noise:
- Reduce the GAIN or VOLUME settings.
- Check for faulty instrument cables.
- Ensure the power adapter is not causing interference if connected.
7. Specifications
| Feature | Detail |
|---|---|
| Model Number | UNIQUE 15G |
| Output Wattage | 15 Watts |
| Product Dimensions | 9.45 x 4.72 x 7.09 inches (24cm x 12cm x 18cm) |
| Item Weight | 5.5 pounds |
| Material | Wood |
| Battery Type | Built-in Rechargeable Lithium Polymer |
| Battery Life | 5-8 hours (after 5 hours charge, depends on volume) |
| Compatible Devices | Electric Guitar, Acoustic Guitar, Bluetooth devices, AUX devices |
| Connector Type | 1/4" Jack (Inputs, D.I. Out, Phones), 3.5mm Jack (AUX), USB Type-C (Charge) |

Figure 7.1: Amplifier dimensions for reference.
8. Warranty and Support
8.1 Warranty Information
Please refer to the warranty card included with your product for specific warranty terms and conditions. Keep your proof of purchase for any warranty claims.
8.2 Customer Support
For further assistance, technical support, or inquiries, please visit the official COOLMUSIC store or contact their customer service through the details provided on their website or product packaging.
You can find more information at the COOLMUSIC Amazon Store.
9. Official Product Videos
No official product videos created by the seller were available for embedding in this manual.