1. Introduction
Thank you for choosing the Golden Age Project EQ-73 PREMIER Equalizer. This manual provides essential information for the proper setup, operation, and maintenance of your unit. The EQ-73 PREMIER is a 1-channel 3-band equalizer designed to deliver definitive British EQ characteristics, featuring a Class A signal path, Burr Brown Op-amp, and Carnhill inductors for superior audio performance.
2. Safety Information
Please read and understand all safety instructions before operating the EQ-73 PREMIER. Retain this manual for future reference.
- Power Supply: Only use the specified AC 24V power adapter provided with the unit. Using an incorrect power supply can damage the unit and void the warranty.
- Moisture: Do not expose the unit to rain, moisture, or extreme humidity. Avoid placing liquid containers near the unit.
- Ventilation: Ensure adequate ventilation around the unit. Do not block ventilation openings.
- Heat: Keep the unit away from heat sources such as radiators, heat registers, stoves, or other apparatus that produce heat.
- Servicing: Do not attempt to service the unit yourself. Refer all servicing to qualified service personnel.
- Cleaning: Disconnect the power before cleaning. Use a dry, soft cloth. Do not use liquid cleaners or aerosol cleaners.
3. Product Overview
The EQ-73 PREMIER is a high-quality 1-channel, 3-band equalizer designed for professional audio applications. Its robust construction and premium components ensure reliable performance and exceptional sound shaping capabilities.
Key Features:
- 1-channel 3-band EQ with Half-rack Chassis
- Class A Signal Path
- Burr Brown Op-amp
- Carnhill Inductors
- Stepped Controls for precise recall
Front Panel Controls:
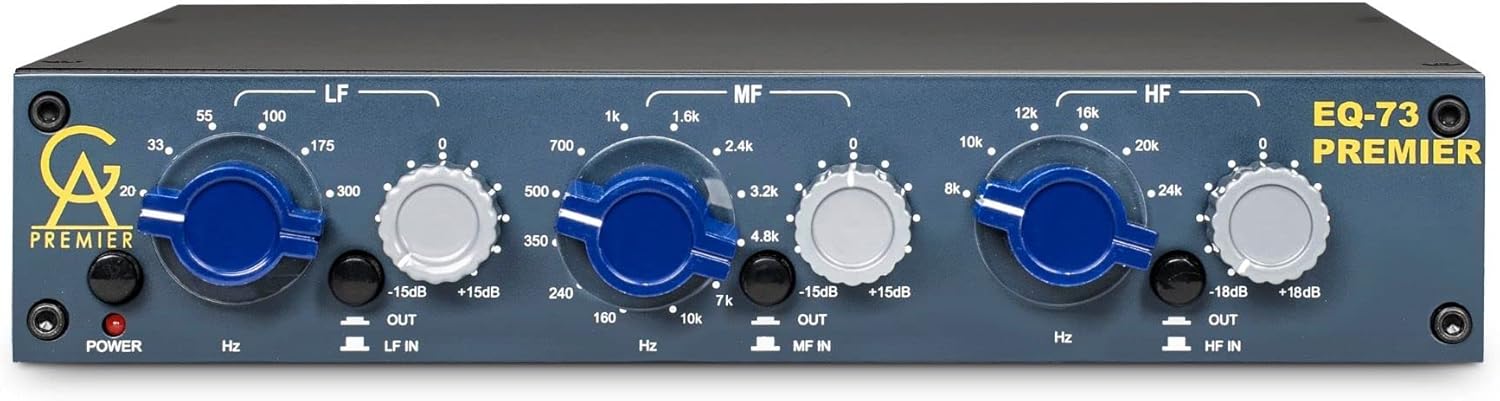
Figure 3.1: Front view of the Golden Age Project EQ-73 PREMIER Equalizer, showing all controls and indicators.
- POWER Button & LED: Activates the unit and indicates power status.
- LF (Low Frequency) Band: Controls for the low-frequency range. Includes frequency selection (Hz) and gain adjustment (±15dB).
- MF (Mid Frequency) Band: Controls for the mid-frequency range. Includes frequency selection (Hz/kHz) and gain adjustment (±15dB).
- HF (High Frequency) Band: Controls for the high-frequency range. Includes frequency selection (kHz) and gain adjustment (±18dB).
- IN/OUT Switches: Engages or bypasses each respective EQ band (LF, MF, HF).
Rear Panel Connections:
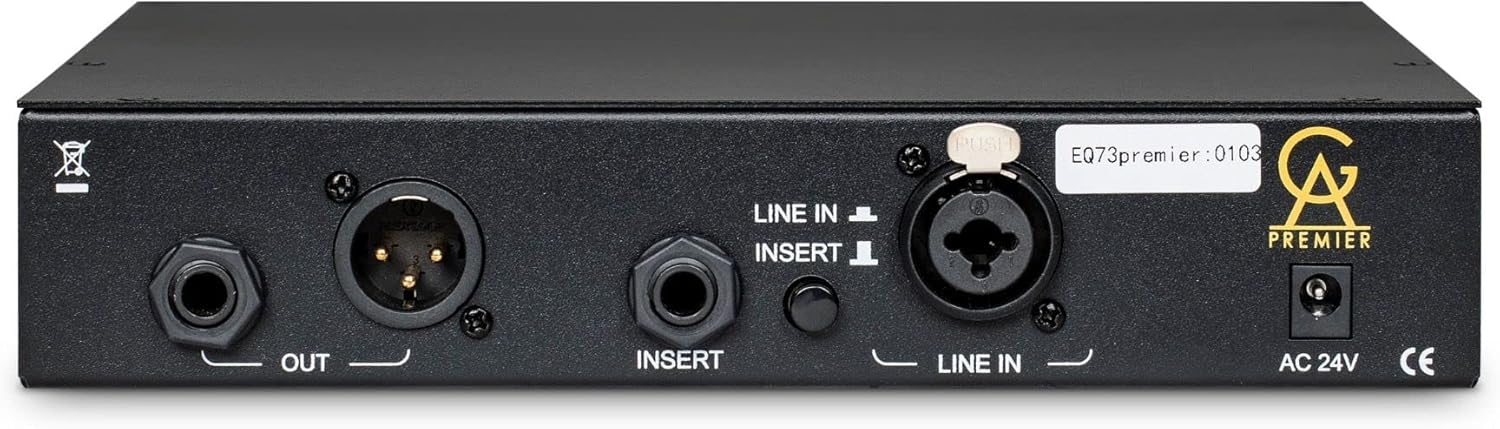
Figure 3.2: Rear view of the Golden Age Project EQ-73 PREMIER Equalizer, detailing input, output, and power connections.
- LINE IN (XLR & TRS): Balanced XLR and unbalanced 1/4" TRS inputs for connecting audio sources.
- INSERT (TRS): 1/4" TRS insert point for connecting external processors.
- OUT (XLR & TRS): Balanced XLR and unbalanced 1/4" TRS outputs for connecting to other audio equipment.
- AC 24V: Power input for the external AC 24V power adapter.
4. Setup
Follow these steps to properly set up your EQ-73 PREMIER unit.
4.1 Unpacking
- Carefully remove the EQ-73 PREMIER from its packaging.
- Inspect the unit for any signs of damage that may have occurred during shipping. If damage is found, contact your dealer immediately.
- Ensure all accessories, including the AC 24V power adapter, are present.
4.2 Power Connection
- Ensure the EQ-73 PREMIER's POWER button is in the OFF position.
- Connect the supplied AC 24V power adapter to the AC 24V input on the rear panel of the unit.
- Plug the power adapter into a suitable AC power outlet.
4.3 Audio Connections
The EQ-73 PREMIER offers flexible input and output options.
- Input: Connect your audio source (e.g., microphone preamp output, line-level signal from an interface) to either the XLR or 1/4" TRS LINE IN connector on the rear panel. Use balanced cables for optimal noise rejection.
- Output: Connect the XLR or 1/4" TRS OUT connector to your next device in the signal chain (e.g., audio interface input, recorder, mixer).
- Insert (Optional): The 1/4" TRS INSERT jack allows you to integrate external signal processors (e.g., compressors, gates) into the EQ-73 PREMIER's signal path. This is a send/return point.
5. Operating Instructions
This section details how to operate the EQ-73 PREMIER for optimal sound shaping.
5.1 Powering On/Off
- To power on, press the POWER button on the front panel. The red LED will illuminate.
- To power off, press the POWER button again. The red LED will extinguish.
5.2 Using the Equalizer Bands
The EQ-73 PREMIER features three distinct frequency bands: Low Frequency (LF), Mid Frequency (MF), and High Frequency (HF).
- LF Band: Select a frequency using the stepped Hz knob (e.g., 33, 55, 100, 175, 300 Hz). Adjust the gain using the ±15dB knob to boost or cut the selected frequency. Engage or bypass the band using the LF IN/OUT switch.
- MF Band: Select a frequency using the stepped Hz/kHz knob (e.g., 160, 240, 350, 500, 700 Hz; 1k, 1.6k, 2.4k, 3.2k, 4.8k, 7k Hz). Adjust the gain using the ±15dB knob. Engage or bypass the band using the MF IN/OUT switch.
- HF Band: Select a frequency using the stepped kHz knob (e.g., 8k, 10k, 12k, 16k, 20k, 24k Hz). Adjust the gain using the ±18dB knob. Engage or bypass the band using the HF IN/OUT switch.
The stepped controls ensure precise and repeatable settings, which is beneficial for recall in studio environments.
6. Maintenance
Proper maintenance will ensure the longevity and optimal performance of your EQ-73 PREMIER.
6.1 Cleaning
- Always disconnect the unit from power before cleaning.
- Use a soft, dry, lint-free cloth to wipe down the exterior of the unit.
- Do not use abrasive cleaners, solvents, or chemical sprays, as these can damage the finish and internal components.
6.2 Storage
When not in use for extended periods, store the unit in a cool, dry place, away from direct sunlight and extreme temperatures.
7. Troubleshooting
If you encounter issues with your EQ-73 PREMIER, refer to the following common problems and solutions.
- No Power:
- Ensure the power adapter is securely connected to both the unit and a working power outlet.
- Verify the POWER button is pressed and the LED is illuminated.
- Check if the power outlet is functional by plugging in another device.
- No Sound Output:
- Check all audio cable connections (input and output) for proper seating and integrity.
- Ensure the source device is sending an audio signal.
- Verify that the EQ bands are not set to extreme cut values that would silence the signal. Try bypassing the EQ bands using their respective IN/OUT switches.
- If using the INSERT, ensure the external processor is correctly connected and functioning, or bypass the insert.
- Distorted Sound:
- Check the input level from your source. If it's too high, it can cause clipping.
- Ensure the gain settings on the EQ bands are not excessively boosted, which can lead to distortion.
- Test with different cables to rule out faulty wiring.
If these steps do not resolve the issue, please contact Golden Age Project customer support or your authorized dealer for further assistance.
8. Specifications
| Feature | Specification |
|---|---|
| Brand | Golden Age Project |
| Model Number | EQ-73 PREMIER |
| Number of Channels | 1 |
| EQ Bands | 3-band (LF, MF, HF) |
| Signal Path | Class A |
| Op-amp Type | Burr Brown |
| Inductors | Carnhill |
| Controls | Stepped |
| Material | Metal |
| Item Dimensions (L x W x H) | 12 x 10 x 4 inches (30.48 x 25.4 x 10.16 cm) |
| Item Weight | 5.54 pounds (2.51 kg) |
| Mounting Type | Surface Mount |
| Power Requirement | AC 24V (external adapter) |
| UPC | 687398893102 |
9. Warranty and Support
The Golden Age Project EQ-73 PREMIER is manufactured to high standards. For warranty information and technical support, please refer to the documentation provided with your purchase or visit the official Golden Age Project website. Keep your proof of purchase for any warranty claims.
For further assistance, you may contact your authorized Golden Age Project dealer.