
EverNice 91-018348-91 / 18348
Instruction Manual: Bobbin Case Cap & Bobbins
Brand: EverNice
Model/Part Number: 91-018348-91 / 18348
1. Product Overview
This product includes a large capacity bobbin case cap and 10 steel bobbins, designed for use with various industrial sewing machines. These components are essential for the proper functioning of the lower threading system in compatible sewing machines, ensuring smooth and consistent stitching.
The bobbin case holds the bobbin and regulates the lower thread tension, while the bobbins store the lower thread supply. This set provides a convenient replacement or spare for high-volume sewing operations.
2. Compatibility
This bobbin case cap and bobbin set is compatible with a range of industrial sewing machines. Specifically, it is designed for:
- Pfaff 541
- Pfaff 542
- Pfaff 545
- Pfaff 546
- Pfaff 551-555 series
- Pfaff 591-596 series
- Pfaff 544-720
- Pfaff 1245
- Pfaff 1242-720
- JUKI 1341
- Wanping 1245
- And many other compatible industrial sewing machine models.
The Pfaff Part Number for this bobbin case is 91-018348-91 / 18348.
3. Components Included
The package contains the following items:
- 1 x Large Capacity Bobbin Case Cap
- 10 x Steel Bobbins

Figure 3.1: Overview of the Bobbin Case Cap and 10 Steel Bobbins included in the set.
4. Setup and Installation
Proper installation of the bobbin and bobbin case is crucial for optimal sewing machine performance. Refer to your specific sewing machine's manual for detailed instructions on accessing and installing the bobbin case.
4.1. Winding Bobbins
- Place an empty steel bobbin onto the bobbin winder spindle of your sewing machine.
- Thread the machine for bobbin winding according to your machine's instructions.
- Start the machine to wind the thread evenly onto the bobbin. Do not overfill the bobbin.
- Once the bobbin is full, cut the thread and remove the bobbin from the winder.
4.2. Installing the Bobbin and Bobbin Case
- Open the bobbin compartment of your industrial sewing machine. This is typically located under the needle plate or in a side access panel.
- Insert a wound bobbin into the bobbin case. Ensure the thread unwinds in the correct direction (usually clockwise or counter-clockwise, as indicated by your machine's markings or manual).
- Guide the bobbin thread through the tension spring slot on the bobbin case. The thread should slide smoothly under the tension spring.
- Pull the thread gently to check for proper tension. It should offer slight resistance but pull freely.
- Insert the bobbin case, with the bobbin inside, into the shuttle hook assembly of your sewing machine. Ensure it clicks securely into place.
- Close the bobbin compartment cover.
- Perform a test stitch on scrap fabric to verify proper threading and tension before beginning your project.
5. Operating Considerations
Once installed, the bobbin case and bobbins operate in conjunction with your sewing machine's upper threading system to form stitches. Key considerations for optimal operation include:
- Thread Matching: For best results, use the same type and weight of thread for both the upper needle and the bobbin.
- Bobbin Tension: The bobbin case has an adjustable tension screw. If your stitches are uneven (e.g., loops on the top or bottom of the fabric), you may need to adjust the bobbin tension. Small adjustments are usually sufficient. Refer to your machine's manual for guidance on tension adjustment.
- Bobbin Winding: Ensure bobbins are wound evenly and not too tightly or too loosely. Unevenly wound bobbins can lead to skipped stitches or thread breaks.
6. Maintenance
Regular maintenance of your bobbin case and bobbins will extend their lifespan and ensure consistent sewing performance.
- Cleaning: Periodically remove the bobbin case and clean any lint, dust, or thread fragments that may have accumulated around the bobbin case and in the shuttle area. Use a small brush or compressed air.
- Inspection: Inspect the bobbin case for any signs of wear, nicks, or burrs, especially around the thread path and tension spring. Damaged bobbin cases can cause thread breakage or poor stitch quality.
- Storage: Store unused bobbins and the bobbin case in a clean, dry place, away from direct sunlight or extreme temperatures.
7. Troubleshooting
While these components are generally robust, issues related to the bobbin system can sometimes arise. Here are common problems and potential solutions:
| Problem | Possible Cause | Solution |
|---|---|---|
| Thread loops on top of fabric | Bobbin tension too loose. | Slightly tighten the small screw on the bobbin case. Test on scrap fabric. |
| Thread loops on bottom of fabric | Bobbin tension too tight, or upper tension too loose. | Slightly loosen the small screw on the bobbin case. Check upper thread tension. |
| Thread breaks frequently | Bobbin wound unevenly, burrs on bobbin case, incorrect bobbin insertion. | Rewind bobbin, inspect bobbin case for damage, re-insert bobbin correctly. |
| Skipped stitches | Incorrect bobbin insertion, lint in bobbin area. | Ensure bobbin is inserted correctly and bobbin case is seated properly. Clean the bobbin area. |
If issues persist, consult your sewing machine's comprehensive troubleshooting guide or contact a qualified technician.
8. Specifications
| Feature | Detail |
|---|---|
| Product Type | Bobbin Case Cap & Bobbins Set |
| Quantity | 1 Bobbin Case Cap, 10 Steel Bobbins |
| Bobbin Material | Steel |
| Bobbin Dimensions (Approx.) | Height: 11mm, Diameter: 25.7mm |
| Compatible Machine Types | Industrial Sewing Machines (e.g., Pfaff, JUKI, Wanping) |
| Pfaff Part Number | 91-018348-91 / 18348 |
| Manufacturer | EverNice |
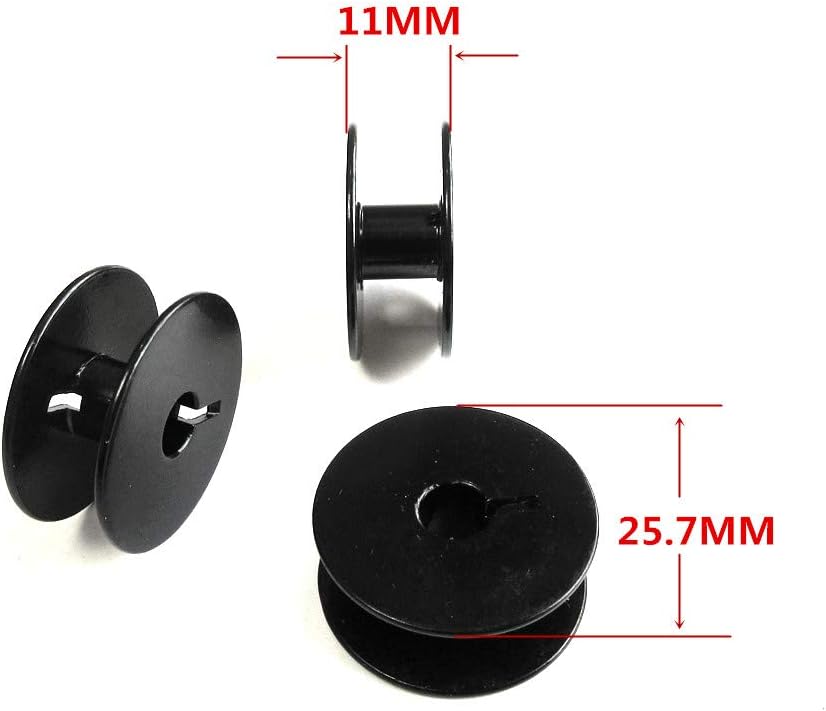
Figure 8.1: Approximate dimensions of the steel bobbins.
9. Warranty and Support
Specific warranty details for this product are not provided in this manual. For information regarding warranty coverage, returns, or technical support, please contact the seller or manufacturer directly.
You can visit the official EverNice store on Amazon for more information and contact options: EverNice Store.
Related Documents - 91-018348-91 / 18348
 |
Mercury Outboard Ignition System Service Manual - Section 2A Detailed service manual section for the Mercury Outboard Capacitor Discharge Ignition (CDI) system, covering specifications, testing procedures, component removal, and installation for models with 4/5 HP and 6 HP engines. |
 |
Ultravation Complete Whole House Air Cleaning System Owner's Guide Owner's guide for the Ultravation Complete Whole House Air Cleaning System, Equipment Support Box Air Cleaner. Includes installation, maintenance, replacement filters, and warranty information for models 90-028 through 90-043. |
 |
Patriot H8049 Long Tube Headers Installation Instructions & Warranty Detailed installation instructions and warranty information for Patriot H8049 Long Tube Headers, designed for 1967-1987 Chevrolet/GMC Pickup trucks and 1969-1991 Blazer, Jimmy, Yukon, and Tahoe models with 265-400 cubic inch engines. |
 |
CHERRY DW 9100 SLIM Wireless Keyboard and Mouse User Manual Comprehensive user guide for the CHERRY DW 9100 SLIM wireless keyboard and mouse, covering setup, connectivity (Bluetooth and RF), charging, cleaning, troubleshooting, and technical specifications. Includes safety information and compliance declarations. |
 |
INVT Goodrive880 Series Active Rectifier Component Hardware Manual Discover the INVT Goodrive880 Series Active Rectifier Component with this comprehensive hardware manual. It covers product specifications, configuration, electrical principles, wiring, and dimensions for industrial VFD systems. |
 |
CHERRY DW 9100 SLIM Wireless Keyboard and Mouse User Manual Comprehensive user guide for the CHERRY DW 9100 SLIM wireless keyboard and mouse set, covering setup, operation, troubleshooting, and technical specifications. Supports Bluetooth and RF connections. |
Ask a question about this manual
Ask about setup, troubleshooting, compatibility, parts, safety, or missing instructions. Manuals+ will review the question and use this page’s manual context to help answer it.