
1. Introduction
The MHCOZY 4-Channel Smart WiFi RF Bluetooth Wireless Dry Contact Relay Switch Module (Model TY4CH) is designed to integrate smart control into your home or industrial applications. This module allows you to remotely control up to four independent devices using the Smart Life/Tuya App, Bluetooth, or 433MHz RF remote control. It supports various operating modes including self-locking, momentary, and interlock, and is compatible with popular voice assistants like Alexa and Google Home.
This manual provides detailed instructions for installation, setup, operation, and troubleshooting to ensure safe and efficient use of your device.
2. Safety Information
- Ensure all power is disconnected before installation or wiring to prevent electric shock.
- Installation should be performed by qualified personnel if you are unfamiliar with electrical wiring.
- Do not exceed the maximum current and voltage ratings specified for the device.
- Operate the device within the specified working temperature and humidity ranges.
- Keep the device away from water and high humidity environments unless properly enclosed.
3. Package Contents
Verify that all items are present in the package:
- 1 x MHCOZY 4-Channel WiFi Dry Contact Relay Board
- 1 x ABS Shell
- 1 x Instruction Manual

Image: The MHCOZY 4-Channel Smart Switch module, showing both the assembled unit and the internal circuit board. Logos for Smart Life, Tuya Smart, Google Assistant, and Amazon Alexa are visible, indicating compatibility.
4. Product Overview
The MHCOZY 4-Channel Smart Switch features multiple input/output terminals, control buttons, and indicators for easy operation and monitoring.

Image: Front view of the MHCOZY 4-Channel Smart Switch. Labels indicate input voltage (7-32V), USB 5V input, reset button, and four manual control buttons (K1, K2, K3, K4). Output terminals for NC, COM, NO are visible for each of the four channels.
Key Components:
- Input Terminals: For DC 7-32V power supply.
- USB 5V Input: Alternative power supply via Micro-USB.
- Output Terminals (NC, COM, NO): Four sets of dry contact outputs for connecting devices.
- Manual Switches (K1-K4): Buttons for local control of each relay channel.
- Reset Button: Used for network pairing and resetting the device.
- Network Indicator: LED to show network status.
- Relay Instruction Lights: LEDs indicating the status of each relay.
5. Specifications
| Feature | Specification |
|---|---|
| Model | TY4CH |
| Input Voltage | USB 5V or DC 7-32V |
| Max. Load (per channel) | 10A / 250V AC or 10A / 30V DC |
| Total Load | 16A / 4 channels |
| Wireless Standard | Wi-Fi 2.4GHz b/g/n + Bluetooth |
| RF Frequency | 433MHz (Fixed Code) |
| Power Consumption | <1W |
| Quiescent Current | 80mA |
| Working Temperature | -40°C to 70°C |
| Working Humidity | 40% to 80% RH |
| Dimensions (L*W*H) | 8 * 7.8 * 3 cm (approx. 3.15 x 3.07 x 1.18 inches) |
| Case Material | ABS |
| Mounting Type | DIN Rail Mount |

Image: A diagram illustrating the dimensions of the MHCOZY 4-Channel Smart Switch and listing its key specifications, including input voltage, load capacity, wireless standards, and operating conditions.
6. Installation
6.1 Wiring Diagrams
The module provides dry contact outputs (NO, COM, NC) for each of its four channels. Ensure correct wiring based on your application and power source.
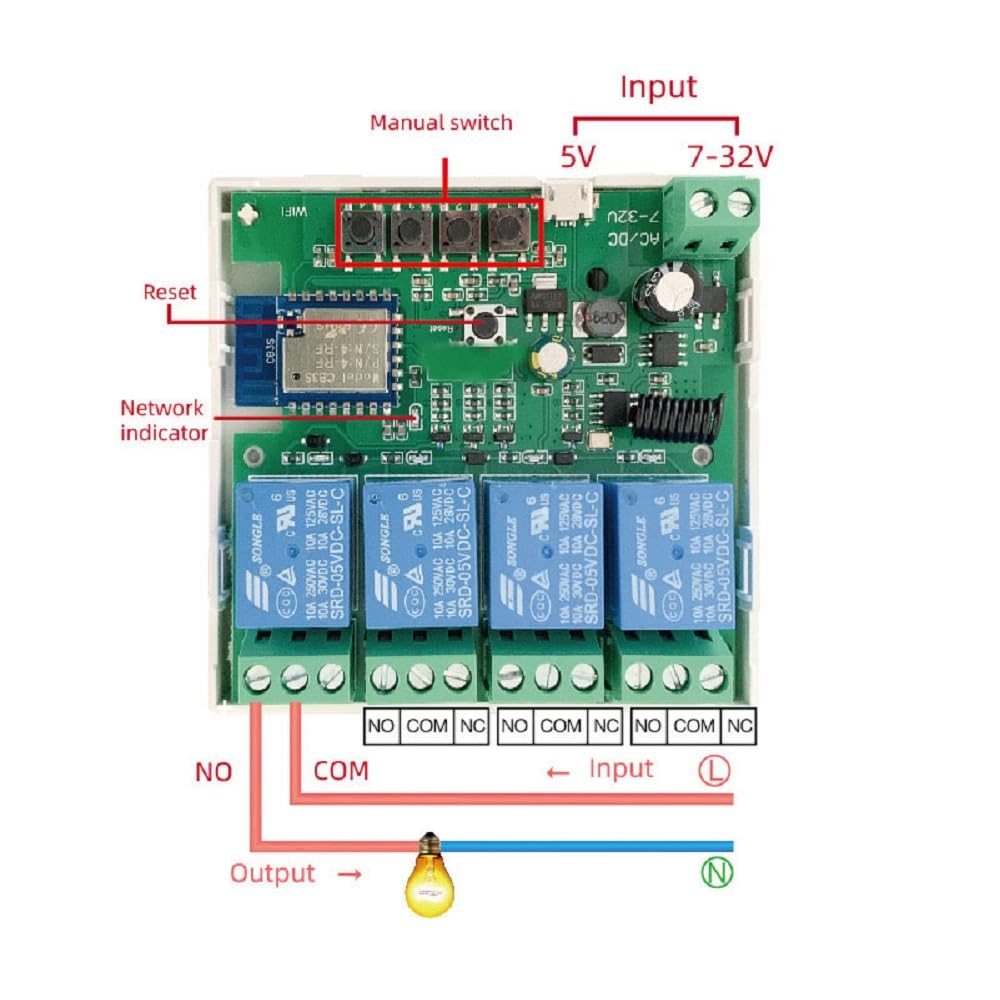
Image: An internal view of the MHCOZY 4-Channel Smart Switch circuit board, highlighting the manual switches, reset button, network indicator, and relay outputs. A basic wiring diagram shows how to connect a load (e.g., a light bulb) to the NO and COM terminals, with the input power (L and N) connected to the load.
General Wiring Principles:
- COM (Common): This is the common terminal for the relay switch.
- NO (Normally Open): The circuit is open (disconnected) when the relay is off, and closed (connected) when the relay is on.
- NC (Normally Closed): The circuit is closed (connected) when the relay is off, and open (disconnected) when the relay is on.
- Connect the power supply (USB 5V or DC 7-32V) to the designated input terminals.
6.2 DIN Rail Mounting
The module is designed for easy installation on a standard DIN rail, making it suitable for integration into electrical enclosures.
- Install the switch into the guide rail: Align the module's clips with the DIN rail.
- Slide it to the right place: Gently slide the module along the rail to your desired position.
- Press the mounting brackets until they click into place: Secure the module by pressing the clips until they lock onto the rail.

Image: A three-step visual guide demonstrating how to install the MHCOZY 4-Channel Smart Switch onto a DIN rail. The steps show aligning, sliding, and clicking the module into place.
7. Setup and Connectivity
7.1 App Download and Account Registration
- Download the Smart Life or Tuya Smart app from your mobile device's app store (iOS App Store or Google Play Store).
- Register for a new account or log in with an existing one.
7.2 Wi-Fi Pairing
Ensure your Wi-Fi network is 2.4GHz. The module does not support 5GHz Wi-Fi.
- Power on the MHCOZY module.
- Open the Smart Life/Tuya Smart app.
- Press and hold the Reset button on the module for approximately 5 seconds until the network indicator light starts blinking rapidly. This indicates pairing mode.
- In the app, tap the "+" icon to add a device.
- Select "Electrical" > "Switch (Wi-Fi)" or allow the app to auto-discover the device.
- Follow the on-screen instructions to connect the module to your 2.4GHz Wi-Fi network. You will need to enter your Wi-Fi password.
- Once connected, the network indicator light will stop blinking and remain solid. You can then rename the device and individual channels within the app.
7.3 Bluetooth Remote Control
After initial Wi-Fi configuration, the module can be controlled via Bluetooth even without an active Wi-Fi connection. This feature is useful in environments where Wi-Fi may be temporarily unavailable.
- Ensure Bluetooth is enabled on your mobile device.
- The Smart Life/Tuya App will automatically detect the module via Bluetooth if Wi-Fi is not available, allowing local control.
7.4 433MHz RF Remote Control
The module supports 433MHz fixed code RF remote controls. This allows for an additional method of control, independent of Wi-Fi or Bluetooth.
- Refer to your 433MHz RF remote control's instructions for pairing with compatible devices.
- The module can learn signals from fixed code 433MHz remotes. Specific pairing steps may vary and are typically initiated by a short press of the reset button or a dedicated pairing button on the module (if available, not explicitly shown).
8. Operating Modes
The MHCOZY module offers three distinct operating modes for its relays, configurable via the Smart Life/Tuya App.
8.1 Self-locking Mode (Latching)
In self-locking mode, each channel operates independently. Pressing the switch (physical or in-app) turns the device on, and it remains on until the switch is pressed again to turn it off.

Image: An illustration showing a mobile phone controlling four different devices (lamp, fan, outdoor light, garage door) in a house layout, demonstrating the independent control of each channel in self-locking mode.
8.2 Momentary Mode (Inching)
In momentary mode, the relay turns on for a set duration after being activated, then automatically turns off. This is ideal for applications like garage door openers or pulse-triggered devices.
- To set momentary mode: In the Smart Life/Tuya App, navigate to the device settings, select the desired channel, and choose "Inching Mode".
- Adjust the inching time from 1 second to 1 minute as required.

Image: A diagram showing the internal circuit board of the MHCOZY module connected to an external device, with text overlay indicating how to set inching mode and timing (1s to 1 hour) within the Tuya app.
8.3 Interlock Mode
In interlock mode, only one relay can be active at a time. When one relay is turned on, all other relays in the interlock group are automatically turned off. This is useful for controlling devices that should not operate simultaneously, such as motor direction control.
- To set interlock mode: In the Smart Life/Tuya App, configure the desired channels into an interlock group.
- The module supports up to two interlocked pairings.
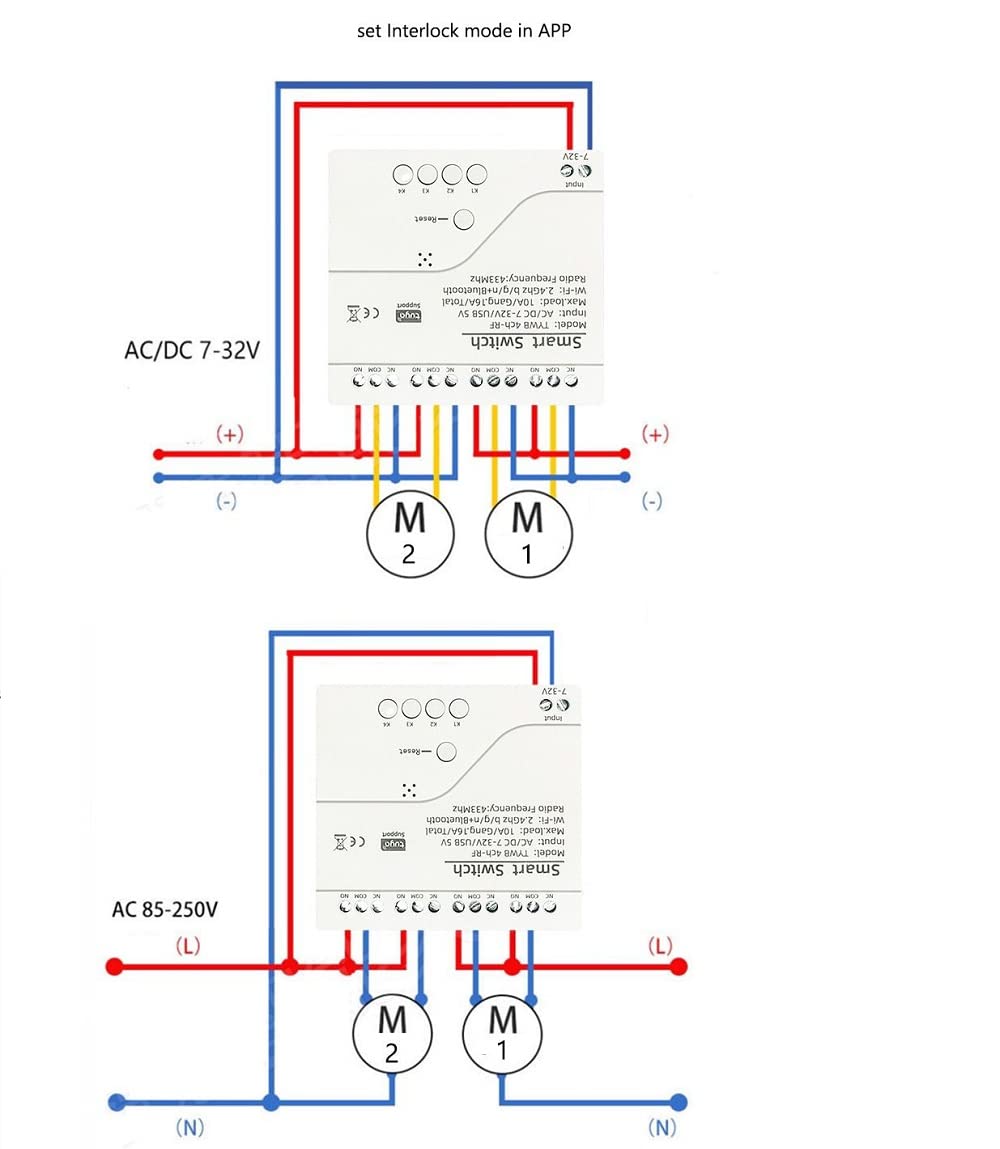
Image: Two wiring diagrams illustrating interlock mode for motor control. The top diagram shows DC 7-32V input controlling two motors (M1, M2) with positive and negative connections. The bottom diagram shows AC 85-250V input controlling two motors (M1, M2) with live (L) and neutral (N) connections, demonstrating how the relays prevent simultaneous operation.
8.4 Timer Functions
The Smart Life/Tuya App allows you to create various timers for automated control:
- Schedule Timers: Set specific times for devices to turn on or off daily or on selected days.
- Countdown Timers: Turn a device on or off after a specified duration.
- Loop Timers: Repeat on/off cycles.
- Timers can run even if the network is unavailable after initial setup.
8.5 Voice Control Integration
The module is compatible with popular voice assistants for hands-free control.
- Amazon Alexa: Link your Smart Life/Tuya account to Alexa through the Alexa app. Use commands like, "Alexa, turn on the light."
- Google Home: Link your Smart Life/Tuya account to Google Home through the Google Home app. Use commands like, "Hey Google, turn off the bedroom light."
- SmartThings & Siri: The module can also be integrated with SmartThings and controlled via Siri shortcuts after configuration in the Smart Life/Tuya app.
9. Maintenance
- Keep the device clean and free from dust.
- Avoid exposing the device to extreme temperatures or direct sunlight.
- Regularly check wiring connections for security and integrity.
- Ensure the device is installed in a well-ventilated area to prevent overheating.
10. Troubleshooting
Common Issues and Solutions:
- Device not connecting to Wi-Fi:
- Ensure your Wi-Fi network is 2.4GHz.
- Verify the Wi-Fi password is correct.
- Move the module closer to your Wi-Fi router.
- Reset the module and try pairing again.
- Relay not responding:
- Check the power supply to the module.
- Verify the wiring connections to the load.
- Ensure the module is connected to the app and shows an online status.
- Voice control not working:
- Confirm that your Smart Life/Tuya account is correctly linked to Alexa or Google Home.
- Check the device names in the voice assistant app to ensure they are recognizable.
- Ensure the module has an active internet connection.
- Module loses connectivity frequently:
- Check for Wi-Fi interference or weak signal strength.
- Ensure your router firmware is up to date.
- Consider a Wi-Fi extender if the distance to the router is significant.
- Power cycle the module and your router.
11. Warranty and Support
MHCOZY products are designed for reliability and performance. For specific warranty details, please refer to the product packaging or contact your retailer. For technical support, please reach out to MHCOZY customer service through the contact information provided with your purchase or on the official MHCOZY website.
When contacting support, please have your product model (TY4CH) and purchase information ready.