GW Security GW8CH853836MIC4
GW Security 8-Channel 4K PoE Security Camera System User Manual
Model: GW8CH853836MIC4
Brand: GW Security
1. Introduction and System Overview
This manual provides comprehensive instructions for the installation, operation, and maintenance of your GW Security 8-Channel 4K PoE Security Camera System. This system is designed to provide high-definition surveillance with advanced features for enhanced security.
Key Features:
- Ultra HD 4K (3840x2160) Resolution for superior image clarity.
- 8-Channel H.265+ 4K NVR with 2TB pre-installed hard drive, expandable up to 28TB.
- Four 4K (8MP) PoE IP Bullet Cameras with built-in microphones.
- 2.8-12mm Varifocal Lens for adjustable angle of view (20 to 120 degrees).
- Advanced AI Detection: Face Recognition, Human Detection, and Vehicle Detection.
- Starlight Color Night Vision for full-color video in low-light conditions.
- Power over Ethernet (PoE) for simplified installation with a single cable for power and video.
- Remote viewing capabilities via smartphone, tablet, and PC.
- H.265+ Video Encoding for efficient storage and bandwidth usage.
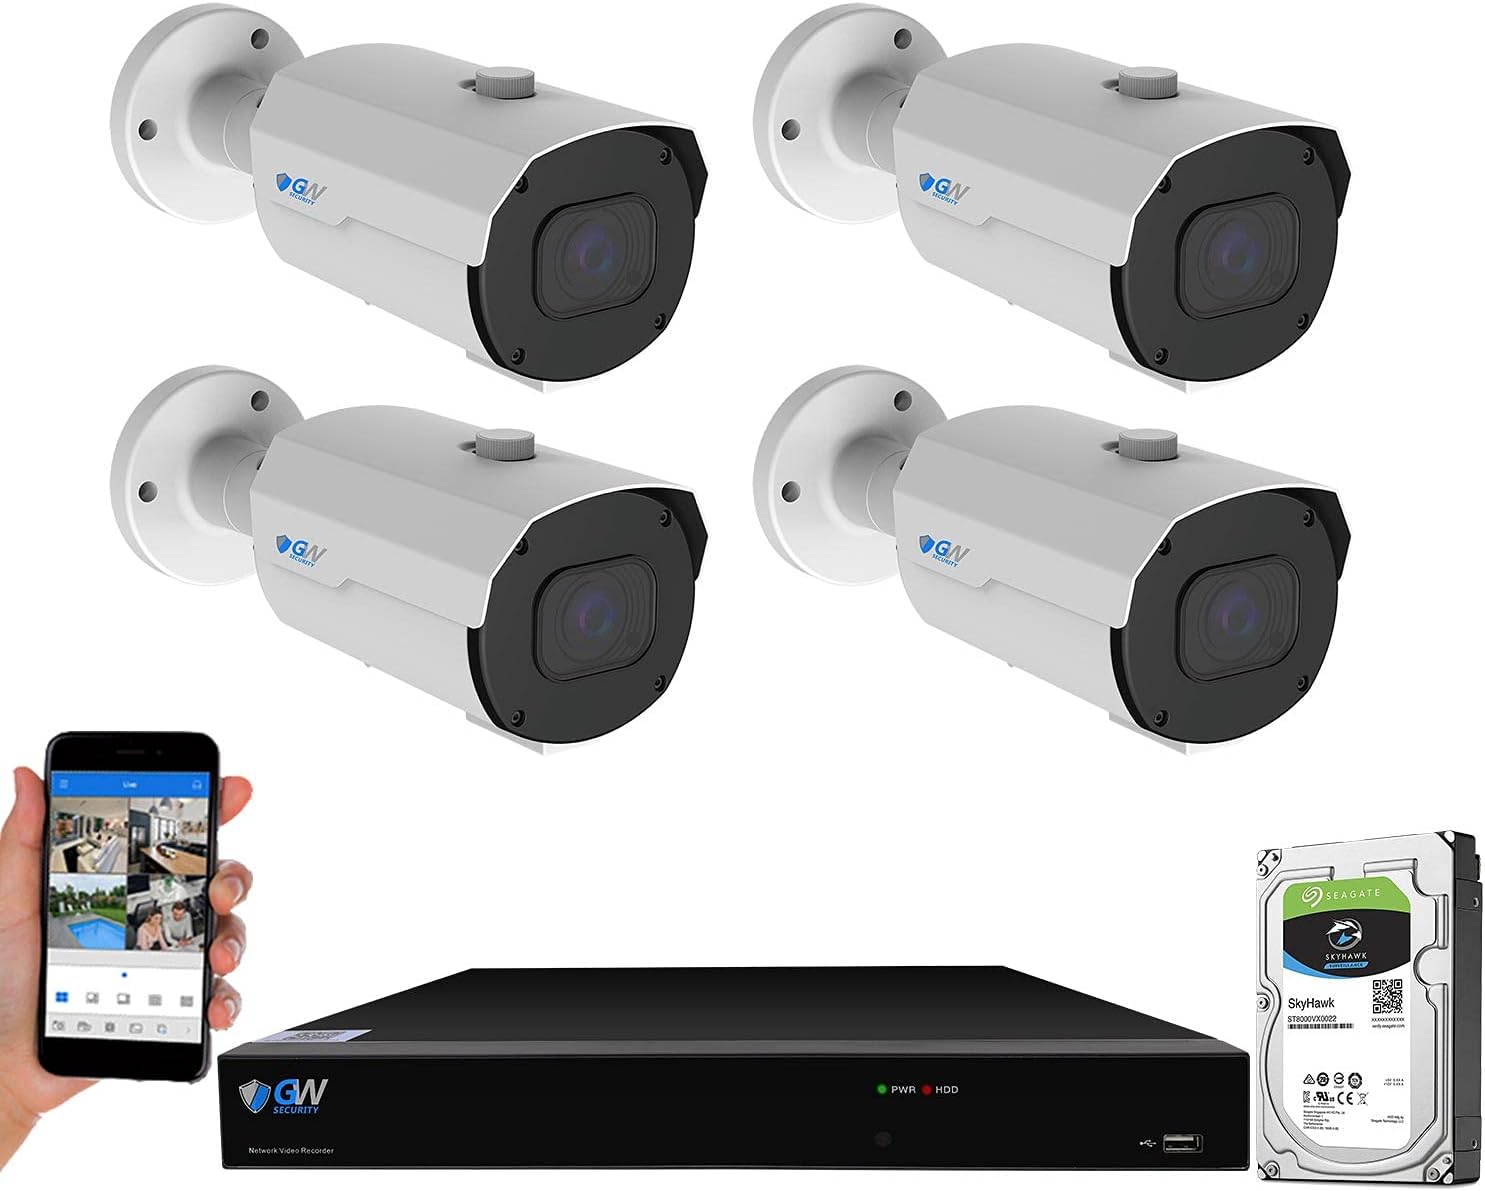
Figure 1.1: Overview of the GW Security 8-Channel NVR Security Camera System components.
2. System Setup
2.1 Package Contents
Before beginning installation, verify that all components are present:
- 1 x 8-Channel H.265+ NVR with 2TB Hard Drive (GW5508NPN)
- 4 x 4K 8MP IP Bullet Cameras with Microphone (GW8550MIC)
- 2 x 60ft Ethernet Cables (GWCAT60)
- 2 x 100ft Ethernet Cables (GWCAT100)
- User Manual and necessary hardware
2.2 Physical Installation
The system utilizes Power over Ethernet (PoE) for simplified wiring. A single Ethernet cable provides both power and video signal to each camera.
- NVR Placement: Place the NVR in a secure, well-ventilated area, away from direct sunlight and heat sources.
- Camera Mounting: Mount cameras in desired locations, ensuring a clear field of view. Use the provided mounting hardware.
- Connect Cameras to NVR: Connect each IP camera to a PoE port on the back of the NVR using the provided Ethernet cables.
- Connect NVR to Monitor: Connect the NVR to a monitor using an HDMI or VGA cable for local viewing and configuration.
- Connect NVR to Network: Connect the NVR's WAN port to your router using an Ethernet cable for remote access.
- Power On: Connect the NVR to a power outlet using the provided power adapter.

Figure 2.1: Simplified PoE connection diagram for the security system.

Figure 2.2: NVR front and rear panel connections.
2.3 Initial Configuration and Mobile Access
Once powered on, the NVR will boot up. Follow the on-screen prompts for initial setup, including setting up a password and network settings.
For remote viewing on your mobile device:
- Download the free "RXCamView" app from your smartphone's app store (available for iPhone and Android).
- Open the app and scan the QR code displayed on the NVR's monitor or located on the NVR's label.
- Follow the app's instructions to add your NVR system. You can now view live streams and playback from anywhere.
3. Operating the System
3.1 Live View and Playback
Access live camera feeds through the connected monitor or the mobile application. The NVR interface allows you to select individual cameras or view multiple feeds simultaneously. To review recorded footage, navigate to the playback menu on the NVR or within the mobile app, select the desired date and time.
3.2 Recording Modes
The system supports various recording modes:
- Continuous Recording: Records 24/7.
- Motion Detection Recording: Records only when motion is detected.
- Scheduled Recording: Records during specific times.
- AI Event Recording: Records when Face, Human, or Vehicle detection events occur.

Figure 3.1: The system supports 24/7 recording with the included hard drive.
3.3 Advanced AI Detection Features
The cameras are equipped with advanced Artificial Intelligence (AI) capabilities to enhance security and reduce false alarms:
- Face Recognition: The system can recognize familiar faces and send alerts for unknown faces.
- Human Detection: Distinguishes human figures from other moving objects, reducing alerts from pets or swaying branches.
- Vehicle Detection: Identifies vehicles, providing specific alerts for car activity.
Configure detection zones and sensitivity settings within the NVR's menu or mobile app to customize alerts.

Figure 3.2: AI Face Recognition capability.

Figure 3.3: Human Detection capability.

Figure 3.4: Smart Playback and Alerts for Human/Vehicle Detection.
3.4 Varifocal Lens Adjustment
The cameras feature a 2.8-12mm manual zoom varifocal lens, allowing you to adjust the angle of view from 20 to 120 degrees. A smaller focal length (e.g., 2.8mm) provides a wider angle of view with a shorter viewing distance, while a larger focal length (e.g., 12mm) offers a narrower field of view with a longer viewing distance. Adjust the lens manually on the camera body to achieve the desired coverage.

Figure 3.5: Examples of varifocal lens adjustments from 2.8mm to 12mm.
3.5 Night Vision and Audio Monitoring
The cameras are equipped with Starlight Color Night Vision, providing full-color video in very low light conditions, unlike traditional infrared cameras that produce black and white images at night. Each camera also includes a built-in microphone for audio monitoring, enhancing the surveillance capabilities.

Figure 3.6: Starlight Color Night Vision provides full-color video in low light.

Figure 3.7: Cameras include built-in microphones for audio monitoring.
4. Maintenance
4.1 Hard Drive Management
The NVR comes with a pre-installed 2TB hard drive. The system supports up to two SATA hard drives, with a total capacity of up to 28TB (14TB per drive). Regularly check the hard drive status in the NVR settings to ensure optimal recording performance. If the hard drive becomes full, older footage will be overwritten unless configured otherwise.

Figure 4.1: Hard drive capacity and expansion.
4.2 Cleaning and Care
- Camera Lenses: Gently wipe camera lenses with a soft, lint-free cloth to remove dust or smudges. Do not use harsh chemicals.
- NVR Unit: Keep the NVR unit clean and free of dust. Ensure ventilation openings are not blocked to prevent overheating.
- Cables: Periodically inspect all cables for wear or damage.
4.3 Firmware Updates
Periodically check the GW Security website for firmware updates for your NVR and cameras. Firmware updates can improve system performance, add new features, and enhance security. Follow the instructions provided with the update carefully.
5. Troubleshooting
This section addresses common issues you might encounter with your GW Security system.
| Problem | Possible Cause | Solution |
|---|---|---|
| No video display on monitor. | Loose video cable, NVR not powered on, incorrect input selected on monitor. | Check HDMI/VGA cable connection. Ensure NVR power adapter is connected and unit is on. Select correct input source on monitor. |
| No camera image. | PoE cable disconnected, camera not powered, faulty camera/port. | Verify Ethernet cable connection to camera and NVR PoE port. Check NVR PoE port status. Try connecting camera to a different PoE port. |
| Cannot access system remotely via app. | NVR not connected to internet, incorrect network settings, app not configured correctly. | Ensure NVR's WAN port is connected to your router. Check NVR network settings (DHCP enabled). Re-scan QR code in app or manually add device. |
| Excessive false motion alerts. | High motion sensitivity, environmental factors (e.g., swaying trees, shadows). | Adjust motion detection sensitivity in NVR settings. Utilize AI Human/Vehicle Detection to filter out irrelevant motion. Define specific motion detection zones. |
| Poor night vision quality. | Dirty lens, insufficient ambient light for color night vision. | Clean camera lens. Ensure there is some ambient light for optimal Starlight Color Night Vision performance. |

Figure 5.1: Motion detection configuration and alerts.
6. Specifications
| Feature | Detail |
|---|---|
| Brand | GW Security |
| Model Number | GW8CH853836MIC4 |
| Video Capture Resolution | 4K (3840x2160p) |
| Number of Channels | 8 |
| Memory Storage Capacity | 2 TB (expandable up to 28 TB) |
| Connectivity Technology | Wired (PoE) |
| Lens Type | Varifocal (2.8-12mm) |
| Night Vision Range | Up to 100 feet |
| Low Light Technology | Starlight Color Night Vision |
| Special Features | Image Sensor, Built-in Microphone, Face Recognition, Human/Vehicle Detection |
| Video Encoding | H.265+, H.265, H.264 |
| Frame Rate | 15fps (at 4K) |
| Video Input | VGA, HDMI |
| Product Dimensions | 15 x 10 x 8 inches |
| Item Weight | 22.3 pounds |

Figure 6.1: 8 Megapixel resolution provides superior detail.

Figure 6.2: H.265+ video compression efficiency.
7. Warranty and Support
7.1 Product Warranty
Your GW Security system is backed by a 2-Year Warranty, ensuring peace of mind regarding product quality and performance.
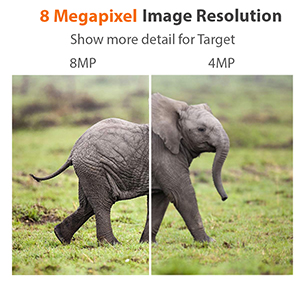
Figure 7.1: 2-Year Warranty coverage.
7.2 Technical Support
GW Security provides free, professional US-based technical support to assist you with any questions or issues. Our highly-trained staff are available to help you secure your property.
- Support Hours: Monday - Friday, 6:00 AM - 7:00 PM PST
- Contact Information: Please refer to the contact details provided on the GW Security official website or the packaging for the most current support channels (phone, email, chat).

Figure 7.2: Dedicated technical support team.
Related Documents - GW8CH853836MIC4
 |
Smart IP Camera with Battery Quick Start Guide A concise guide to setting up and using your Smart IP Camera with Battery, covering packing lists, interface descriptions, pairing, installation, charging, troubleshooting, and FAQs. |
 |
GW Security GW55 Series NVR User Manual: Setup, Operation, and Features This comprehensive user manual provides detailed instructions for setting up, configuring, and operating the GW Security GW55 Series Network Video Recorder (NVR). Learn about installation, system setup, alarm settings, AI features, playback, and remote access for your network video recorder. |
Ask a question about this manual
Ask about setup, troubleshooting, compatibility, parts, safety, or missing instructions. Manuals+ will review the question and use this page’s manual context to help answer it.