Introduction
This manual provides instructions for the safe and effective use of your YAMATIC 5000 PSI High Pressure Washer Trigger Gun and Nozzle Kit. This kit includes a high-pressure trigger gun with a 3/8" swivel FNPT quick connector, a 3500 PSI turbo nozzle, and five high-pressure spray nozzle tips. Please read this manual thoroughly before operation and retain it for future reference.
Safety Information
Always observe the following safety precautions when using the pressure washer trigger gun:
- Wear appropriate personal protective equipment (PPE), including safety glasses or goggles, gloves, and hearing protection.
- Never point the spray gun at people, pets, or electrical equipment. The high-pressure spray can cause serious injury.
- Ensure all connections are secure before operating the pressure washer to prevent leaks and accidental disconnections.
- Do not modify the trigger gun or nozzles. Use only genuine YAMATIC replacement parts.
- Keep children and bystanders away from the operating area.
- Always engage the trigger lock when the gun is not in use to prevent accidental discharge.
- Disconnect the trigger gun from the pressure washer and relieve pressure before performing any maintenance or changing accessories.
Package Contents
Verify that all items are present in your package:
- 1 x YAMATIC High Pressure Washer Trigger Gun with 3/8" Swivel FNPT Quick Connector
- 1 x YAMATIC 3500 PSI Turbo Nozzle
- 5 x High Pressure Washer Spray Nozzle Tips (0°, 15°, 25°, 40°, 65°)
Specifications
| Feature | Specification |
|---|---|
| Brand | YAMATIC |
| Model Number | 05eb8c5f-e47f-4518-b042-e97de18da11c |
| Maximum Operating Pressure (Trigger Gun) | 5000 PSI (35 Mpa) |
| Maximum Operating Pressure (Turbo Nozzle) | 3500 PSI |
| Maximum Flow Rate | 12 GPM |
| Inlet Connection Size | 3/8 Inches |
| Inlet Connection Type | FNPT Quick Connector (Swivel) |
| Outlet Connection Size | 1/4 Inches |
| Outlet Connection Type | Quick-Connect |
| Material | Brass, Ceramic |
| Working Temperature | 32°F-140°F (0°C-60°C) |
Setup
Follow these steps to set up your YAMATIC pressure washer trigger gun:
- Connect to Pressure Washer Hose:

This image illustrates the various connection types for the pressure washer trigger gun, including 3/8 inch, M22-14mm, and M22-15mm. Ensure your pressure washer hose matches one of these connection types. The trigger gun features a 3/8" swivel FNPT quick connector inlet. Connect your pressure washer hose to this inlet. The swivel design helps prevent hose kinking during use.
Note: This product is not compatible with SUN JOE pressure washers or standard garden hoses and faucets.
- Attach Nozzle or Accessory:

This image shows the assembled trigger gun with a nozzle. The trigger gun's outlet features a 1/4" quick-connect fitting. To attach a spray nozzle tip or the turbo nozzle, pull back the collar on the quick-connect fitting, insert the nozzle, and release the collar. Tug gently on the nozzle to ensure it is securely locked in place.
Operating Instructions
Before operating, ensure your pressure washer is connected to a water supply and powered on according to its manufacturer's instructions.
- Engage Trigger Lock:
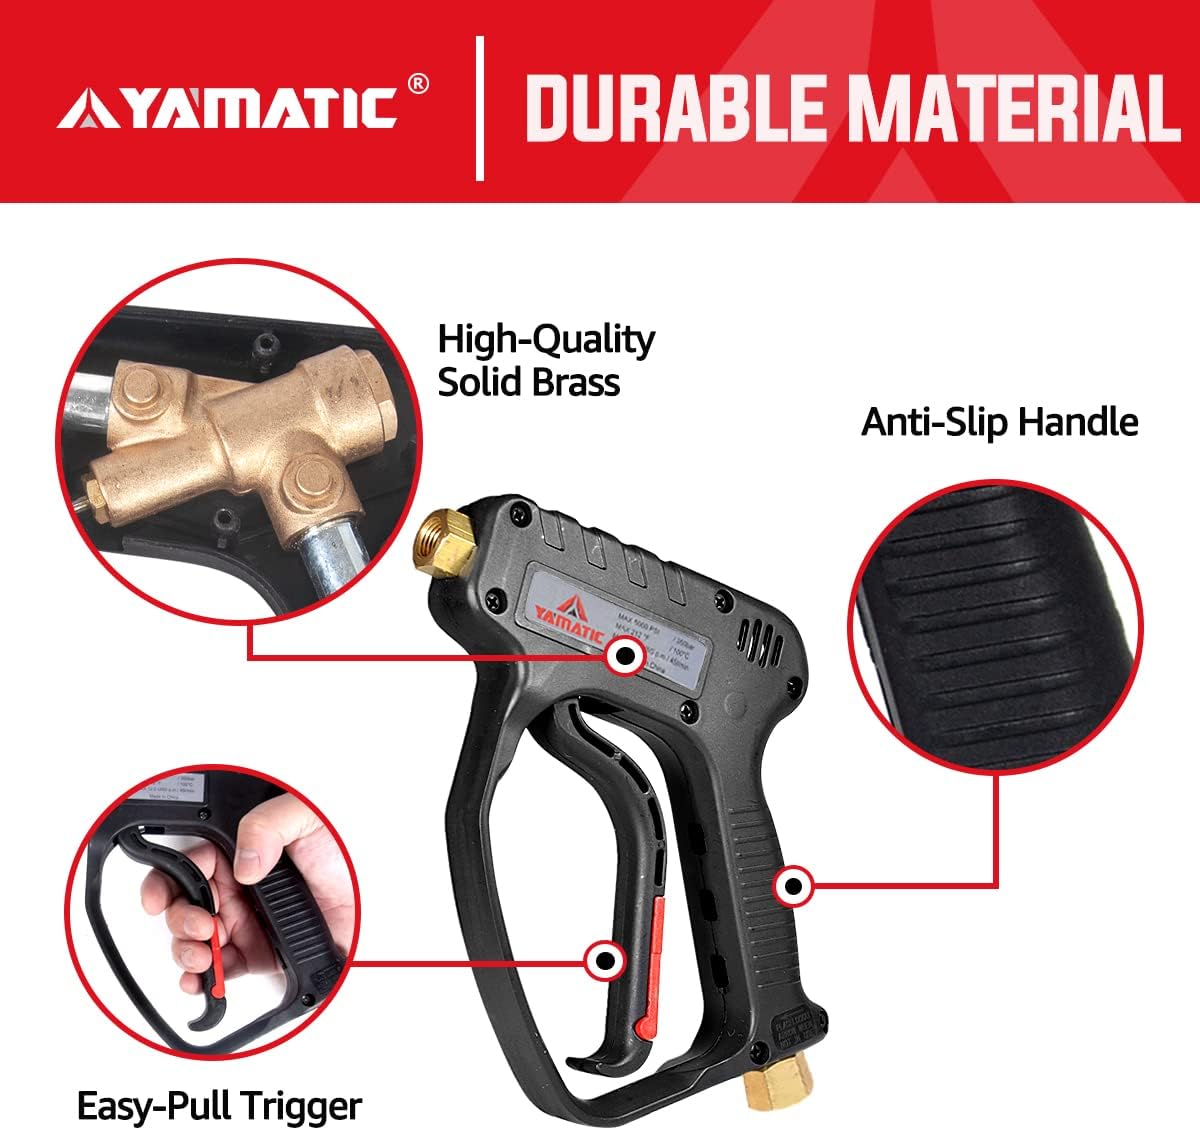
This image highlights the ergonomic design of the trigger gun, including the easy-pull red trigger and the anti-slip handle. The trigger gun features an easy-pull red trigger lock. When not actively spraying, push the red lever to engage the trigger lock, preventing accidental water discharge and reducing hand fatigue.
- Select Spray Nozzle:
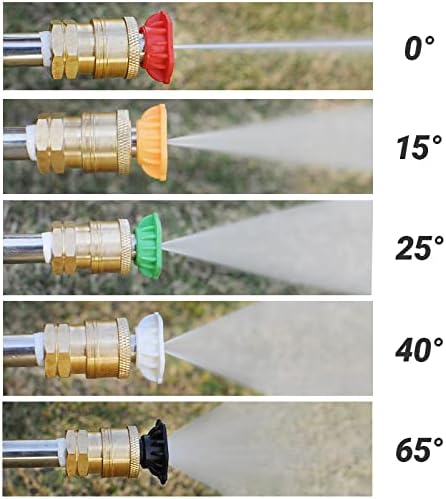
This image displays the five color-coded spray nozzle tips and their corresponding spray angles. Select the appropriate nozzle tip for your cleaning task:
- Red (0°): For intense spot cleaning or hard-to-reach areas. Use with extreme caution.
- Yellow (15°): For aggressive cleaning of small areas, such as removing stubborn dirt from concrete.
- Green (25°): For general cleaning of larger surfaces, like decks, patios, and driveways.
- White (40°): For gentle cleaning of delicate surfaces, such as vehicles, boats, and windows.
- Black (65°): For applying soap or detergent at low pressure.
- Using the Turbo Nozzle:

This image illustrates the wide, rotating spray pattern of the turbo nozzle, designed for fast and powerful cleaning. The turbo nozzle provides a 360-degree rotating jet of water, ideal for cleaning large, heavily soiled areas like concrete or brick. It offers a powerful cleaning action up to 3500 PSI and 4.0 GPM. The internal ceramic ball ensures durability and wear resistance.

This image provides a detailed view of the turbo nozzle, highlighting the A+ ceramic ball at its core. This ceramic component is crucial for the nozzle's wear resistance and its ability to produce a powerful, oscillating jet of water.

This image showcases the one-piece design of the turbo nozzle, which is engineered to prevent screws from loosening under high-pressure rotation and to eliminate water leakage, ensuring consistent performance.
- Begin Cleaning: Hold the trigger gun firmly with both hands. Aim the nozzle at the surface to be cleaned, maintaining a safe distance. Squeeze the trigger to start the water flow. Release the trigger to stop.
- Heat Dissipation: The trigger gun features a strip heat dissipation design, allowing it to perform effectively even with hot water (up to 140°F / 60°C) and prolonging its service life.

This image illustrates the strip heat dissipation design on the trigger gun, showing how air flows to cool the internal components, allowing for effective use with hot water.
Maintenance
Regular maintenance ensures optimal performance and extends the life of your trigger gun and nozzles.
- Nozzle Cleaning: If the spray pattern becomes irregular or pressure drops, the nozzle may be clogged. Use the included nozzle cleaning tool (if applicable) or a small paperclip to clear any debris from the nozzle opening. Rinse thoroughly.
- Inspect Connections: Periodically check all quick-connect fittings and threaded connections for wear, damage, or leaks. Replace O-rings or fittings as needed.
- Storage: After each use, disconnect the trigger gun and nozzles from the pressure washer. Drain any remaining water. Store in a clean, dry place, protected from freezing temperatures.
Troubleshooting
| Problem | Possible Cause | Solution |
|---|---|---|
| No water flow or low pressure | Clogged nozzle; insufficient water supply to pressure washer; air in the system. | Clean nozzle; ensure adequate water supply; bleed air from pressure washer pump. |
| Water leaking from connections | Loose connections; worn O-rings; damaged fittings. | Tighten all connections; replace worn O-rings; replace damaged fittings. |
| Trigger gun not engaging/disengaging | Trigger lock engaged; internal mechanism obstruction. | Disengage trigger lock; inspect for debris or damage, contact support if issue persists. |
Warranty and Support
YAMATIC products are manufactured to high-quality standards. For warranty information or technical support, please refer to the documentation provided with your pressure washer or visit the official YAMATIC website. If you encounter any issues not covered in this manual, please contact YAMATIC customer service for assistance.