1. Introduction
This manual provides detailed instructions for the installation and maintenance of the TASTONTUP 3-inch front and 2-inch rear leveling lift kit. This kit is designed to enhance vehicle appearance, increase ground clearance, and allow for larger custom rims and tires.
1.1. Compatibility
- 2003-2024 Toyota 4Runner (2WD/4WD)
- 2007-2015 FJ Cruiser (2WD/4WD)
- Note: Does NOT fit 4Runner Limited models with X-REAS hydraulic struts or 2018+ TRD PRO Models.

1.2. Kit Benefits
- Improves vehicle stance and aesthetics.
- Increases ground clearance for off-road capabilities.
- Allows for installation of larger wheels and tires.
- Includes a differential lowering kit to reduce wear on CV joints and axles.

2. Safety Information
Always prioritize safety during installation. If you are not confident in your mechanical abilities, seek professional installation.
- Wear appropriate personal protective equipment (PPE), including safety glasses and gloves.
- Ensure the vehicle is securely supported on a level surface using jack stands before beginning any work. Never rely solely on a jack.
- Disconnect the vehicle's battery before starting electrical work, if any.
- Follow all torque specifications provided by the vehicle manufacturer and this kit.
- After installation, a professional wheel alignment is mandatory to ensure proper vehicle handling and tire wear.
3. Package Contents
Verify that all components listed below are present and undamaged before beginning installation.
- 2 x Front Strut Spacers (Billet Aluminum)
- 2 x Rear Coil Spring Spacers
- 2 x Differential Drop Spacers
- 2 x Skid Plate Drop Spacers
- Necessary mounting hardware (bolts, nuts, washers)

4. Tools Required
The following tools are generally required for installation:
- Vehicle Jack and Jack Stands
- Wheel Chocks
- Metric Socket and Wrench Set
- Torque Wrench
- Pry Bar
- Spring Compressor (may be required depending on vehicle and strut design)
- Penetrating Oil
- Basic Hand Tools (hammer, screwdrivers, etc.)
5. Installation Guide (Setup)
Installation typically takes 2 to 4 hours. No special tools are generally required beyond standard automotive tools. Always refer to your vehicle's service manual for specific component removal and torque specifications.
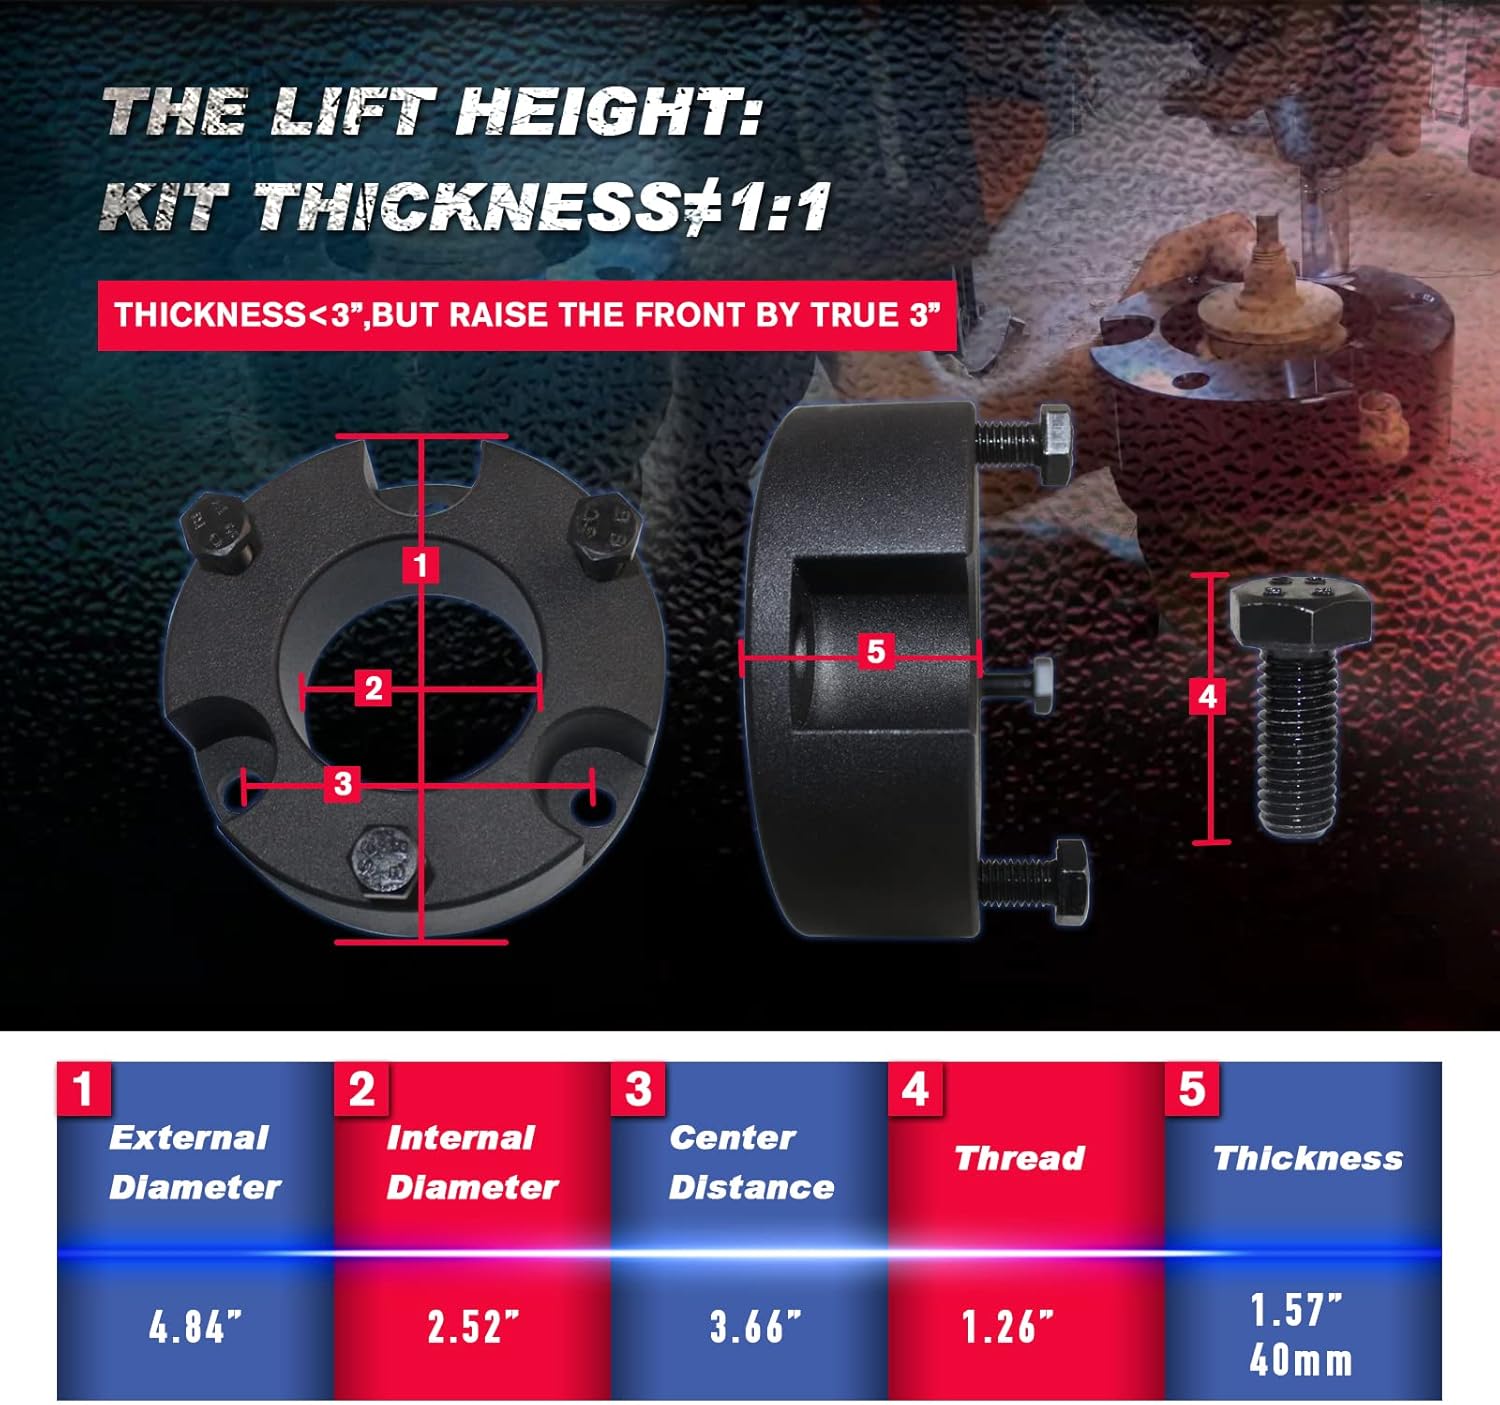
5.1. Important Note on Lift Height
It is crucial to understand that the ratio of spacer thickness to actual lift height is not 1:1. A 3-inch lift may be achieved with a spacer that is less than 3 inches thick due to suspension geometry. Measure your vehicle's ride height before and after installation to confirm the achieved lift.

5.2. Front Strut Spacer Installation
- Safely lift the front of the vehicle and support it with jack stands. Remove the front wheels.
- Remove the lower strut bolts and disconnect any components attached to the strut assembly (e.g., sway bar links, ABS lines).
- Carefully remove the upper strut nuts. The strut assembly can now be removed from the vehicle.
- Install the front strut spacer on top of the strut assembly, aligning the bolt holes. Secure with the provided hardware.
- Reinstall the strut assembly into the vehicle, securing the upper strut nuts and lower strut bolts. Reconnect all disconnected components.
- Repeat for the other side.
5.3. Rear Coil Spring Spacer Installation
- Safely lift the rear of the vehicle and support it with jack stands. Remove the rear wheels.
- Support the rear axle with a jack. Disconnect the lower shock bolts and any other components that limit axle droop (e.g., sway bar links).
- Slowly lower the axle to allow the coil springs to be removed.
- Place the rear coil spring spacers on top of the factory spring pockets or directly under the coil springs, as per design.
- Raise the axle to compress the springs and reinstall the lower shock bolts and any other disconnected components.
- Repeat for the other side.
5.4. Differential Drop Kit Installation
The differential drop kit lowers the front differential to correct the CV axle angles, reducing stress and wear on the CV joints and boots after lifting the front of the vehicle.
- Locate the front differential mounting points.
- Install the differential drop spacers between the differential and the frame mounting points using the provided longer bolts.
- Install the skid plate drop spacers to ensure proper clearance for the skid plate after the differential has been lowered.
- Torque all bolts to manufacturer specifications.
5.5. Post-Installation
- Reinstall all wheels and lower the vehicle.
- Torque wheel lug nuts to vehicle manufacturer specifications.
- Mandatory: Drive the vehicle a short distance and then re-check all fasteners for tightness.
- Mandatory: Have a professional alignment performed immediately after installation to prevent premature tire wear and ensure safe handling.
5.6. Installation Videos
Refer to the following videos for visual guidance on the installation process. These videos demonstrate general procedures for similar leveling lift kits on compatible vehicles.
Video 5.1: TASTONTUP Leveling Lift Kit Installation for Toyota 4Runner/FJ Cruiser. This video provides a step-by-step guide for installing a full leveling lift kit on compatible Toyota models.
Video 5.2: Differential Drop Kit Installation for Toyota 4Runner/FJ Cruiser. This video focuses on the installation of the differential drop kit, crucial for maintaining proper CV axle angles after a lift.
Video 5.3: TORCH 3" Lift Kit Installation for Toyota 4Runner/FJ Cruiser. Another helpful video demonstrating the installation of a 3-inch lift kit on compatible Toyota vehicles.
6. Operating Considerations
After installing the leveling lift kit, the vehicle's handling characteristics may change slightly. It is recommended to drive cautiously until you become accustomed to the new ride height and feel.
- Increased center of gravity may affect cornering stability.
- Braking distances may be marginally affected.
- Be mindful of overhead clearances when entering garages or low-clearance areas.
7. Maintenance
Regular inspection and maintenance are crucial for the longevity and safe operation of your lifted vehicle.
- Initial Check: After approximately 500 miles, re-torque all fasteners installed with the lift kit.
- Routine Checks: Periodically inspect all suspension components, including bolts, spacers, and bushings, for any signs of wear, damage, or looseness.
- Alignment: Re-check wheel alignment annually or if you notice uneven tire wear or changes in steering.
- Cleaning: Keep suspension components clean, especially after off-road use, to prevent corrosion and premature wear.
8. Troubleshooting
If you encounter any issues after installation, consider the following common troubleshooting steps:
- Uneven Ride Height: Double-check that the correct spacers were installed on the appropriate corners of the vehicle. Ensure all components are seated correctly.
- Noise (Clunking/Squeaking): Inspect all fasteners for proper torque. Check for any components rubbing against each other. Lubricate bushings if necessary.
- Steering/Handling Issues: This is almost always due to improper alignment. Ensure a professional alignment has been performed. Check for loose steering or suspension components.
- Vibrations: Verify that the differential drop kit was installed correctly. Check for proper driveshaft angles.
If problems persist, contact TASTONTUP customer support or a qualified automotive technician.
9. Specifications
| Feature | Specification |
|---|---|
| Brand | TASTONTUP |
| Model Number | AW-119 |
| Auto Part Position | Front, Rear |
| Material | Aluminum, High-Density Polyurethane |
| Maximum Lifting Height | 3 Inches (Front), 2 Inches (Rear) |
| Included Components | 2 x Front Strut Spacers-Billet Aluminum, 2 x Rear Coil Spring Spacers, 2 x Differential Drop Spacers, 2 x Skid Plate Drop Spacers |
| Item Weight | 9.09 pounds |
| UPC | 797032830209 |
10. Warranty & Support
For warranty information and customer support, please refer to the manufacturer's official website or contact TASTONTUP directly. Keep your purchase receipt for any warranty claims.
TASTONTUP Customer Service: Refer to your product packaging or the seller's information on the purchase platform for the most current contact details.