Marcree MK1-60
Marcree Biometric Fingerprint Safe Box User Manual
Model: MK1-60
Introduction
Thank you for choosing the Marcree Biometric Fingerprint Safe Box. This safe is designed to provide secure storage for your valuables, documents, and other important items. It features advanced biometric fingerprint recognition, a touch screen keypad, and multiple unlocking methods for enhanced security and convenience. Constructed from premium-grade solid alloy steel, it offers robust protection against various forms of intrusion. This manual will guide you through the setup, operation, and maintenance of your new safe.

Figure 1: Marcree Biometric Fingerprint Safe Box (Model MK1-60)
This image displays the Marcree Biometric Fingerprint Safe Box with its door open, revealing a spacious interior designed for storing various valuables such as cash, a camera, and gold bars. The biometric keypad is visible on the exterior.
Package Contents
Before proceeding with the setup, please verify that all components listed below are present in your package:
- 1 x Marcree Biometric Safe Box
- 2 x Master Keys
- 2 x Emergency Keys
- 6 x Mounting Screws
- 1 x Emergency Battery Box
- 4 x Non-slip Foot Mats
- 1 x User Manual (this document)
Important: Do not leave the keys or the emergency battery box inside the safe box.

Figure 2: Package Contents
This image illustrates all items included in the safe box package, ensuring users can verify they have received everything necessary for setup and operation.
Setup and Installation
1. Initial Opening and Battery Installation
- Locate the emergency keyhole, usually concealed behind a cover on the keypad panel.
- Insert one of the emergency keys and turn it to unlock the safe.
- Open the safe door.
- Inside the safe, locate the battery compartment, typically on the back of the door or inside the main cabinet.
- Insert the required batteries (not included) into the compartment, ensuring correct polarity. The safe requires 4 AA batteries.
- Close the battery compartment.
2. Mounting the Safe
For enhanced security, it is recommended to mount the safe to a floor or wall. The safe comes with pre-drilled holes and mounting hardware.
- Floor Mount: Position the safe in the desired location. Mark the drilling points through the pre-drilled holes at the bottom of the safe. Drill pilot holes into the floor, then secure the safe using the provided mounting screws.
- Wall Mount: Position the safe against a sturdy wall. Mark the drilling points through the pre-drilled holes at the back of the safe. Drill pilot holes into the wall, then secure the safe using the provided mounting screws. Ensure the wall material can support the weight of the safe and its contents.

Figure 3: Easy Installation Steps
This diagram illustrates the three-step process for securely mounting the safe using the provided expansion screws, suitable for both floor and wall installations.
Operating Instructions
1. Unlocking Methods
Your Marcree safe offers multiple secure unlocking methods:
- Master Key + Emergency Key: Used for first opening or emergency situations.
- Biometric Fingerprint: Quick access (≤ 0.1s) with capacity for up to 30 different fingerprints.
- Personal Password: Utilizes a 10-digit backlit touch screen keypad.
- Password + Fingerprint: A two-factor authentication mode for enhanced security.
- Combined Methods with Master Key:
- Keep the master keyhole at a horizontal angle, then unlock with password, fingerprint, or password + fingerprint.
- Keep the master keyhole at a vertical angle, then open with password + master key, fingerprint + master key, or password + fingerprint + master key.
Note: After entering the correct code or scanning a registered fingerprint, you must turn the handle to open the door.

Figure 4: Multiple Unlocking Methods
This image visually explains the various ways to unlock the safe, including key, fingerprint, password, and combined methods, highlighting the flexibility and security options available.

Figure 5: More Unlocking Modes
This image details the three primary unlocking modes: semiconductor fingerprint, touch screen keypad, and double key, emphasizing the advanced security features.
2. Setting Up Fingerprints and Passwords
Refer to the quick start guide included in your package for detailed instructions on programming fingerprints and setting your personal password. It is crucial to set up your preferred unlocking methods immediately after initial opening.

Figure 6: Biometric Fingerprint Recognition
This image highlights the biometric fingerprint recognition feature, demonstrating its quick access capability and high resolution for reliable scanning.
3. Dual Alarm System
The safe is equipped with an advanced dual alarm system to deter unauthorized access:
- Incorrect Entry Alarm: An alarm will trigger if three consecutive incorrect password or fingerprint attempts are made.
- Vibration Alarm: The alarm activates in the event of violent vibrations or tampering.
The powerful alarm sound exceeds 70 decibels and will sound for 60 seconds, ensuring you are alerted from any part of your home.

Figure 7: Dual Alarm System Coverage
This image illustrates the reach of the safe's dual alarm system, showing how its loud sound (≥70 dB) can be heard throughout a typical home layout, providing effective security alerts.
Features and Design
- Robust Construction: Crafted from premium-grade solid alloy steel, offering resistance against drilling, smashing, and extreme temperatures. Features a reinforced door panel and four solid locking bolts.
- Ample Storage Space: 3.0 cubic feet interior with a removable and adjustable shelf, a versatile multi-function hook, and a private inner cabinet for customizable storage.
- Anti-Drilling and Anti-Prying: Designed with micro seam design and thickened structure to prevent forced entry.
- Large Opening Angle: Provides easy access to the safe's interior.
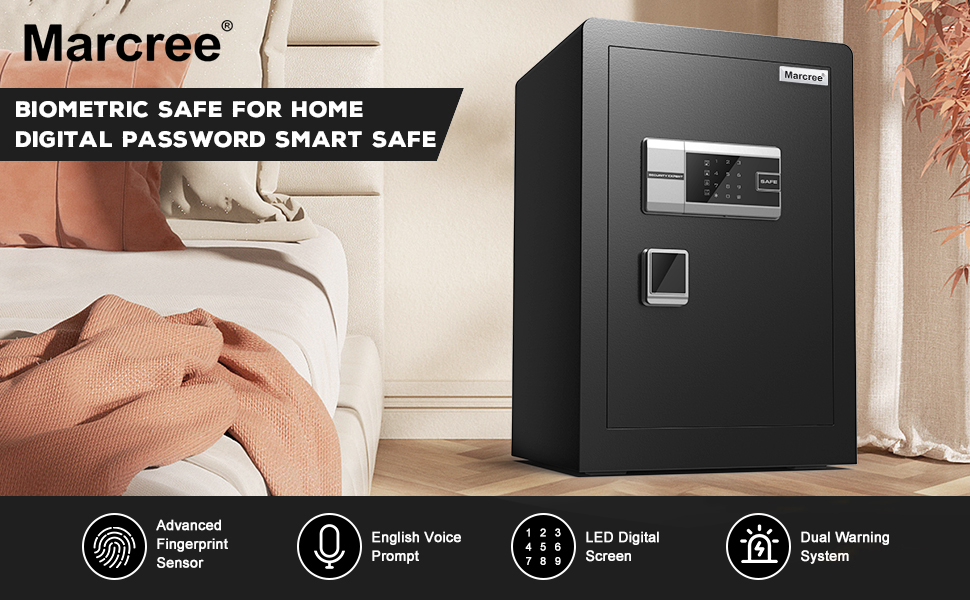
Figure 8: Security and Convenience Features
This image highlights the safe's robust security features, including anti-prying design and dual alarm system, alongside its convenient large opening angle and spacious interior.

Figure 9: Adjustable Shelf and Inner Cabinet
This image showcases the safe's interior flexibility, demonstrating how the adjustable shelf and inner cabinet can be configured to accommodate various items, providing more flexible and larger storage space.
Maintenance
- Cleaning: Wipe the exterior of the safe with a soft, damp cloth. Avoid abrasive cleaners or solvents that could damage the finish or electronic components.
- Battery Replacement: When the battery indicator light signals low power, or if the keypad becomes unresponsive, replace all batteries with new ones. Use the emergency battery box if the internal batteries are completely depleted and the safe cannot be opened electronically.
- Key Storage: Store master and emergency keys in a secure location outside the safe, accessible only to authorized individuals.
- Regular Checks: Periodically check the locking bolts and door hinges for any signs of wear or damage. Ensure the safe is securely mounted if applicable.
Troubleshooting
| Problem | Possible Cause | Solution |
|---|---|---|
| Safe does not open with fingerprint/password. | Low batteries; incorrect fingerprint/password; system error. | Replace batteries. Re-enter password carefully. Re-scan fingerprint. Use emergency key to open. |
| Alarm sounds unexpectedly. | Three incorrect entries; violent vibration/tampering. | Ensure correct entries. Check for external impacts. The alarm will stop after 60 seconds or upon successful unlocking. |
| Keypad is unresponsive. | Dead batteries; connection issue. | Replace batteries. Use emergency battery box if needed. If issue persists, contact customer support. |
| Door does not close properly. | Obstruction; misaligned bolts. | Check for items blocking the door or bolts. Ensure safe is on a level surface. |
Specifications
| Feature | Detail |
|---|---|
| Brand | Marcree |
| Model Number | MK1-60 |
| Product Dimensions | 12.9"D x 15.74"W x 22.05"H |
| Lock Type | Biometric, Digital Keypad, Key |
| Color | 3.0 Cub Fingerprint (Black) |
| Capacity | 3 Cubic Feet |
| Material | Alloy Steel |
| Special Feature | Alarm System (Dual Warning) |
| Mounting Type | Floor Mount (also wall mountable) |
| Item Weight | 44 Pounds |
| Water Resistance Level | Not Water Resistant |
| Batteries Required | Yes (4 AA batteries, not included) |

Figure 10: Product Dimensions and Specifications
This image provides a detailed visual representation of the safe's external and internal dimensions, along with a clear display of the accessories included in the package.
Warranty and Customer Support
Marcree stands behind the quality of its products. Your Biometric Fingerprint Safe Box comes with:
- A comprehensive five-year warranty.
- Lifetime after-sales service.
- 24/7 online customer support.
- A hassle-free 90-day return policy.
If you have any questions, concerns, or require assistance with your safe, please do not hesitate to contact Marcree customer support. Refer to the contact information provided on the product packaging or the official Marcree website.