1. Introduction
This manual provides detailed instructions for the installation, operation, and maintenance of your podofo 9-inch 4-Split IP69 Night Vision Backup Camera System. This system is designed to enhance safety and visibility for large vehicles such as RVs, trucks, trailers, pickups, vans, and buses by providing multiple camera views on a single monitor.

Figure 1: Complete podofo 9-inch Backup Camera System components.
2. Package Contents
Please verify that all items listed below are included in your package:
- 1 x 9-inch LCD Color Monitor
- 4 x AHD Cameras (2 Front, 2 Rear)
- 2 x 65ft (20m) 4-pin Aviation Cables
- 2 x 32ft (10m) 4-pin Aviation Cables
- 1 x Remote Control
- 1 x Monitor Mounting Bracket
- 1 x Power Cable for Monitor

Figure 2: Package contents and component dimensions.
3. Product Features
- 9-inch Split Screen Monitor: Supports 4-channel video input, allowing simultaneous display of up to four camera views. The screen can be configured for single, dual, or quad-view display.
- Image Rotation and Mirroring: Images can be rotated horizontally and vertically for mirror or normal viewing, providing flexibility for various mounting positions.
- High-Definition Cameras: Equipped with AHD cameras for clear image display.
- IP68 Waterproof Rating: Cameras are designed to withstand harsh weather conditions.
- 18-LED Night Vision: Ensures clear visibility in low-light conditions.
- Wide Viewing Angle: Cameras offer a 170-degree wide viewing angle for comprehensive coverage.
- Adjustable Angle: Cameras feature an adjustable mounting bracket for optimal positioning.
- Reverse Parking Lines: Option to enable or disable reverse parking guidelines on the monitor.

Figure 3: Monitor split-screen display options.

Figure 4: Image mirroring effect.

Figure 5: Reverse parking line on/off feature.

Figure 6: Camera features and specifications.
4. Installation Guide
This section outlines the steps for installing your backup camera system. Professional installation is recommended for optimal performance and safety.
4.1 Mounting the Monitor
- Choose a suitable location on your dashboard or overhead console that does not obstruct your view or interfere with vehicle controls.
- Attach the monitor to the included mounting bracket.
- Secure the bracket to the chosen surface using appropriate fasteners. Ensure the monitor is stable and positioned for easy viewing.
4.2 Mounting the Cameras
The system includes two front and two rear cameras. Select mounting locations that provide the desired field of view and are protected from direct impact.
- For rear cameras, common locations include above the license plate, near the top of the rear bumper, or on the rear of an RV/trailer.
- For front cameras, consider mounting near the front grille or bumper.
- Use the adjustable bracket to angle the camera for the best view.
- Securely fasten each camera using the provided hardware.
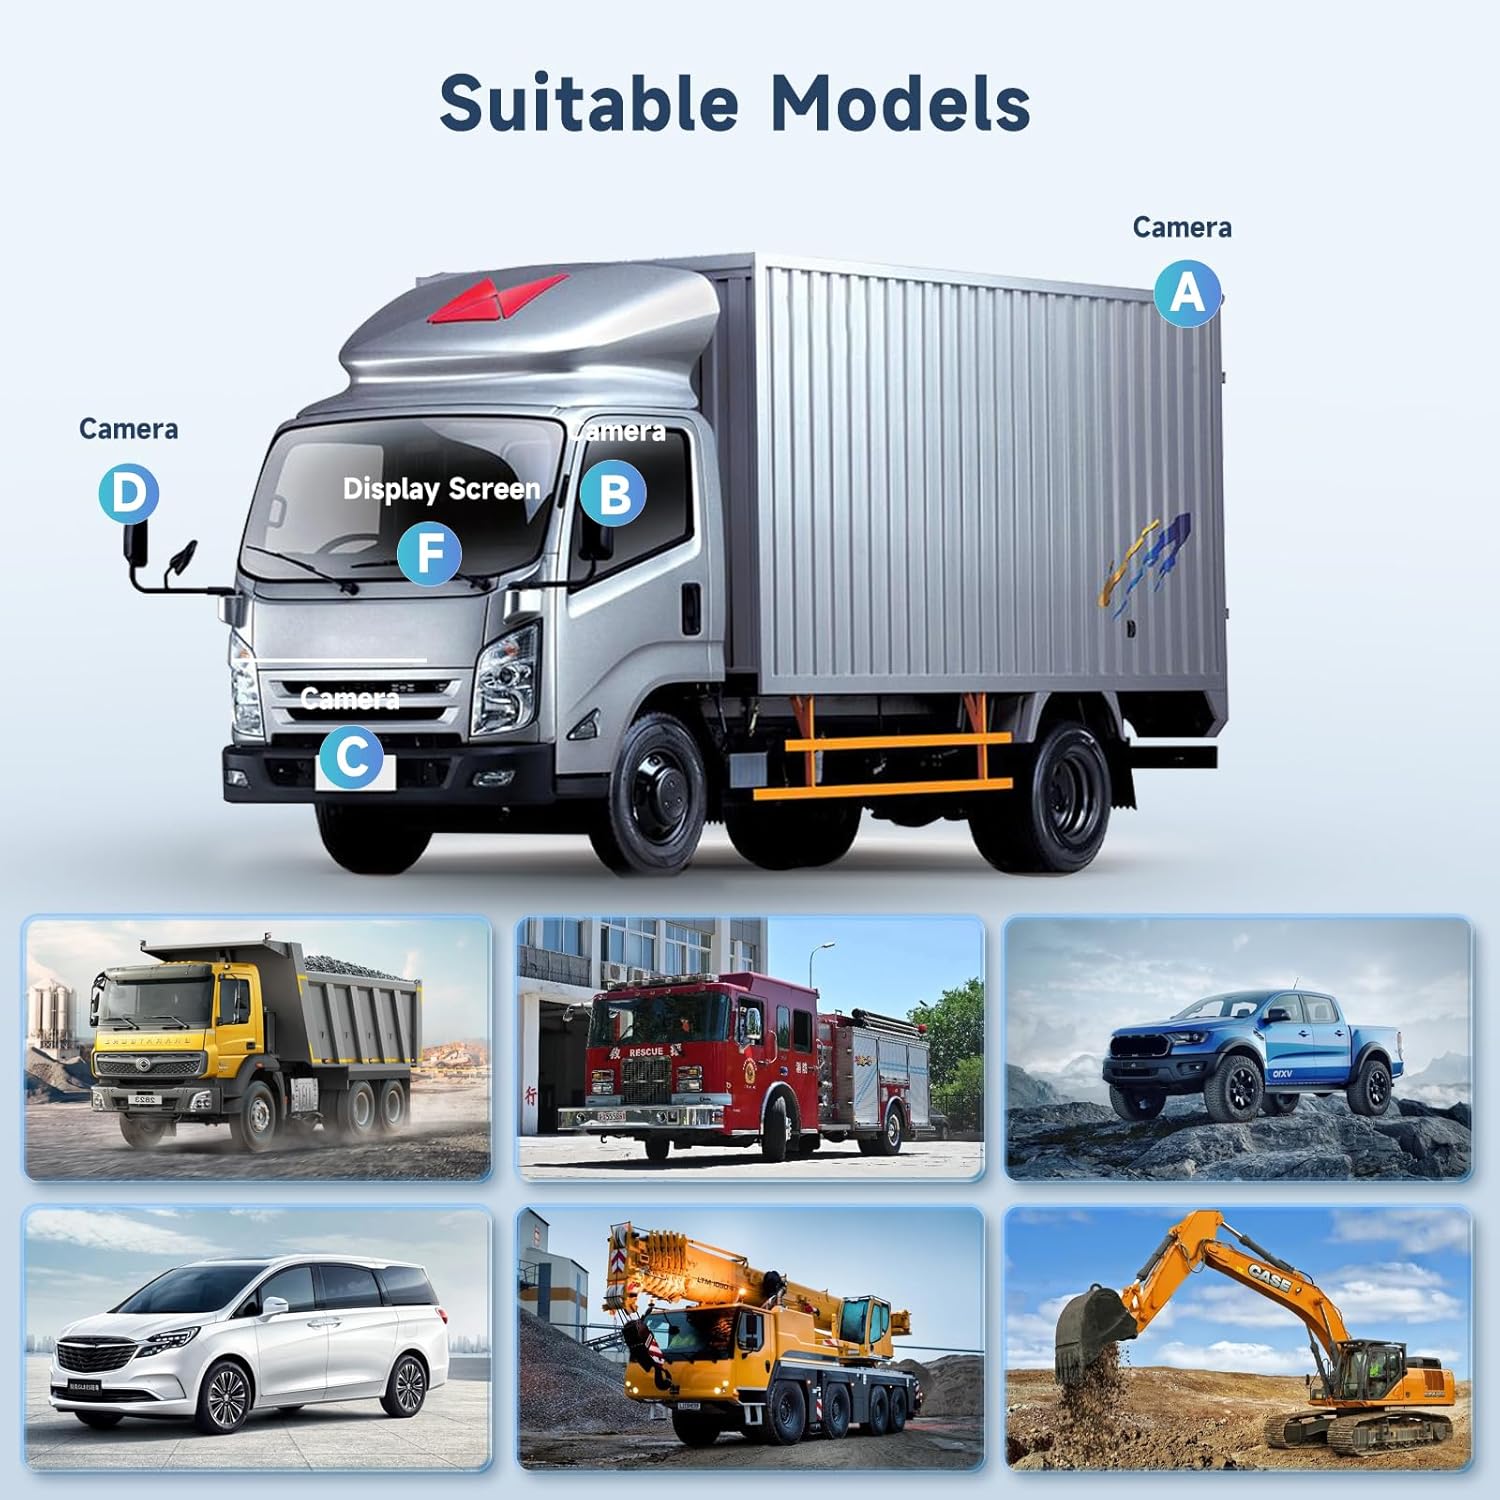
Figure 7: Suitable vehicle types and camera placement examples.
4.3 Wiring Connections
The system uses 4-pin aviation cables for a secure and stable connection. Ensure all connections are tight and protected from moisture.
- Connect each camera to the monitor using the appropriate length 4-pin aviation cable (10m or 20m).
- Connect the monitor's power cable to a 12V/24V DC power source in your vehicle.
- Connect the ground wire (black) to a chassis ground point.
- Connect the positive wire (red) to a switched power source.
- For automatic activation of a specific camera view (e.g., when reversing), connect the corresponding trigger wire (blue for V1, white for V2, green for V3, brown for V4) to the vehicle's backup light circuit or other desired trigger.
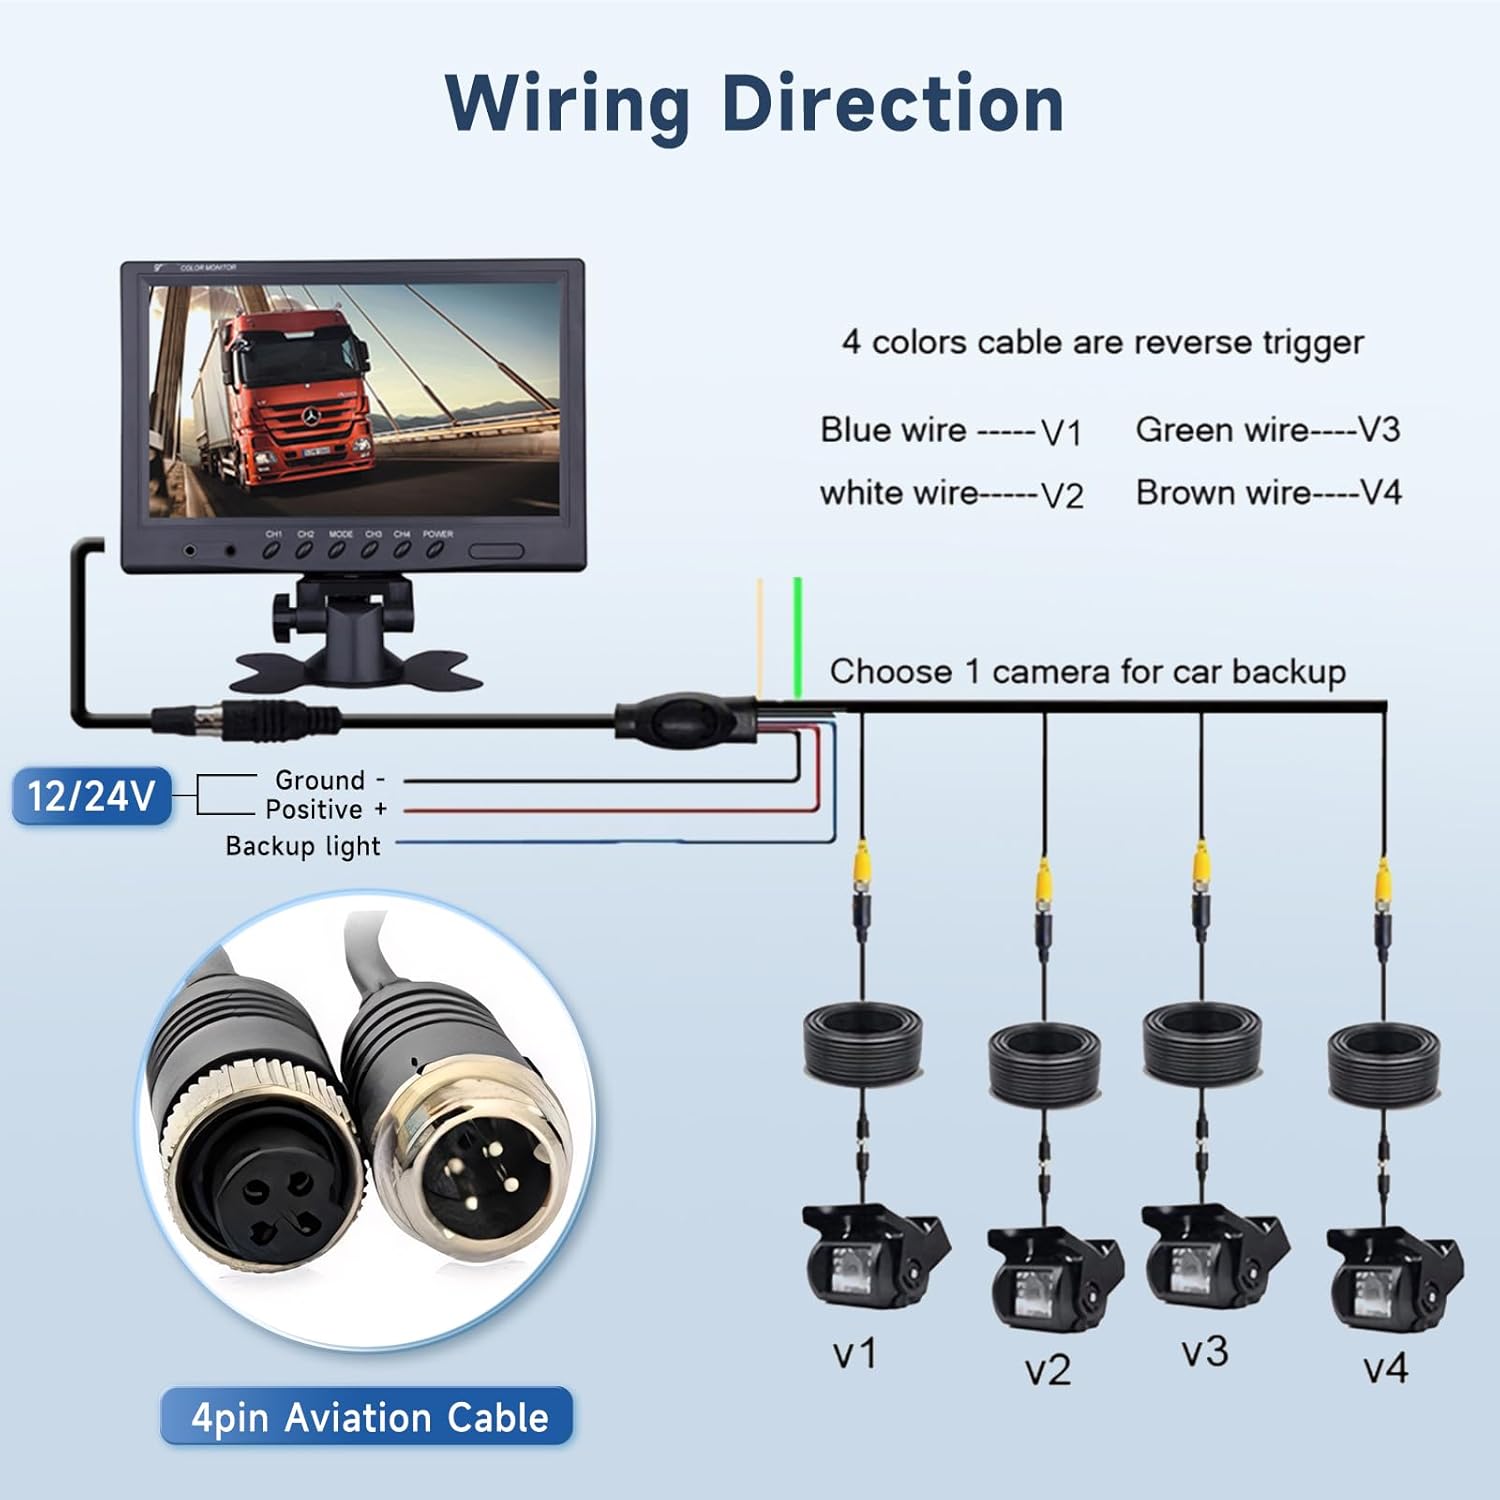
Figure 8: Wiring diagram for the camera system.

Figure 9: Cable routing and connection example.
5. Operation Instructions
Once installed, operating the system is straightforward using the monitor buttons or the remote control.
5.1 Monitor Controls
- POWER: Turns the monitor on/off.
- CH1-CH4: Selects individual camera views.
- MODE: Cycles through different display modes (single, dual, quad-view).
- MENU: Accesses system settings (brightness, contrast, color, image flip, parking lines, etc.). Use CH buttons to navigate and MODE to confirm.
5.2 Remote Control
The included remote control provides convenient access to all monitor functions from a distance.
- Buttons on the remote correspond to the functions on the monitor.
- Point the remote control directly at the monitor's IR receiver for best performance.
6. Maintenance
To ensure the longevity and optimal performance of your camera system, follow these maintenance guidelines:
- Cleaning: Regularly clean the camera lenses and monitor screen with a soft, damp cloth. Avoid abrasive cleaners that may scratch surfaces.
- Cable Inspection: Periodically check all cables for signs of wear, damage, or loose connections. Secure any loose cables to prevent interference or disconnection.
- Camera Position: Ensure cameras remain securely mounted and their angles are not altered by vibrations or impacts. Re-adjust if necessary.
- Environmental Protection: While cameras are waterproof, avoid directing high-pressure water jets directly at them during vehicle washing.
7. Troubleshooting
If you encounter issues with your system, refer to the following troubleshooting steps:
| Problem | Possible Cause | Solution |
|---|---|---|
| No image on monitor | Loose power connection Camera cable disconnected Incorrect input selected | Check power cable connection to monitor and vehicle. Ensure all 4-pin aviation cables are securely connected. Press CH1-CH4 or MODE button to cycle through inputs. |
| Image is blurry or distorted | Dirty camera lens Damaged cable Poor power supply | Clean camera lens with a soft cloth. Inspect cables for damage; replace if necessary. Ensure stable 12V/24V power supply. |
| Night vision not working | IR LEDs obstructed Camera malfunction | Ensure nothing is blocking the IR LEDs on the camera. Contact customer support if issue persists. |
| Remote control not working | Dead battery Obstruction Not pointed correctly | Replace remote control battery. Ensure no objects are between remote and monitor. Point remote directly at the monitor's IR receiver. |
8. Specifications
| Feature | Specification |
|---|---|
| Brand | podofo |
| Monitor Screen Size | 9 Inches |
| Display Technology | LCD, LED |
| Video Capture Resolution | 480p |
| Operating Voltage | 9-35 Volts DC |
| Camera Lens Type | Wide Angle |
| Actual Viewing Angle | 170 Degrees |
| Optical Sensor Technology | CMOS |
| Optical Sensor Size | 7.2mm |
| Connector Type | 4-pin Aviation |
| Waterproof Rating | IP68 (Cameras) |
| Compatible Devices | Car Console (Monitor) |
| Cable Lengths | 2 x 65ft (20m), 2 x 32ft (10m) |
9. Warranty and Support
podofo is committed to providing excellent customer service and technical support.
- Warranty: This product comes with a 2-year replacement warranty.
- Money-Back Guarantee: A 30-day money-back guarantee is offered.
- Technical Support: Lifetime technical support is available.
If you have any questions regarding installation, operation, or require technical assistance, please contact podofo customer service. You can typically find contact information by visiting the seller's page on the platform where you purchased the product and selecting 'Ask a question'.