Important Safety Information
Please read all instructions carefully before using this product.
- For first-time use, always begin with the lowest mode (Soft or Low) to allow your gums to adapt to the water pressure.
- Do not aim the water jet directly at your throat or eyes when operating.
- Keep out of reach of children.
- Do not immerse the entire unit in water; only the water tank and nozzle are designed for water contact. Ensure the charging port cover is securely closed during use.
- Use only clean water or dentist-recommended mouthwash. Do not use corrosive or abrasive cleaning agents.
- If you have any oral medical conditions, consult your dentist before use.
Product Overview and Components
The H2ofloss Cordless Water Dental Flosser is designed for effective oral hygiene, offering multiple pressure settings and a portable design.

Figure 1: H2ofloss Cordless Water Dental Flosser with key components labeled. This includes the replaceable nozzle, 360° rotatable head, power button, mode selection button, mode indicator lights, charging indicator, detachable water tank, tank release button, nozzles release button, waterproof charging port, and water entrance.
Package Contents:
- H2ofloss Cordless Water Dental Flosser Unit
- 6 Multifunctional Jet Tips (various types for different needs)
- USB Charging Cable
- Power Adapter
- Portable Storage Bag
- Replacement Tips Box
- Instruction Manual (this document)

Figure 2: The H2ofloss water flosser unit along with its comprehensive set of accessories, including various nozzles, charging cable, power adapter, and travel case.
Setup
- Charge the Unit: Before first use, fully charge the water flosser. Connect the USB charging cable to the waterproof charging port on the unit and plug the other end into the provided power adapter or a compatible USB power source (e.g., power bank, computer). The charging indicator lights will illuminate to show the charging status. A full charge typically takes approximately 5 hours and can last for 21-30 days of regular use.

Figure 3: The waterproof charging port, located on the side of the unit, ensures safe charging.

Figure 4: The unit can be conveniently charged via various USB power sources.
- Attach a Nozzle: Select the desired jet tip. Insert the tip into the hole at the top of the flosser handle until it clicks into place. Ensure it is firmly seated.

Figure 5: The nozzle can rotate 360 degrees for comprehensive cleaning.
- Fill the Water Tank: Detach the water tank by pressing the tank release button and pulling it down. Fill the tank with lukewarm water. You can also fill it directly through the small flip-top lid on the side of the tank without detaching it. Ensure the lid is securely closed after filling. The tank has a 300ml capacity.

Figure 6: The detachable water tank allows for easy filling and cleaning.
Operating Instructions
- Select a Mode: Press the "MODE" button to cycle through the 5 available pressure settings: Super High (110psi), Strong (95psi), Medium (80psi), Soft (40psi), and Low (20psi). The mode indicator lights will illuminate to show the selected mode. For first-time users or those with sensitive gums, start with the "Soft" or "Low" mode.
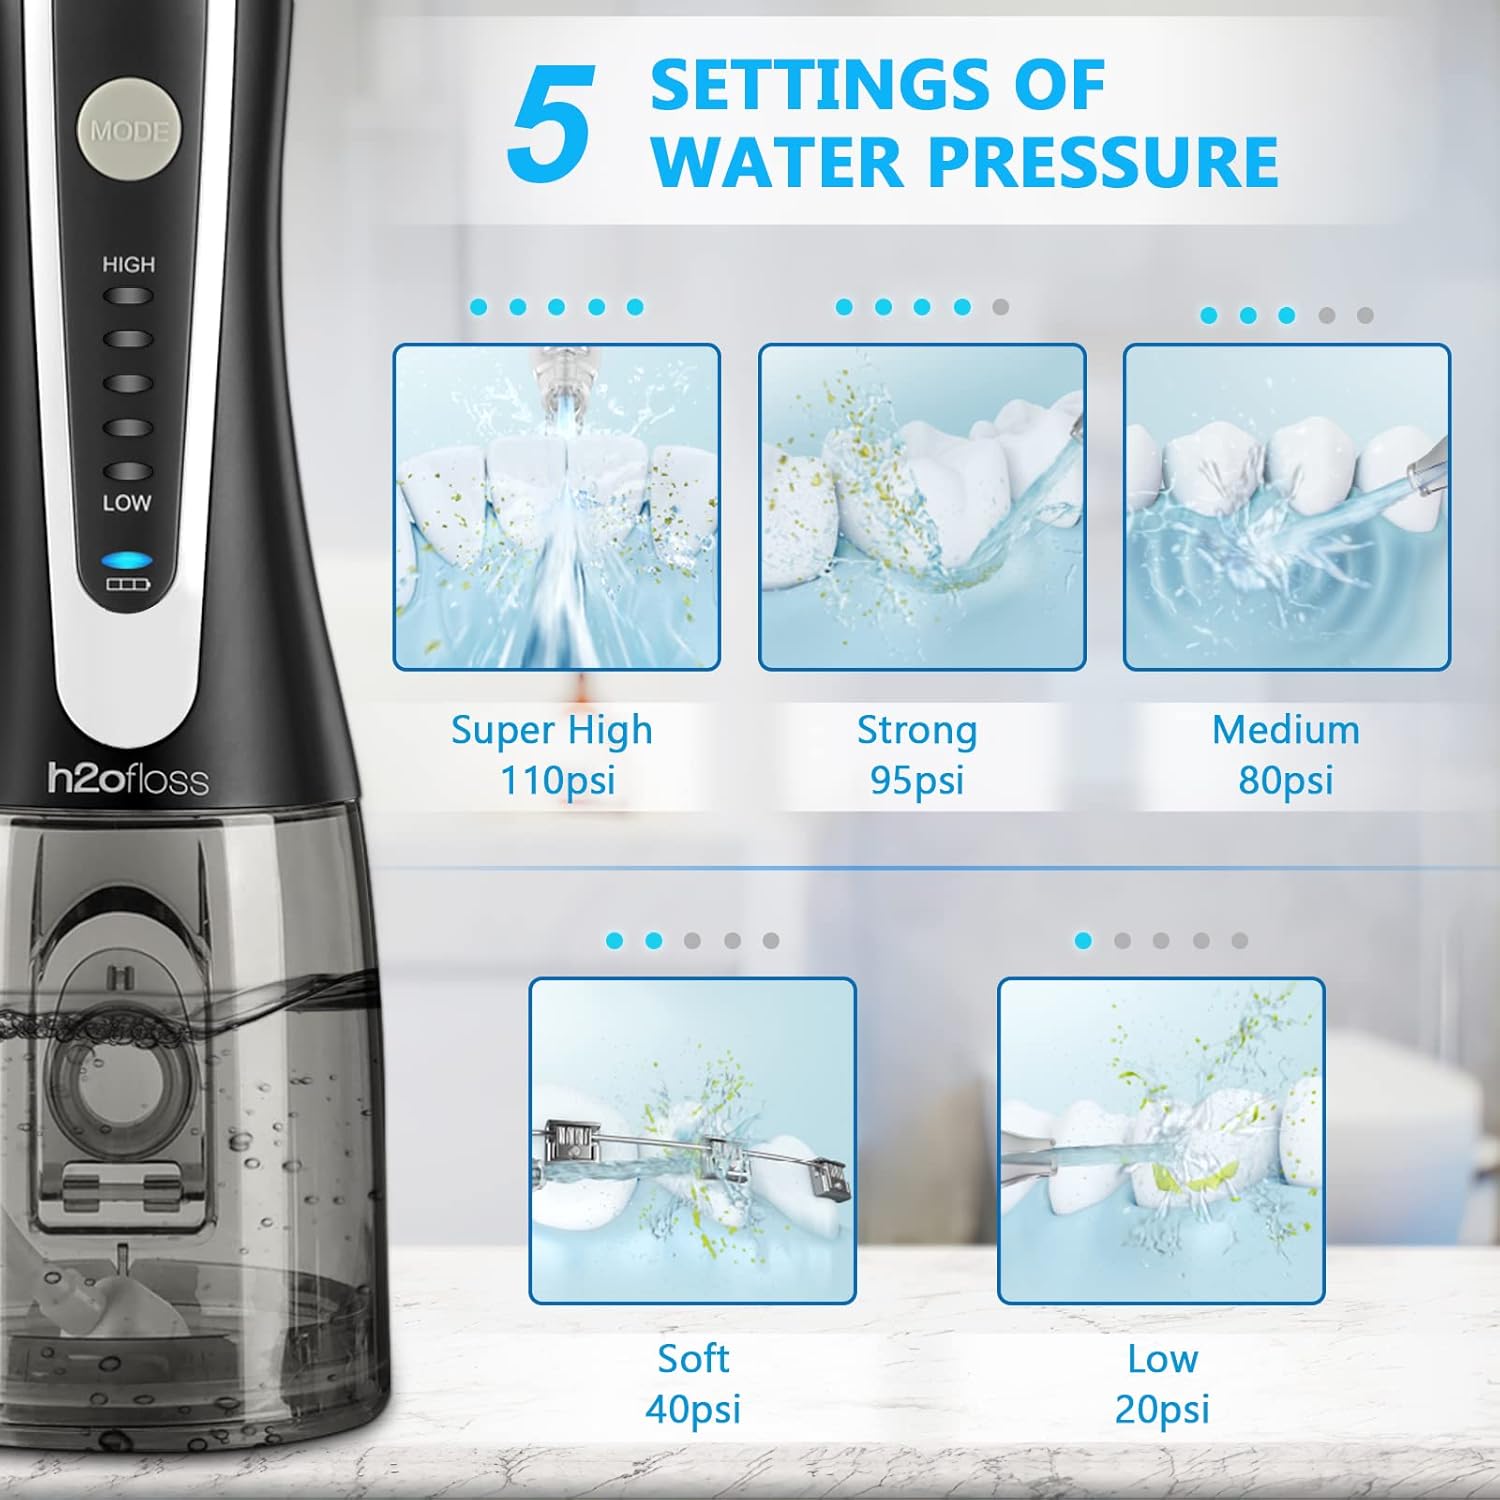
Figure 7: Choose from 5 distinct water pressure settings for personalized cleaning.
- Begin Flossing: Place the nozzle tip into your mouth, aiming it at your gumline at a 90-degree angle. Lean over a sink to avoid splashing. Press the Power button to turn on the unit.
- Flossing Technique: Guide the water jet along your gumline, pausing briefly between teeth. Allow the water to flow into the sink. The 360° rotatable nozzle allows you to reach all areas of your mouth. The innovative Gravity Ball design ensures continuous water flow even when the unit is tilted at various angles.

Figure 8: The Gravity Ball ensures consistent water delivery regardless of the flosser's orientation.
- Finish Flossing: When finished, press the Power button again to turn off the unit. Empty any remaining water from the tank.
Maintenance and Cleaning
Regular cleaning ensures optimal performance and extends the lifespan of your H2ofloss water flosser.
- After Each Use:
- Empty any remaining water from the tank.
- Run the unit for a few seconds to clear any water from the internal pump and nozzle.
- Detach the water tank and rinse it thoroughly with clean water. Allow it to air dry.
- Press the nozzle release button to remove the nozzle. Rinse the nozzle under running water.
- Wipe the exterior of the unit with a soft, damp cloth.
- Deep Cleaning (Monthly):
- To prevent mineral buildup, mix 1 part white vinegar with 2 parts water in the tank.
- Run the solution through the unit until the tank is empty.
- Rinse the tank and unit thoroughly by running a full tank of clean water through it.
- Storage: Ensure the unit is clean and dry before storing. Store in a cool, dry place away from direct sunlight. The included portable storage bag is ideal for travel and storage.

Figure 9: The IPX7 waterproof design allows for safe use in the shower and easy cleaning under running water. Always ensure the charging port cover is closed.
Troubleshooting
| Problem | Possible Cause | Solution |
|---|---|---|
| Unit does not turn on. | Low battery; Unit not charged. | Charge the unit fully. Ensure the charging cable is properly connected. |
| Weak water pressure or no water flow. | Water tank empty; Nozzle clogged; Air trapped in pump; Mineral buildup. | Refill water tank. Remove and clean the nozzle. Run unit with nozzle removed to clear air. Perform deep cleaning with vinegar solution. |
| Water leakage from the unit. | Water tank not properly seated; Charging port cover not closed. | Ensure the water tank is securely attached. Close the waterproof charging port cover tightly. |
| Unit makes a high-pitched whining sound but no water. | Pump issue; Airlock. | Try running the unit with the nozzle removed to clear any airlock. If the issue persists, contact customer support. |
Specifications
- Model: HF-2 black 300ML
- Dimensions: 2.76 x 3.31 x 9.06 inches
- Weight: Approximately 0.01 ounces (Note: This weight seems incorrect based on typical product weights, likely a data entry error. Actual weight would be higher.)
- Water Tank Capacity: 300ml
- Water Pressure Range: 20psi - 140psi (5 modes)
- Battery: 2500mAh Lithium Battery (1 A battery required)
- Charging Time: Approx. 5 hours
- Usage Time: 21-30 days per charge
- Power Source: Battery Powered, USB Rechargeable
- Wattage: 21 watts
- Waterproof Rating: IPX7
- Manufacturer: baofengtong
Warranty and Support
H2ofloss provides a 12-MONTH hassle-free refund & replacement warranty for this water flosser.
For any questions, concerns, or troubleshooting assistance, please contact H2ofloss customer support via email. We aim to provide support and resolve issues within 24 hours.
Please refer to your purchase documentation or the official H2ofloss website for the most current contact information.