1. Introduction
Thank you for choosing the AstroAI Digital Tire Inflator and 12V Extension Cord. This manual provides important information regarding the safe operation, maintenance, and troubleshooting of your new device. Please read this manual thoroughly before use and retain it for future reference.

Image: AstroAI Digital Tire Inflator and 12V Extension Cord.
2. Product Features
- Efficient and Durable Design: Features a metal gear and cylinder structure for enhanced performance and extended service life compared to plastic alternatives. Capable of continuous operation for up to 20 minutes, allowing inflation of four 195/55/R15 car tires (0-35 PSI) without requiring a cooling period.
- Clear LCD Screen and LED Light: The LCD screen displays air pressure in KPA, PSI, and BAR units for easy reading. An integrated LED light assists in inflating or checking tires in low-light conditions.
- User-Friendly Operation: Simple to use by plugging into a vehicle's 12V cigarette lighter and connecting the hose to the tire valve. Suitable for vehicles, SUVs, motorcycles, and bicycles. Note: Not compatible with high-pressure or large-flow inflatables.
- Robust 12V Extension Cord: The included 12-foot heavy-duty 16 AWG wire extension cord is designed for durability and everyday use. Its highly efficient wire ensures low impedance and flexibility.
- Universal Compatibility (Extension Cord): The extension cord integrates with various 12V car accessories, including tire inflators, air compressors, heated blankets, AC to DC converters, car fans, portable refrigerators, dash cams, inverters, and vacuum cleaners.
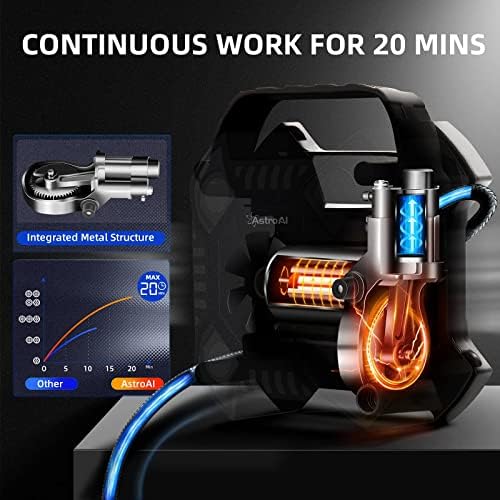
Image: Internal view of the inflator highlighting the integrated metal structure for durability and continuous operation.

Image: The inflator's compact design and integrated storage for accessories, demonstrating portability.

Image: The inflator's high-quality construction, indicating heat resistance up to 158°F and freezing tolerance down to -4°F.
3. Product Components
Familiarize yourself with the parts of your AstroAI Digital Tire Inflator:

Image: Labeled diagram of the AstroAI Digital Tire Inflator components.
- Air Pressure Gauge: Digital display for current tire pressure.
- Carrying Handle: For easy transport of the unit.
- LED Light: Illuminates the work area in low light.
- Inflation Tube: Connects to the tire valve for inflation.
- Multi-function Button: Used for setting pressure units and adjusting target pressure.
- Power Cord: Connects the inflator to the 12V power source.
- 12V Cigarette Lighter Plug: Power connector for vehicle's 12V outlet.
- Quick Connector: Attaches the inflation tube to the tire valve.
12V Cigarette Lighter Extension Cord Components:
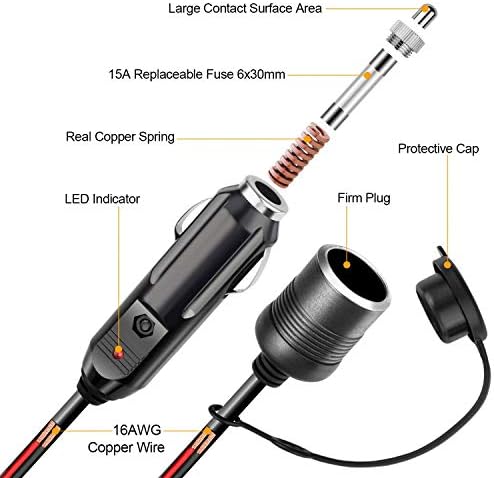
Image: Detailed view of the 12V Cigarette Lighter Extension Cord's internal components, including the 15A replaceable fuse, copper spring, and 16AWG copper wire.
- Large Contact Surface Area: Ensures stable power connection.
- 15A Replaceable Fuse (6x30mm): Provides overcurrent protection.
- Real Copper Spring: Enhances conductivity and durability.
- 16AWG Copper Wire: Heavy-duty wire for efficient power transmission.
- LED Indicator: Shows power status.
- Protective Cap: Covers the female socket when not in use.
- Firm Plug: Ensures a secure connection to the vehicle's 12V outlet.
4. Setup
Before operating the tire inflator, ensure your vehicle is parked safely and the engine is running to provide stable power.
- Connect to Power: Insert the 12V cigarette lighter plug of the inflator directly into your vehicle's 12V accessory outlet. If additional reach is needed, connect the inflator's plug to the female end of the provided 12V extension cord, then plug the extension cord's male end into the vehicle's 12V outlet.
- Prepare the Tire: Remove the valve cap from the tire you wish to inflate.
5. Operating Instructions
Follow these steps to inflate your tires:
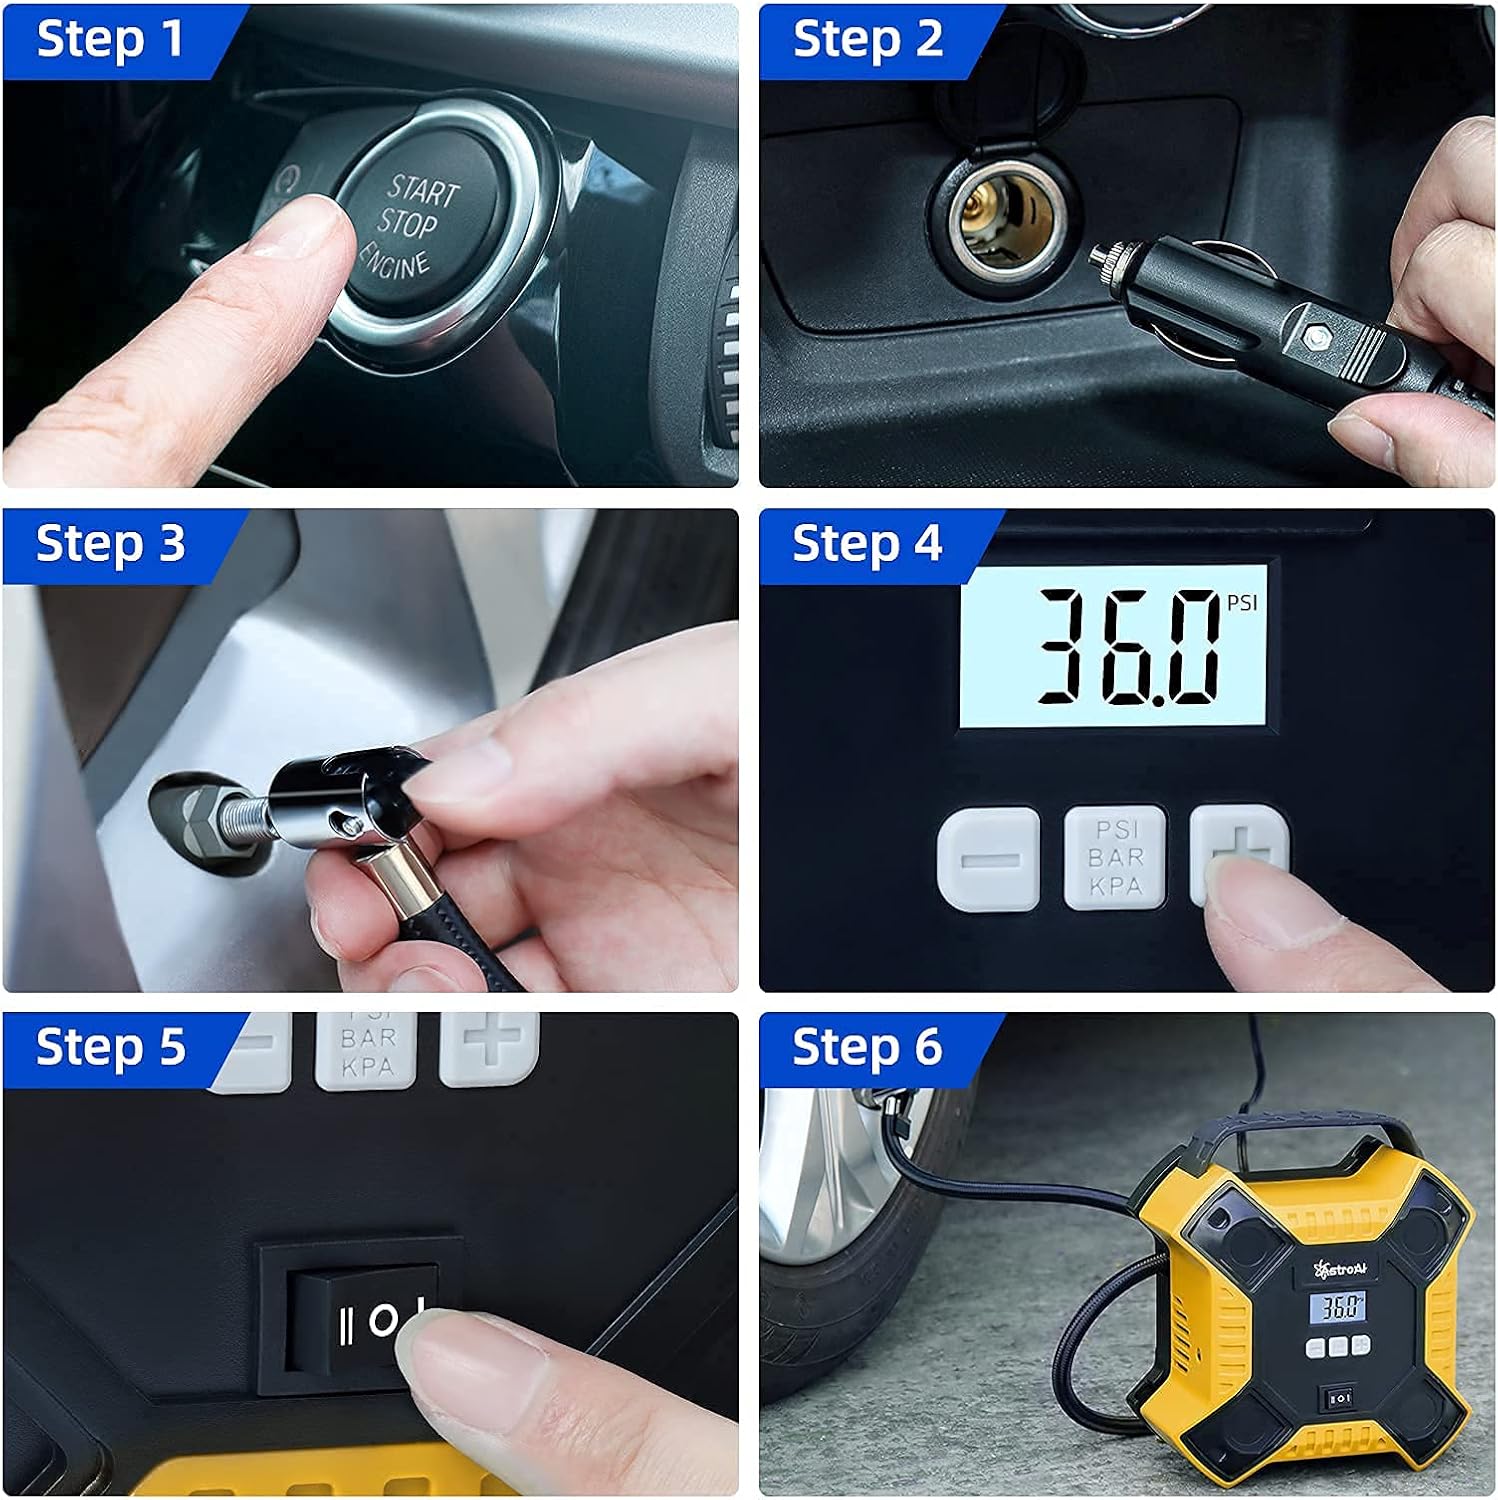
Image: Visual step-by-step instructions for operating the tire inflator.
- Start Vehicle Engine: Ensure your car engine is running to provide sufficient power (Step 1).
- Connect Power: Plug the 12V cigarette lighter plug into your vehicle's 12V power outlet (Step 2).
- Attach to Tire Valve: Securely screw the quick connector of the inflation tube onto the tire valve stem (Step 3). The digital display will show the current tire pressure.
- Set Desired Pressure: Use the multi-function buttons (+ and -) to set your desired tire pressure. Press the unit button (PSI/BAR/KPA) to cycle through the pressure units (Step 4). Refer to your vehicle's owner's manual or door jamb sticker for recommended tire pressure.
- Start Inflation: Flip the power switch to the "ON" position to begin inflation (Step 5). The inflator will automatically stop once the preset pressure is reached.
- Disconnect: Once inflation is complete and the unit has stopped, turn off the power switch, then unscrew the quick connector from the tire valve. Replace the tire valve cap. (Step 6 shows the inflator in use).
Important Notes:
- Do not exceed the maximum continuous operating time of 20 minutes. Allow the unit to cool down for at least 10 minutes after 20 minutes of continuous use.
- Always ensure the vehicle engine is running during operation to prevent draining the car battery.
- Check tire pressure regularly, especially before long trips.
6. Maintenance
Proper maintenance ensures the longevity and optimal performance of your tire inflator:
- Cleaning: Wipe the unit with a damp cloth. Do not use harsh chemicals or abrasive cleaners. Ensure the unit is completely dry before storage.
- Storage: Store the inflator in a cool, dry place, away from direct sunlight and extreme temperatures. Ensure the power cord and inflation tube are neatly coiled to prevent damage. Utilize the integrated accessories storage for nozzles.
- Fuse Replacement (Extension Cord): If the 12V extension cord stops working, check the 15A fuse located within the male plug. To replace, unscrew the tip of the plug, remove the old fuse, and insert a new 15A (6x30mm) fuse.
7. Troubleshooting
| Problem | Possible Cause | Solution |
|---|---|---|
| Inflator does not turn on. |
|
|
| Inflator runs but does not inflate. |
|
|
| Inflator stops prematurely. |
|
|
8. Specifications
| Feature | Detail |
|---|---|
| Brand | AstroAI |
| Model Name | Digital Tire Inflator |
| ASIN | B09LMBMPSD |
| Color | Yellow |
| Material | Metal |
| Power Source | Corded Electric (12V DC) |
| Maximum Pressure | 35 PSI (Pound per Square Inch) |
| Voltage | 12 Volts |
| Connector Type | 12V Cigarette Lighter Plug |
| Hose Length | 12 Feet (Power Cord) |
| Continuous Work Time | Up to 20 minutes |
9. Warranty Information
AstroAI products are designed and manufactured to high-quality standards. For specific warranty details regarding your Digital Tire Inflator, please refer to the warranty card included with your purchase or visit the official AstroAI website. Keep your purchase receipt as proof of purchase for warranty claims.
10. Customer Support
If you have any questions, concerns, or require assistance with your AstroAI Digital Tire Inflator, please contact AstroAI customer support. Contact information can typically be found on the product packaging or on the official AstroAI website. Please have your product model and ASIN (B09LMBMPSD) ready when contacting support.