1. Introduction
Thank you for choosing the Pigeon By Stovekraft Sleek 4 Burner Ultra Slim Gas Stove. This manual provides essential information for the safe and efficient use of your new appliance. Please read it thoroughly before installation and operation, and keep it for future reference.
2. Safety Information
Your safety and the safety of others are paramount. Always follow basic safety precautions when using this gas stove.
- Gas Leak Detection: If you smell gas, immediately turn off the gas supply, open windows and doors for ventilation, and do not operate any electrical switches or appliances. Contact your gas supplier or a qualified technician.
- Ventilation: Ensure adequate ventilation in the kitchen area during operation to prevent the accumulation of unburnt gases.
- Children and Pets: Keep children and pets away from the appliance during operation and when it is hot.
- Flammable Materials: Do not store or use flammable materials near the gas stove.
- Stable Surface: Always place the gas stove on a stable, non-combustible surface.
- Professional Installation: Gas connections should be performed by a qualified technician to ensure safety and proper functioning.
- Hot Surfaces: Burners and pan supports become very hot during use. Avoid touching them until they have cooled down.
3. Product Overview
The Pigeon Sleek 4 Burner Gas Stove features an ultra-slim design with a glossy glass top and sturdy aluminum body. It is equipped with four efficient burners for diverse cooking needs.
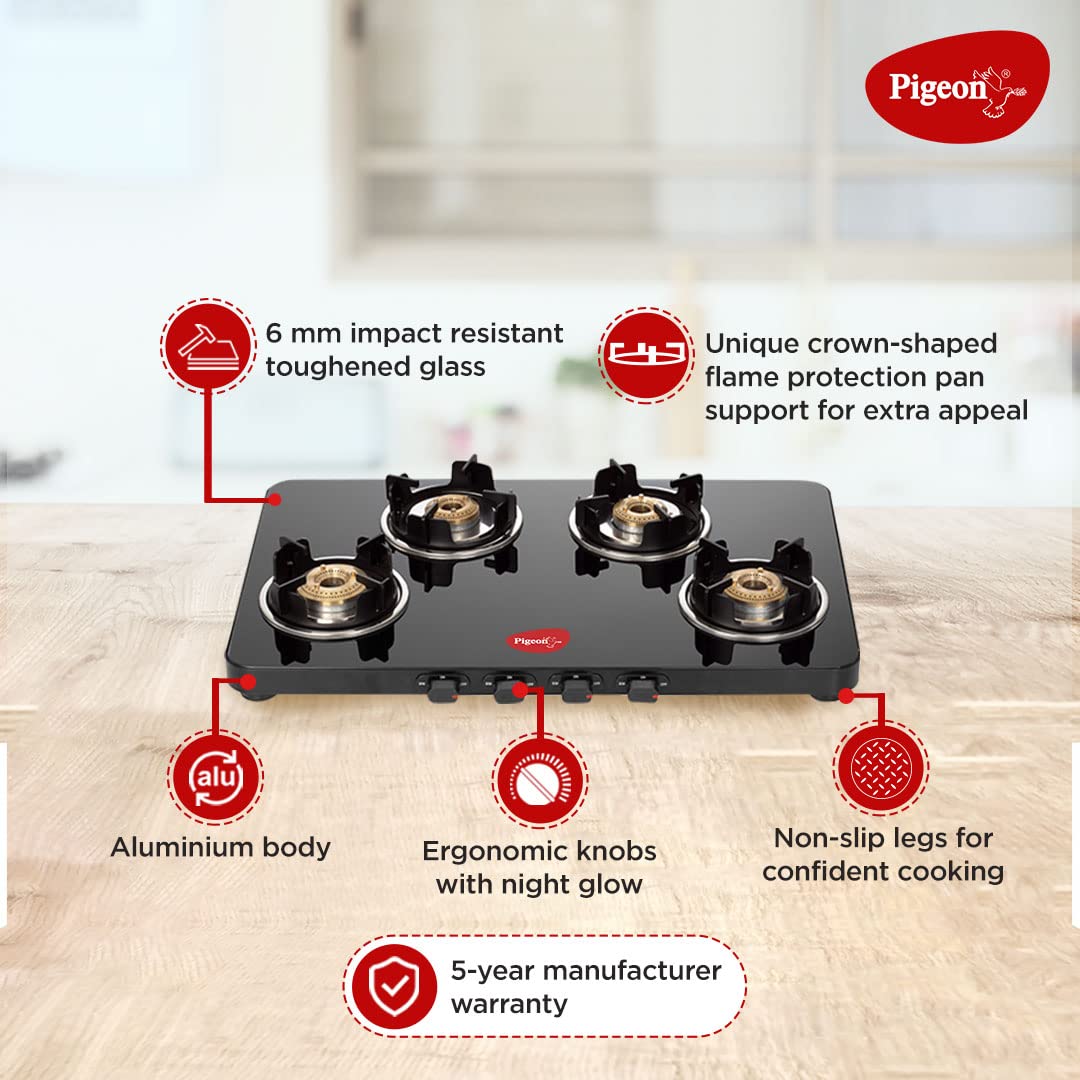
Figure 3.1: Overview of the Pigeon Sleek 4 Burner Gas Stove, highlighting its 6mm impact-resistant toughened glass, unique crown-shaped flame protection pan support, aluminum body, ergonomic knobs with night glow, and non-slip legs.
Key Components:
- Tempered Glass Top: 6 mm impact-resistant toughened glass for durability and easy cleaning.
- Burners: Four Tri Pin Brass Burners, including a Jumbo Burner for faster heating.
- Pan Supports: Uniquely designed crown-shaped pan supports with bottom pins for better utensil stability and flame protection.
- Knobs: Smooth grip and smart ergonomic rotary knobs with night glow for easy operation and visibility.
- Body: Ultra-slim aluminum frame design, rust-proof.
- Legs: Non-slip legs (Skid Proof Stands) for confident cooking and stability.
- Spill Tray: Removable spill tray for easy cleaning.
- Nozzle: 360-degree revolving nozzle for flexible gas connection.

Figure 3.2: Detail of the unique crown-shaped pan support, designed for stability and flame protection.

Figure 3.3: Ergonomic rotary knobs with night glow for precise flame control and enhanced visibility.
4. Setup and Installation
Proper installation is crucial for the safe and efficient operation of your gas stove. It is recommended that installation be carried out by a qualified technician.
4.1 Unboxing
- Carefully remove the gas stove from its packaging.
- Check for any damage during transit. If damage is found, do not proceed with installation and contact customer support.
- Ensure all included components are present: One Sleek 4 Burner Gas Stove and User Manual.
4.2 Placement
- Place the gas stove on a flat, stable, and heat-resistant surface.
- Ensure there is sufficient clearance from walls and overhead cabinets to allow for proper ventilation and prevent fire hazards.
- The 360-degree revolving nozzle allows for flexible positioning of the gas cylinder.
4.3 Gas Connection
- Connect the gas stove to a suitable gas supply (LPG) using an approved gas hose and regulator.
- Ensure all connections are tight and free from leaks. Use soapy water to check for leaks; bubbles indicate a leak.
- Do not use an open flame to check for gas leaks.
4.4 Burner Assembly
- Place the brass burners correctly onto their respective gas outlets.
- Position the crown-shaped pan supports securely over the burners.
5. Operating Instructions
Follow these steps to safely operate your gas stove.
5.1 Lighting a Burner
- Ensure the gas supply to the stove is open.
- Push and turn the corresponding knob counter-clockwise to the 'ON' position.
- Immediately bring a lit matchstick or gas lighter near the burner to ignite the gas.
- Once the flame is lit, release the knob.
- If the burner does not light within a few seconds, turn the knob to 'OFF', wait for a few moments for the gas to disperse, and then repeat the process.
5.2 Adjusting the Flame
- To increase the flame, turn the knob further counter-clockwise towards the 'HIGH' setting.
- To decrease the flame, turn the knob clockwise towards the 'SIM' (Simmer) setting.
- For optimal cooking, adjust the flame so that it does not extend beyond the base of your cooking utensil.
5.3 Turning Off a Burner
- Turn the knob clockwise until it clicks into the 'OFF' position.
- Ensure the flame is completely extinguished.
- After cooking, it is advisable to turn off the main gas supply to the stove.
6. Maintenance and Cleaning
Regular cleaning and maintenance will ensure the longevity and efficient performance of your gas stove.
6.1 Daily Cleaning
- Allow the stove to cool completely before cleaning.
- Wipe the tempered glass top with a soft cloth and a mild cleaning solution. Avoid abrasive cleaners that can scratch the surface.
- Clean the aluminum body with a damp cloth.
6.2 Burner and Pan Support Cleaning
- Remove the pan supports and burners.
- Wash them with warm soapy water. For stubborn stains, use a non-abrasive scrubber.
- Ensure burners are completely dry before placing them back on the stove to prevent ignition issues.
- Regularly check burner holes for blockages and clean them with a thin wire if necessary.
6.3 Removable Spill Tray
- The spill tray can be removed for easy cleaning of food spills and debris.
- Wash with warm soapy water and dry thoroughly before reinserting.
7. Troubleshooting
Refer to this section for solutions to common issues you might encounter.
| Problem | Possible Cause | Solution |
|---|---|---|
| Burner does not light | Gas supply off, clogged burner holes, faulty lighter. | Check gas supply, clean burner holes, use a working lighter. |
| Weak or uneven flame | Clogged burner holes, low gas pressure. | Clean burner holes, check gas regulator. |
| Smell of gas | Gas leak from connections or hose. | Immediately turn off gas supply, ventilate area, contact technician. |
| Knob is stiff | Accumulation of dirt or grease. | Clean around the knob base. Do not force. |
If the problem persists after attempting these solutions, please contact customer support.
8. Specifications
Detailed specifications for the Pigeon By Stovekraft Sleek 4 Burner Gas Stove.
- Brand: Pigeon
- Model Number: 14764
- Heating Elements: 4 Burners
- Fuel Type: Gas (LPG)
- Item Weight: 8 kg 100 g
- Item Dimensions (LxWxH): 79.5 x 13 x 51.4 Centimeters
- Colour: Black
- Top Material: Tempered Glass
- Body Material: Aluminium
- Included Components: One Sleek 4 Burner Gas Stove and User Manual
- Country of Origin: India
9. Warranty and Support
Your Pigeon By Stovekraft Sleek 4 Burner Gas Stove comes with a manufacturer's warranty and dedicated customer support.
9.1 Manufacturer Warranty
This product is covered by a 5-year manufacturer warranty. Please retain your purchase receipt for warranty claims.

Figure 9.1: The Pigeon Sleek 4 Burner Gas Stove, certified and backed by a 5-year warranty.
9.2 Customer Support
For any issues, concerns, or warranty claims, please contact Stovekraft Limited:
- Phone/WhatsApp: +91 63649 14202
- Email: customercare@stovekraft.com
- Address: Stovekraft Limited, 81/1 Harohalli Industrial Area, Kanakapura Taluk, Ramanagara, Bangalore, Karnataka 562112, India.