
1. Introduction
This manual provides essential information for the safe and effective use of your VIVOHOME 80-inch 16:9 Manual Pull Down Projector Screen. Please read these instructions thoroughly before installation and operation, and retain them for future reference.
The VIVOHOME manual projector screen offers an 80-inch diagonal display area (70W×40H inches, 16:9 aspect ratio) designed for optimal viewing at a distance of approximately 7.2 feet. The overall product dimensions are 75 × 49 inches. Ensure your installation area accommodates these measurements.

Image: VIVOHOME 80-inch 16:9 Manual Pull Down Projector Screen.
2. Safety Information
Observe the following safety precautions to prevent injury or damage to the product:
- Always ensure the screen is securely mounted to a stable wall or ceiling structure. Use appropriate hardware for your specific mounting surface (screws/L-brackets are not included).
- Do not attempt to disassemble or modify the screen mechanism. Repairs should only be performed by qualified personnel.
- Keep the screen away from direct heat sources, open flames, and excessive moisture.
- When retracting the screen, guide it gently to prevent rapid retraction, which could cause damage or injury.
- A slight odor may be present when first unboxing the screen. This is normal and will dissipate after airing out the product in a well-ventilated area.

Image: Example of a projector screen warning label.
3. Package Contents
Verify that all components are present before beginning installation:
- VIVOHOME 80-inch Manual Pull Down Projector Screen
- Instruction Manual
Note: Mounting screws and L-brackets are not included and must be purchased separately based on your installation requirements.
4. Setup and Installation
The VIVOHOME projector screen can be mounted on a wall or ceiling. Choose the appropriate method for your space.
4.1 Mounting Options

Image: Diagrams illustrating wall mount and ceiling mount options.
4.2 Installation Steps
- Measure and Mark: Determine the desired location for your screen. Ensure there is sufficient space for the screen's overall size (75 × 49 inches) and that the viewing distance is appropriate (recommended 7.2 ft for 80-inch screen). Mark the positions for the mounting points.
- Install Hooks/Brackets: Securely install appropriate hooks or L-brackets (not included) into your wall or ceiling at the marked positions. Ensure they are level and can support the screen's weight (9.8 lbs).
- Mount the Screen: Carefully lift the projector screen and attach it to the installed hooks or brackets. Ensure it is firmly seated and stable.
For a visual guide on installation, please refer to the setup video below:
Video: Setup Guide for Manual Projection Screen. This video demonstrates the steps for installing the VIVOHOME manual projector screen.
4.3 Recommended Throw Distance
The optimal viewing experience depends on the projector's throw distance relative to the screen size. For the 80-inch screen, a viewing distance of 6-8 feet is generally recommended.

Image: Diagram showing recommended viewing distances for different screen sizes.
Video: Recommended Throw Distance for Manual Projection Screen. This video provides guidance on optimal projector placement.
5. Operating Instructions
The VIVOHOME manual projector screen features a smooth pull-down and auto-locking mechanism for easy operation.
5.1 Extending the Screen
- Grasp the handle located at the center of the screen's bottom bar.
- Gently pull the screen downwards to the desired height.
- Pause briefly at the desired height. The auto-locking mechanism will engage, holding the screen in place.

Image: The self-locking mechanism allows the screen to stay at any desired height.
5.2 Retracting the Screen
- Grasp the handle and gently pull the screen downwards by approximately 1-2 inches.
- Release the handle slowly. The screen will retract smoothly back into its casing.
- Ensure the screen fully retracts to protect the viewing surface when not in use.
Image: The screen retracts smoothly, clearing your living space.
5.3 Viewing Experience
This screen supports 3D, 1080P, 4K, 8K, and Full HD images. The matte white surface with a 160° viewing angle provides bright, uniform images and minimizes glare, offering an immersive theater experience.

Image: Illustration of the 160-degree viewing angle, ensuring clear views from various positions.
6. Maintenance
To ensure the longevity and optimal performance of your projector screen, follow these maintenance guidelines:
- Cleaning: The 3-layer water-proof PVC fabric is wipe-clean. Use a soft, damp cloth with mild soap and water to gently clean the screen surface. Avoid abrasive cleaners or harsh chemicals.
- Storage: When not in use, fully retract the screen into its metal casing to protect it from dust and damage.
- Environmental Conditions: The screen resists changes in temperature or humidity, making it suitable for both indoor and outdoor use. However, prolonged exposure to extreme weather conditions should be avoided.

Image: The screen is easy to maintain; simply wipe with a damp cloth.
7. Troubleshooting
If you encounter issues with your projector screen, refer to the following common solutions:
- Screen does not lock at desired height: Ensure you are pulling the screen down firmly and pausing briefly to allow the auto-locking mechanism to engage. If the issue persists, gently pull down further and then release slowly to reset the mechanism.
- Screen does not retract smoothly: Ensure there are no obstructions in the path of the screen. Gently pull the screen down slightly and then release to encourage smooth retraction. Avoid forcing the screen.
- Wrinkles or uneven surface: The 3-layer PVC fabric is designed to resist creases. If minor wrinkles appear, ensure the screen is fully extended and allowed to hang for a period. Avoid folding or creasing the screen manually.
- Odor: A new screen may have a slight manufacturing odor. This is normal and will dissipate over a few days in a well-ventilated area.
8. Specifications
| Feature | Specification |
|---|---|
| Brand | VIVOHOME |
| Model Number | VH828-BK |
| Mounting Type | Ceiling Mount & Wall Mount |
| Product Dimensions (W x H) | 74.8"W x 48.2"H |
| Display Dimensions (W x H) | 69.7"W × 39.4"H |
| Diagonal Size | 80 inches |
| Aspect Ratio | 16:9 |
| Material | Alloy Steel, Fabric, Polyvinyl Chloride (PVC) |
| Item Weight | 9.8 Pounds |
| Screen Finish | Matte |
| Viewing Angle | 160 Degrees |
| Operation Mode | Manual |
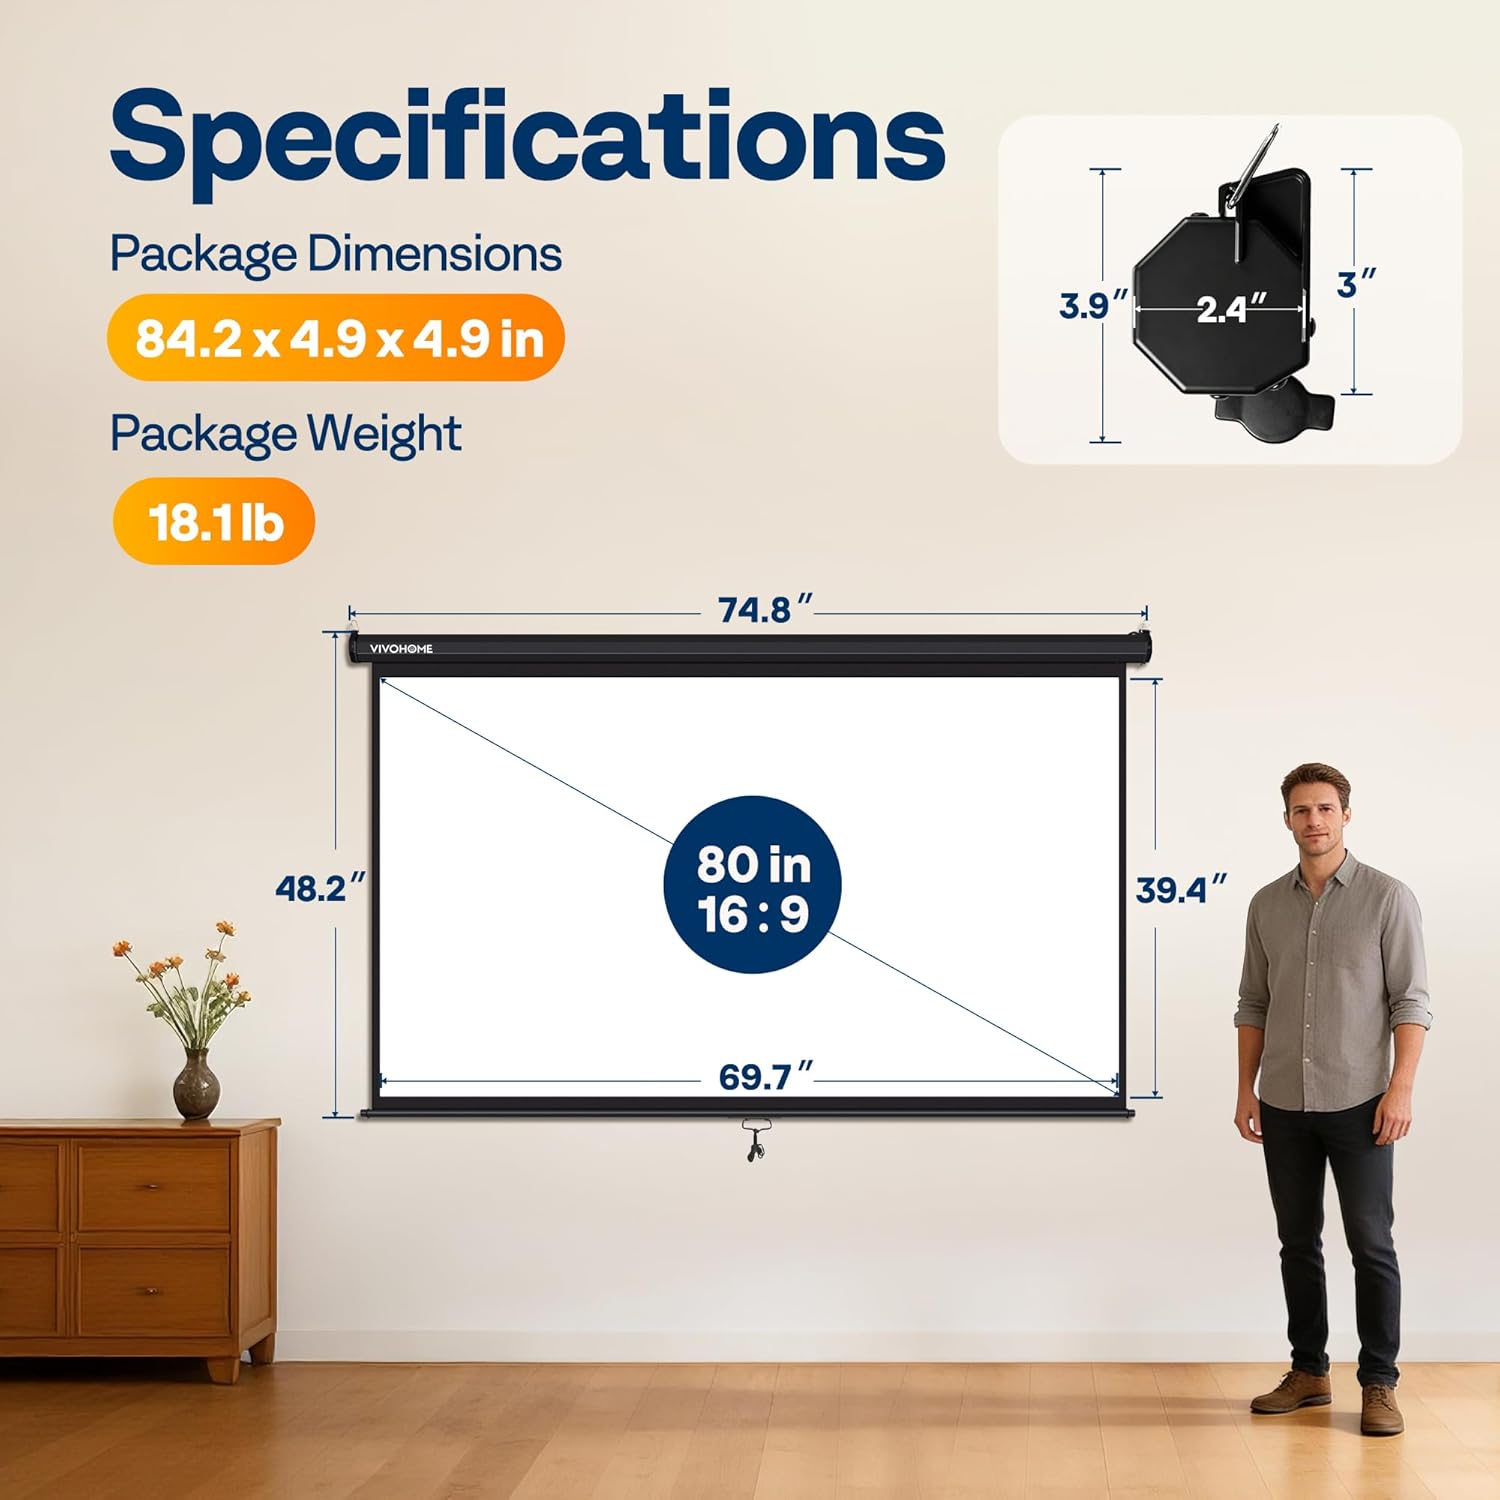
Image: Visual representation of product dimensions and specifications.
9. Warranty and Support
The VIVOHOME 80-inch 16:9 Manual Pull Down Projector Screen comes with a 1-Year Manufacturer Warranty.
For warranty claims, technical support, or any questions regarding your product, please contact VIVOHOME customer service through their official channels or the retailer where the product was purchased.
Please retain your proof of purchase for warranty validation.