VIVOHOME VH779-BK
VIVOHOME 120 Inch Manual Pull Down Projector Screen User Manual
Model: VH779-BK | Brand: VIVOHOME
1. Introduction
This manual provides essential information for the safe and effective use of your VIVOHOME 120 Inch Manual Pull Down Projector Screen. Please read this manual thoroughly before installation and operation to ensure optimal performance and longevity of your product.
The VIVOHOME 120 Inch Manual Pull Down Projector Screen is designed for various applications, including home theater, office presentations, and gaming. It features a 1:1 aspect ratio and supports 3D, 1080P, and 4K Full HD images, offering a wide 160° viewing angle and 1:1 high gain for a clear visual experience.

Image: The VIVOHOME 120 Inch Manual Pull Down Projector Screen, showcasing its design and application.

Image: Comparison showing enhanced picture contrast and clarity with the VIVOHOME screen, supporting 4K, 1080P, and 3D content.
2. Safety Information
Please observe the following safety precautions to prevent injury or damage to the product:
- Read all instructions before installation and use.
- Ensure the mounting surface is strong enough to support the screen's weight.
- Keep the screen away from direct sunlight, heat sources, and moisture.
- Do not use abrasive cleaners or sharp objects on the screen surface.
- During initial use, a slight chemical odor may be present. This is normal and will dissipate within a few days. Ensure adequate ventilation in the room.
- Note: Screws and hooks for installation are not included with the product.
3. Package Contents
Verify that all components are present in the package:
- VIVOHOME 120 Inch Manual Pull Down Projector Screen (1 unit)
- User Manual (this document)
If any items are missing or damaged, please contact VIVOHOME customer support.
4. Setup & Installation
The VIVOHOME projector screen offers two installation methods: wall mounting and ceiling mounting. Choose the method best suited for your space. Ensure you have the necessary tools and hardware (screws and hooks are not included).
4.1 Required Tools (Not Included)
- Drill
- Measuring Tape
- Level
- Pencil
- Screws and Wall Anchors (appropriate for your wall/ceiling type)
- Hooks (for ceiling mount)
4.2 Installation Steps
- Determine Mounting Location: Choose a location that allows for optimal viewing and sufficient space for the screen to fully extend. Consider the projector's throw distance and the recommended viewing distance of 8-10 feet from the seating area for the 120-inch screen.
- Mark Drilling Points: Hold the screen in the desired position and use a pencil to mark the drilling points for the mounting brackets. Ensure the marks are level.
- Drill Holes: Drill pilot holes at the marked points. Insert wall anchors if necessary.
- Attach Mounting Hardware:
- For Wall Mount: Secure the screen's integrated mounting brackets to the wall using appropriate screws.
- For Ceiling Mount: Install hooks into the ceiling at the marked points. Hang the screen from these hooks using the screen's top hanging points.
- Secure the Screen: Ensure the screen is securely fastened and level.

Image: Visual guide for wall mounting and ceiling installations, showing the attachment points.
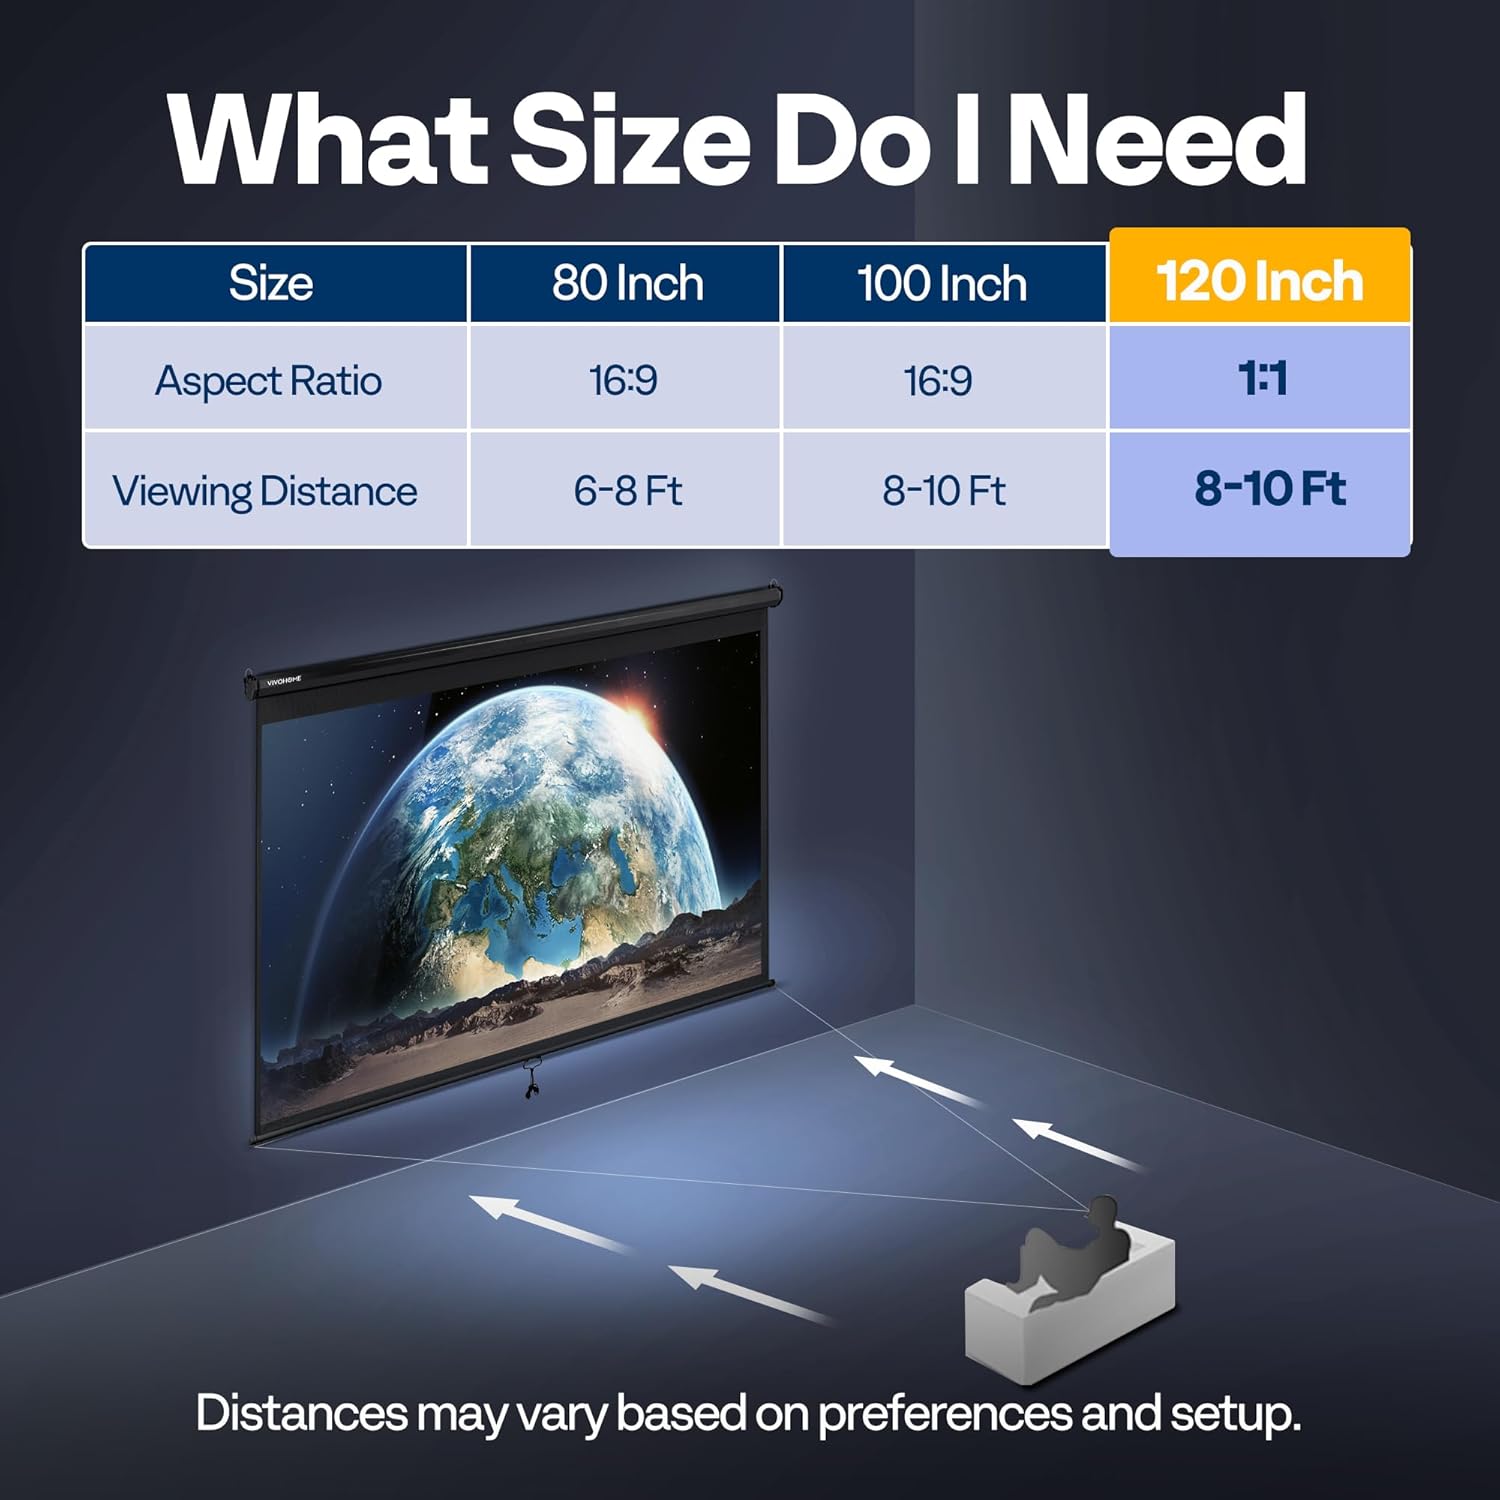
Image: Chart indicating recommended viewing distances for different screen sizes, including 120-inch (1:1) at 8-10 feet.
5. Operation
Your VIVOHOME projector screen features a manual pull-down mechanism with a self-locking system for easy and precise positioning.
5.1 Extending the Screen
- Gently pull down the screen by the handle located at the bottom center.
- As you pull, the screen will extend downwards. The innovative self-locking torsion spring system allows you to stop the screen at any desired height.
- To lock the screen in position, pull it down slightly further than your desired stop point, then release it slowly. The screen will retract slightly and lock into place.
5.2 Retracting the Screen
- To retract the screen, pull it down firmly by the handle for a short distance (approximately 1-2 inches).
- Release the handle slowly. The screen will begin to retract smoothly back into its casing. Guide the screen gently to prevent rapid retraction.

Image: Illustration of the self-locking mechanism, showing how the screen can be stopped and locked at various positions.

Image: Diagram illustrating the wide 160° viewing angle and 1:1 high gain, ensuring clear visibility from various seating positions.
6. Maintenance
Proper maintenance will ensure the longevity and optimal performance of your projector screen.
- Cleaning the Screen Surface: The white plastic material is mildew and moisture-proof and can be scrubbed. Use a soft, damp cloth with mild soap and water to gently clean the screen surface. Avoid harsh chemicals or abrasive materials that could damage the matte coating.
- Casing Maintenance: The metal casing is designed to be durable. Wipe it with a dry or slightly damp cloth to remove dust.
- Storage: When not in use, retract the screen fully into its casing to protect the screen surface from dust and damage.
- Wrinkle Prevention: The three-layer fiber structure is designed to prevent wrinkling and deformation due to temperature and humidity changes. Ensure the screen is always fully retracted when not in use to maintain its flatness.

Image: Details on the matte white finish, highlighting its easy maintenance, smooth and flat surface, and high gain material for glare-free viewing.
7. Troubleshooting
If you encounter any issues with your VIVOHOME projector screen, refer to the following common problems and solutions:
| Problem | Possible Cause | Solution |
|---|---|---|
| Screen does not lock in position. | Screen not pulled down far enough or released too quickly. | Pull the screen down slightly past the desired position, then release it slowly to engage the self-locking mechanism. |
| Screen retracts too quickly or with a loud noise. | Screen released without guiding it. | When retracting, pull down slightly and then guide the screen gently as it rolls up to ensure a smooth and quiet retraction. |
| Strong odor from the screen. | New product odor from manufacturing materials. | This is normal for new products. Air out the room and leave the screen extended for a day or two to allow the odor to dissipate. |
| Screen surface appears wrinkled or uneven. | Improper storage or handling; extreme temperature changes. | Ensure the screen is fully retracted when not in use. The material is designed to resist wrinkling; if persistent, contact support. |
8. Specifications
Detailed specifications for the VIVOHOME 120 Inch Manual Pull Down Projector Screen (Model: VH779-BK):

Image: Diagram showing the overall dimensions and display area of the 120-inch (1:1) projector screen.
| Feature | Detail |
|---|---|
| Model | VH779-BK |
| Screen Size (Diagonal) | 120 Inches |
| Aspect Ratio | 1:1 |
| White Display Area (W x H) | Approx. 84 x 84 inches (2.13 x 2.13 meters) |
| Total Screen Dimensions (W x H) | Approx. 90 x 92 inches (2.28 x 2.34 meters) |
| Viewing Angle | 160 Degrees |
| Gain | 1:1 High Gain |
| Supported Resolutions | 3D, 1080P, 4K, Full HD |
| Screen Material | White Plastic with Matte Coating |
| Casing Material | Metal |
| Operation Mode | Manual Pull Down with Self-Locking System |
| Mounting Type | Ceiling Mount & Wall Mount |
| Item Weight | 6.5 Kilograms (14.3 lbs) |
9. Warranty and Support
For warranty information, technical support, or any inquiries regarding your VIVOHOME projector screen, please contact VIVOHOME customer service directly. Refer to the contact information provided on the product packaging or visit the official VIVOHOME website for the most up-to-date support details.
You can visit the VIVOHOME Store at VIVOHOME Store on Amazon for more information.
Related Documents - VH779-BK
 |
VIVOHOME HVAC Condensate Pump User Manual User manual for the VIVOHOME HVAC Condensate Pump, providing detailed instructions on product introduction, safety precautions, installation steps, features, operation testing, maintenance procedures, parts list, troubleshooting guide, and warranty information. |
 |
VIVOHOME Garden Cart Instruction Manual - Assembly and Usage Guide Comprehensive instruction manual for the VIVOHOME Garden Cart. Includes parts list, assembly steps, safety warnings, and usage tips for model V-1. |
 |
VIVOHOME 1.5 HP Variable Speed Pool Pump User Manual Comprehensive user manual for the VIVOHOME 1.5 HP Variable Speed Pool Pump, covering installation, operation, maintenance, troubleshooting, technical specifications, and warranty information. |
 |
VIVOHOME Convection Toaster Oven VH861 Instruction Manual Instruction manual for the VIVOHOME Convection Toaster Oven, model VH861. Includes product specifications, important safety safeguards, parts of the appliance, and operating instructions. |
 |
VIVOHOME Bathroom Exhaust Fan with Heater User Manual and Installation Guide Comprehensive user manual and installation guide for the VIVOHOME Bathroom Exhaust Fan with Heater, covering specifications, wiring, safety, installation, remote control pairing, and warranty information. |
 |
VIVOHOME VH1818 Bathroom Exhaust Fan with RGB Light User Manual Comprehensive user manual for the VIVOHOME VH1818 Bathroom Exhaust Fan with RGB Light, covering installation, operation, safety, troubleshooting, and warranty information. |
Ask a question about this manual
Ask about setup, troubleshooting, compatibility, parts, safety, or missing instructions. Manuals+ will review the question and use this page’s manual context to help answer it.