1. Introduction
Thank you for choosing the Gueiddi 48V/64V/72V 1000W-1500W Brushless Motor Controller. This manual provides essential information for the safe and efficient installation, operation, and maintenance of your new controller. Please read these instructions thoroughly before use to ensure optimal performance and longevity of the product.

Image 1.1: The Gueiddi Brushless Motor Controller.
2. Safety Information
Always observe the following safety precautions to prevent injury or damage to the product:
- Ensure the power supply is disconnected before performing any installation, wiring, or maintenance.
- Incorrect wiring can cause damage to the controller, motor, or battery. If unsure, consult a qualified technician.
- Avoid exposing the controller to extreme temperatures, direct sunlight, or corrosive environments.
- Do not attempt to open or modify the controller casing, as this may void the warranty and pose electrical hazards.
- Keep the controller away from water and moisture to prevent short circuits.
3. Product Overview and Features
The Gueiddi Brushless Motor Controller is designed for electric bicycles and scooters, offering stable speed control and efficient power management. Its robust construction ensures durability and reliable performance.
Key Features:
- High-quality Materials: Features a thicker aluminum shell for better heat dissipation, protecting internal circuits from thermal overloading.
- Smooth Operation: Ensures smoother motor starts and a more comfortable riding experience.
- Sensitive Control: Provides stable speed, silent operation, and sensitive control for braking and direction changes.
- Easy Installation: Each cable is labeled with instructions for straightforward setup.
- Wide Application: Compatible with sine wave and rectangular motors, suitable for Hall motors, and supports 48V, 64V, and 72V systems for electric bicycles and scooters.

Image 3.1: The aluminum shell design for efficient heat dissipation.
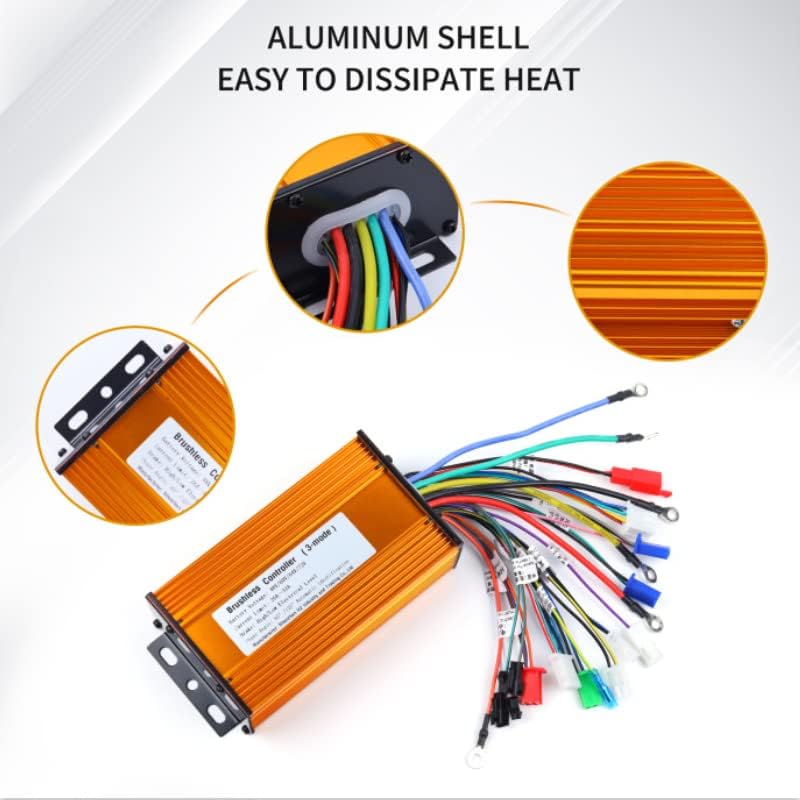
Image 3.2: Illustration of the controller's waterproof performance.
4. Specifications
| Specification | Value |
|---|---|
| Battery Voltage | 48V/64V/72V (Universal) |
| Current Limit | 26A-33A |
| Brake Level | High/Low Electrical Level |
| Phase Angle | 60°/120° Automatic Identification |
| Material | Aluminum |
| Item Weight | 588 Grams |
| Dimensions (L x W x H) | 9.29 x 6.81 x 1.97 inches |
5. Installation Guide
This section provides detailed instructions for wiring and installing your brushless motor controller. Each cable is labeled for easier identification.
Wiring Diagram Overview:

Image 5.1: Comprehensive wiring diagram with labeled connections.
Step-by-Step Wiring Instructions:
- Connect the 3 Motor Wires: Connect the three thick yellow, thick green, and thick blue wires from the motor. If the wheel rotates in the wrong direction after initial power-up, you can connect them randomly first. After connecting the motor wires, shake the rear wheel with your hand to feel for resistance. If there is no resistance, continue to the next step. If there is resistance, it indicates that the motor is not connected correctly.
- Connect Power Supply Positive and Negative & Electric Door Lock: The controller's power cable (thick red for positive, thick black for negative) and your electric car's power supply positive and negative, and the electric door lock line can be connected one by one. The positive and negative power supply must not be connected to the opposite polarity. The electric door lock line is controlled by a switch.
- Learning Wire: There are two white learning wires. Plug them together, then turn the power key on. The motor will automatically turn. Unplug the learning wires, then plug them together again. The motor will reverse direction. Unplug the learning wires again. This step ensures the controller is properly configured for the motor.
- Connecting the Hall Wire: The Hall wire has 5 wires: a head of the note, a positive Hall, a negative Hall, and three color lines. Our controller is a brushless controller, with or without Hall. If your electric car motor has Hall sensors, connect them. If not, the controller can still operate, but with some differences: 1) Starting may be less smooth, but riding will be fine. 2) Anti-theft alarm can be used, but the motor locking function cannot be used. 3) The high-speed gear of the three-speed function cannot be used, but the low-speed gear can be used.
- Connect to the Handlebar Cable: Find the handlebar wire of the controller (red, green, and black). Red is the positive pole, black is the negative pole, and green is the signal wire. If you need to dismantle the handlebar to identify the wires, use a multimeter to test the signal line. The positive and negative poles of the handlebar must be connected correctly. If the handlebar is bad, change it.
- Connect the Brake Line and EABS (Optional): There is a separate yellow wire for the high battery brake line and a white and black wire for the low battery brake line. Identify the wires coming out of your brake handle. If your car has an integrated brake, pull out the white and black wires and merge them with the handlebar cable. EABS electronic brake is a controller program function; only need to brake power off will produce electronic brake effect.
- Instrument Cable: The instrument cable is a thin green wire, suitable for pointer-type instruments. If using an LCD instrument, ensure compatibility to avoid mismatch.
- Connecting the Cruise Line: The cruise line is divided into automatic cruise (can be plugged in) and button cruise (through the two wires and cruise line connection).
- Connecting the 3-Speed Cable: The three-speed cable is blue-black-black. Blue and black are shorted for low speed, green and black are shorted for high speed. The default for electric vehicles is medium speed.
- Connecting the Anti-Theft Alarm System: The anti-theft function has two groups of wires: anti-theft power supply (red and black, red is positive, black is negative) and anti-theft signal (orange, red, and blue). Connect according to color.
- Connecting the Reversing Function: The reversing function is a closed circuit. Connect it according to your needs. Note that the 350W controller does not have a reversing function.
Video Guide: How to Connect the Controller
Video 5.2: A visual guide demonstrating how to connect the brushless motor controller. This video shows the various connections and their proper placement.
6. Operating Instructions
Once the controller is correctly installed and wired, follow these steps for operation:
- Power On: Turn the ignition key or switch connected to the electric door lock wire. The system should power on.
- Throttle Control: Gently twist the throttle handle to engage the motor. The controller provides sensitive and stable speed control.
- Braking: Apply the brake levers. The controller will cut power to the motor and engage braking. If EABS is connected, it will provide electronic braking.
- Speed Modes (if applicable): If the 3-speed gear wires are connected, you can switch between low, medium, and high speeds as configured.
- Cruise Control (if applicable): Activate cruise control via the dedicated switch or by holding the throttle steady for a few seconds, depending on your setup.
- Reversing (if applicable): If the reversing function is connected, activate it as per your vehicle's controls.
7. Maintenance
To ensure the longevity and optimal performance of your Gueiddi Brushless Motor Controller, follow these simple maintenance guidelines:
- Regular Inspection: Periodically check all wiring connections to ensure they are secure and free from corrosion or damage.
- Cleanliness: Keep the controller clean and free from dust, dirt, and debris. Use a dry, soft cloth for cleaning. Avoid using harsh chemicals or abrasive materials.
- Environmental Protection: While the controller has good waterproof performance, avoid prolonged exposure to heavy rain or submersion in water.
- Heat Management: Ensure the controller is mounted in a location with adequate airflow to facilitate heat dissipation. Do not cover the controller.
- Avoid Overloading: Do not exceed the specified current and voltage limits to prevent damage to the controller and motor.
8. Troubleshooting
If you encounter issues with your controller, refer to the following common problems and solutions:
| Problem | Possible Cause | Solution |
|---|---|---|
| Motor not spinning or spinning intermittently | Loose or incorrect wiring connections (power, motor phase, Hall wires). Faulty throttle. | Check all connections, especially power, motor phase, and Hall wires. Ensure the electric door lock is connected. Test the throttle. Re-perform the learning wire procedure. |
| Motor spins in the wrong direction | Incorrect motor phase wire connection or learning wire not properly used. | Re-perform the learning wire procedure to automatically adjust motor direction. |
| No power to the controller/system | Battery not connected, electric door lock not connected, or main power wires reversed. | Verify battery connection and charge. Ensure electric door lock is properly wired and switched on. Check main power wire polarity. |
| Brakes not working or always engaged | Brake signal wires incorrectly connected or shorted. | Check brake lever wiring. Ensure brake signal wires are not constantly activated. |
| Controller overheating | Insufficient airflow, prolonged high load, or internal fault. | Ensure proper ventilation around the controller. Reduce continuous high load. If problem persists, contact support. |
If the issue persists after attempting these solutions, please contact customer support.
9. Warranty and Support
The Gueiddi Brushless Motor Controller comes with a standard manufacturer's warranty. For specific warranty details, please refer to the product packaging or contact the seller directly.
If you have any product issues, questions, or require technical assistance, please do not hesitate to contact us via the Amazon message system. Our support team will do their best to resolve your concerns promptly.
Manufacturer: Guudi
Brand: Gueiddi