1. Introduction
This instruction manual provides comprehensive guidance for the safe and effective use of your COROLLATA Digital Angle Finder with Electronic Laser. Please read this manual thoroughly before operating the device and retain it for future reference.
The COROLLATA Digital Angle Finder is a versatile measuring tool designed for precise angle measurement, leveling, and laser marking. Its compact size, strong magnetic base, and dual laser functionality make it ideal for various applications in woodworking, construction, and home improvement.

2. Product Features
- Digital Level with Laser: Class II laser with output <5mW. Portable pocket size (L2.4in, W2.4in, H1.2in).
- High Precision: ±0.2° precise microprocessor with automatic inversion when upside down.
- Versatile Measurement: 4*90° measurement range, capable of zeroing at any angle for relative measurements.
- Strong Magnetic Base: Powerful magnets on all four sides ensure stable fixing to metal surfaces.
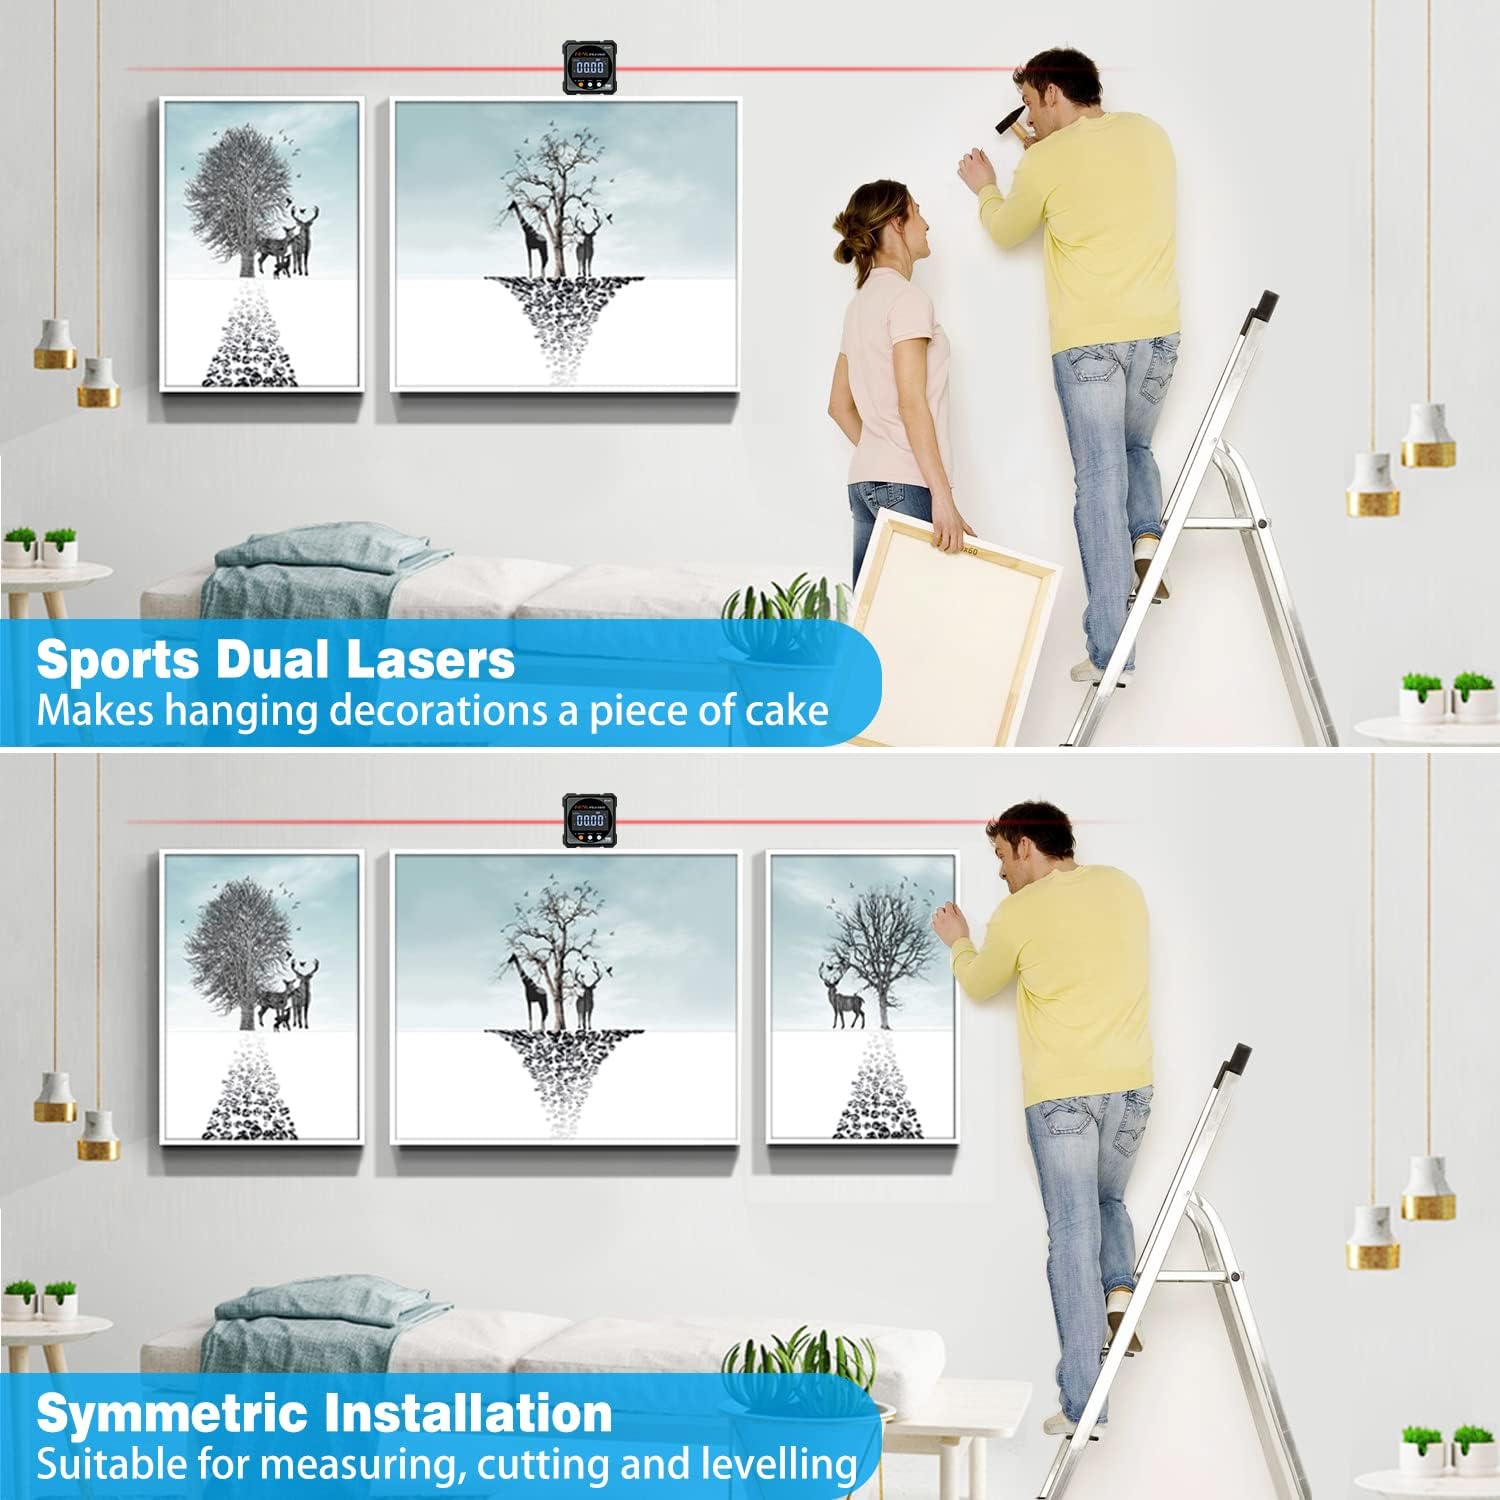
- Dual Lasers: Aids in horizontal and symmetrical installation for tasks like hanging decorations.
- Rechargeable Battery: Internal 340mAH lithium battery, charged via USB-C cable.
- Durable Design: Dust-proof and IP67 waterproof performance.
- Clear Display: Bright red backlight for easy readability, even in bright conditions.

3. Setup and Components
3.1 Unboxing and Initial Inspection
Upon receiving your Digital Angle Finder, carefully open the packaging and inspect the contents. Ensure all items are present and undamaged.
- Digital Angle Finder
- USB-C Charging Cable
- User Manual (this document)
- Belt Bag (if included with your model)

3.2 Charging the Device
The device comes with a built-in rechargeable lithium battery. Before first use, or if the battery indicator is low, charge the device using the provided USB-C cable.
- Connect the USB-C end of the cable to the charging port on the angle finder.
- Connect the USB-A end to a standard USB power adapter (not included) or a computer USB port.
- The battery indicator on the display will show charging status.
- Once fully charged, disconnect the cable.

4. Operating Instructions
4.1 Button Functions and Display Overview

- ON/OFF Button / Laser Switch: Press to turn the device on/off. Long press to activate/deactivate the laser.
- HOLD/Tilt% Button: Press to hold the current measurement. Long press to switch between angle (°) and tilt percentage (%).
- ZERO Button: Press to set the current position as 0° for relative measurements.
- Display: Shows angle, battery level, tilt symbol, laser indicator, and data hold status.
4.2 Absolute and Relative Angle Measurement
The device supports two primary measurement modes:
- Absolute Angle Measurement: Measures the angle relative to a true horizontal surface.
- Relative Angle Measurement: Allows you to set any surface as a 0° reference point to measure the angle of another surface relative to it.

4.3 Performing Measurements
- Power On: Press the ON/OFF button to turn on the device.
- Absolute Measurement: Place the device on the surface you wish to measure. The display will show the angle relative to horizontal.
- Relative Measurement (Zeroing): Place the device on your reference surface. Press the ZERO button. The display will show 0.00°. Now, move the device to the target surface, and the display will show the angle relative to your set reference.
- Hold Function: Press the HOLD button to freeze the current reading on the display. Press again to release.
- Laser Function: Long press the ON/OFF button to activate the dual lasers for marking or alignment. Long press again to turn off.

4.4 Applications
The Digital Angle Finder is suitable for a wide range of tasks:
- Setting saw blade angles on table saws or miter saws.
- Measuring and verifying angles in woodworking projects.
- Leveling surfaces and checking plumb.
- Assisting with hanging pictures and decorations using the dual lasers for alignment.
- Checking vehicle alignment or component angles.

5. Maintenance
5.1 Cleaning
To maintain accuracy and prolong the life of your device:
- Wipe the device with a soft, dry cloth after each use.
- For stubborn dirt, use a slightly damp cloth with mild soap, then dry thoroughly.
- Do not use abrasive cleaners or solvents, as these can damage the display or casing.
- Ensure the laser aperture is clean and free of obstructions.
5.2 Storage
When not in use, store the device in its protective belt bag (if applicable) in a cool, dry place, away from direct sunlight and extreme temperatures.
5.3 Battery Care
To maximize battery life:
- Charge the device regularly, even if not used frequently.
- Avoid completely draining the battery before recharging.
- If storing for an extended period, charge the battery to approximately 50% and recharge every few months.
6. Troubleshooting
| Problem | Possible Cause | Solution |
|---|---|---|
| Device does not turn on | Low battery; Device malfunction | Charge the device fully. If problem persists, contact customer support. |
| Inaccurate readings | Device not zeroed; Surface not stable; External interference | Ensure the device is zeroed on a stable, level surface. Re-calibrate if necessary. Avoid strong magnetic fields. |
| Laser not working | Laser off; Low battery; Obstruction | Long press the ON/OFF button to activate the laser. Charge the device. Check for obstructions in the laser aperture. |
| Display is dim or unreadable | Low battery; Extreme lighting conditions | Charge the device. The backlight should improve readability in various conditions. |
7. Specifications
| Parameter | Value |
|---|---|
| Material | Aluminum alloy |
| Measuring Range | 4*90° |
| Resolution | 0.05° |
| Accuracy | ±0.2° |
| Repeatability | 0.1° |
| Power Supply | 3.7V Lithium battery (340mAH) |
| Charging Port | USB-C |
| Working Temperature | 14-122°F (-10-50°C) |
| Laser Class | Class II, Output <5mW |
| Waterproof Rating | IP67 |
| Product Dimensions | 2.4"L x 2.4"W x 1.2"H (approx.) |
| Item Weight | 0.15 Kilograms (approx. 5.3 ounces) |
| Model Number | COUS31001c6 |
8. Warranty and Support
COROLLATA products are designed for reliability and performance. For warranty information, technical support, or service inquiries, please refer to the contact information provided with your purchase or visit the official COROLLATA website.
Please retain your proof of purchase for warranty claims.