1. Introduction
The JMT Eport-E20 is a highly integrated embedded module designed for industrial applications, smart grids, and personal health medical applications. It functions as a TTL Serial to Ethernet converter, enabling serial data transmission over a 10/100M Ethernet network. This compact module integrates serial data into an ultra-small RJ45 interface, allowing for easy integration and modification within existing products.

Figure 1: JMT Eport-E20 Network Server Port Module. This image shows the compact design of the Eport-E20 module with its RJ45 port and serial pins.
2. Features
- Processor: Cortex-M3 MCU with 128KB SRAM and 2MB Flash.
- Operating System: FreeRTOS real-time operating system.
- Protocol Support: TCP / IP / Telnet / Modbus TCP protocols.
- Serial to Ethernet: Supports serial port to 10/100M Ethernet data transmission.
- Serial Port Rate: Up to 921600 bps.
- Ethernet Interface: 10/100M Ethernet auto-negotiation, 1 RJ45 port with LED.
- Configuration: Simple webpage configuration, CLI command, XML file import, Telnet, IoTService software, serial port quick configuration.
- Security: Data SSL / AES / DES security encryption.
- Firmware Upgrade: Web OTA wireless upgrade.
- Operating Temperature: Industrial-grade -40°C to +85°C.
- Power Supply: Single +3.3V.
- Dimensions: 50 x 23 x 11 mm (L x W x H).
- Certifications: 3C/FCC/CE/ROHS.
3. Setup
This section outlines the basic steps for connecting and configuring your JMT Eport-E20 module.
3.1 Physical Connection
- Connect Serial Device: Connect your serial device (e.g., PLC, MCU) to the TTL serial interface of the Eport-E20 module. Ensure correct TX/RX and ground connections.
- Connect Ethernet: Plug a standard RJ45 Ethernet cable into the Eport-E20 module and connect the other end to your network router, switch, or directly to a PC.
- Power On: Apply a stable +3.3V power supply to the module.

Figure 2: Product Application Diagram. This diagram illustrates how the Eport-E20 connects a serial device (like an RS232 PLC) to an Ethernet network, allowing access from various devices such as laptops, phones, and tablets.
3.2 Initial Configuration
The Eport-E20 supports various configuration methods. The most common is via a web page interface.
- Network Access: Ensure your computer is on the same local network as the Eport-E20 module. The module typically defaults to a specific IP address (e.g., 192.168.1.100 as shown in some diagrams, though this may vary or be assigned via DHCP).
- Access Web Interface: Open a web browser and enter the IP address of the Eport-E20 module.
- Login: If prompted, enter the default username and password (refer to specific product documentation for default credentials, if any).
- Configure Parameters: Within the web interface, you can configure network settings (static IP, DHCP), serial port parameters (baud rate, data bits, stop bits, parity), and operating modes.
Other configuration methods include CLI commands, XML file import, Telnet, and the dedicated IoTService Configuration Software.
4. Operating Modes
The Eport-E20 module supports several operating modes to suit different application requirements.
4.1 Transparent Transmission Mode
In this mode, the device acts as a transparent bridge, transferring data directly between the serial interface and the Ethernet network without modification. Users only need to set necessary communication parameters. After power-on, the device automatically connects to the default network and server based on the configured settings.

Figure 3: Transparent Transmission Mode Configuration. This image displays a software interface for configuring the Eport-E20 in transparent transmission mode, showing network and serial port settings.
4.2 TCP Server Mode
The transparent transmission mode supports communication applications such as TCP Server, TCP Client, UDP Server, and UDP Client. By default, a socket is created. This socket can be modified to select one of the working modes. When the socket is set to a TCP Server, it supports multiple TCP connections, allowing up to 5 TCP clients to connect to this socket simultaneously.
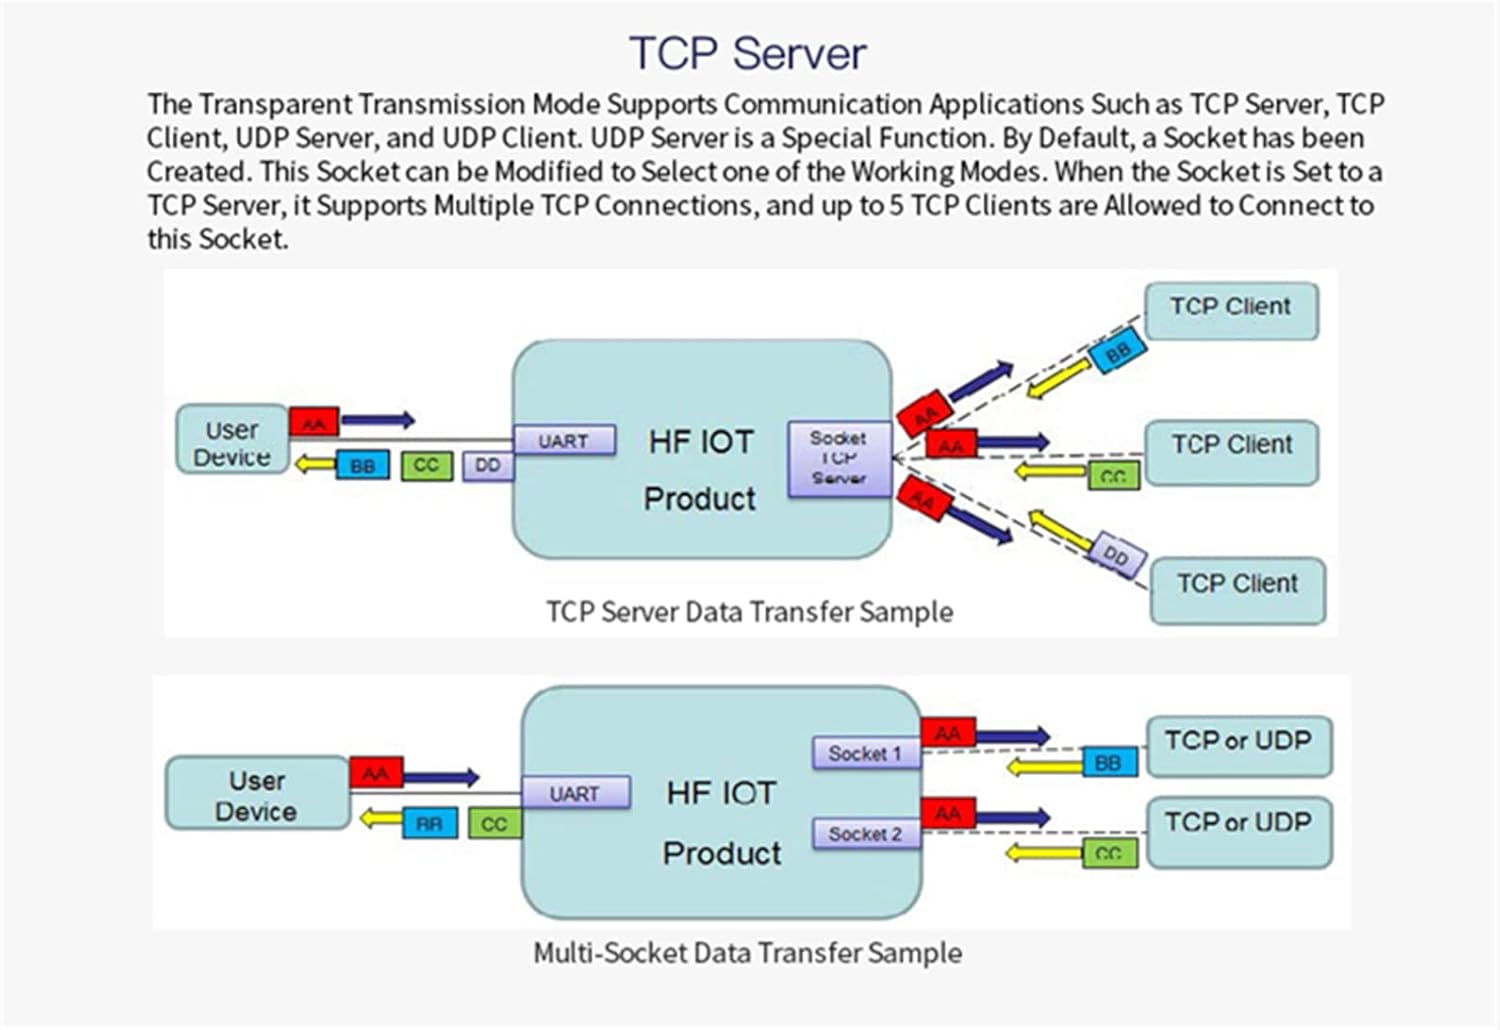
Figure 4: TCP Server Data Transfer Sample. This diagram illustrates data flow in TCP Server mode, showing how a user device communicates with multiple TCP clients through the Eport-E20 module.
4.3 HTTP Mode
In HTTP Mode, the Eport-E20 supports sending data to an HTTP Server via the HTTP protocol. The product can be configured to work in this mode through IoT Service software or the web page. When operating in HTTP Mode, the module automatically sends the HTTP protocol header to the received serial port data. The HTTP header is then removed by the HTTP Server, and the serial port data is output.

Figure 5: HTTP Transmission Sample. This image shows a software interface demonstrating data transmission in HTTP mode, including HTTP GET requests and responses.
4.4 Telnetd Mode
When the device is operating in Telnetd Mode, the UART port can be connected to the console port of the user device. Gateways and switch devices may utilize this console port to set their operating mode parameters. User equipment can be configured using the Eport-E20's Telnetd mode.

Figure 6: Telnetd Display Sample. This image shows a Telnet console interface displaying network and serial port parameters, indicating configuration options available in Telnetd mode.
5. Specifications
| Parameter | Value |
|---|---|
| Processor / Frequency | Cortex-M3 / 96MHz |
| Flash / SDRAM | 2MB / 128KB |
| Operating System | FreeRTOS |
| Ethernet Interface Port | 1 RJ45 with LED |
| Ethernet Standard | 10/100 Base-T Auto-negotiation |
| Ethernet Protection | 1.5KV Electromagnetic Isolation, Housing Isolation Protection |
| Network Transformer | Integrated |
| Network Protocols | IP, TCP, UDP, DHCP, DNS, HTTP Server/Client, ARP, BOOTP, AutoIP, ICMP, Web socket, Telnet, FTP, TFTP, uPNP, NTP, SNMP, Modbus TCP |
| Security Protocols | TLS, AES 128Bit, DES3 |
| IPV6 Support | No |
| Serial Port Number | 1 + 1 debug interface |
| Serial Interface Standard | 3.3V TTL, 2 wire (TX, RX) |
| Data Bits | 5, 6, 7, 8 |
| Stop Bits | 1, 2 |
| Check Digit (Parity) | None, Even, Odd |
| Baud Rate (TTL) | 600 bps - 921600 bps |
| Flow Control | No Aow Control, Hardware RTS/CTS, Software Xon/Xoff |
| Configuration Methods | WEB Page, CLI Command, XML File Import, Telnet, IoTService Software, Serial Port Quick Configuration |
| Firmware Upgrade | Web Page, IoTService Tool |
| Dimensions | 50 x 23 x 11 mm |
| Operating Temperature | -45°C to 85°C |
| Storage Environment | -45°C to 85°C, 5-95% RH (No Condensation) |
| Input Voltage | 3.3V |
| Working Current | ~100mA |
| Power Consumption | <400mW |
| Certifications | 3C/FCC/CE/ROHS |
6. Troubleshooting
If you encounter issues with your JMT Eport-E20 module, consider the following troubleshooting steps:
- No Power: Ensure the +3.3V power supply is correctly connected and providing stable voltage. Check for proper polarity.
- No Network Connection: Verify the Ethernet cable is securely connected to both the module and the network device (router/switch). Check the LED indicators on the RJ45 port for activity. Ensure your network settings (IP address, subnet mask, gateway) are correctly configured, especially if using a static IP.
- Serial Communication Issues: Double-check the TX/RX connections between the Eport-E20 and your serial device. Ensure the baud rate, data bits, stop bits, and parity settings match on both ends.
- Cannot Access Web Interface: Confirm your computer is on the same network segment as the Eport-E20. Try pinging the module's IP address. Clear your browser cache or try a different browser.
- Data Corruption: Verify that flow control settings (if used) are correctly configured. Ensure there is no electrical interference affecting the serial or Ethernet lines.
- Firmware Update Issues: Ensure a stable power supply during firmware updates. Do not interrupt the process. If an update fails, refer to the manufacturer's recovery procedure.
7. Warranty and Support
For warranty information, technical support, or further assistance with your JMT Eport-E20 module, please contact the manufacturer or your authorized reseller. Keep your purchase receipt and product model number (N23959-5$) handy when seeking support.
Manufacturer: HF