1. Introduction
Thank you for choosing the URVOLAX Mirror Dash Cam Backup Camera. This device is designed to enhance your driving safety and provide reliable video recording for both the front and rear of your vehicle. Featuring a large 11-inch anti-glare screen, detached front camera, and advanced functions like parking monitoring and GPS, this manual will guide you through its setup, operation, and maintenance to ensure optimal performance.
2. Product Overview
The URVOLAX Mirror Dash Cam (Model RM) is an advanced vehicle recording system. Key features include:
- Flexible Detached Front Cam: Allows mounting anywhere on the windshield to avoid obstructions.
- 11-Inch Anti-Glare Screen: Provides a wide, clear view with minimized reflection.
- Dual IMX335 Lenses: Superior sensor technology for sharp 1296P Full HD recording in both daytime and night vision.
- Split Screen Display: View front and rear camera feeds simultaneously.
- Flexible Rear Cam Installation: Waterproof camera can be installed inside or outside the vehicle.
- GPS Antenna Support: Records driving speed and routines (GPS antenna sold separately).
- 24H Parking Monitoring: Automatically records collisions when parked (requires hardwire kit, sold separately).
- Loop Recording & G-Sensor: Ensures continuous recording and locks emergency footage.
- Adjustable Reversing Lines: Customizable parking assist guidelines.
What's in the Box:
- URVOLAX Mirror Dash Cam Unit
- Detached Front Camera
- Rear Camera (with 33ft cable)
- Power Cable
- Memory Card (32GB)
- Mounting Straps

Figure 2.1: Complete URVOLAX Mirror Dash Cam System Components.
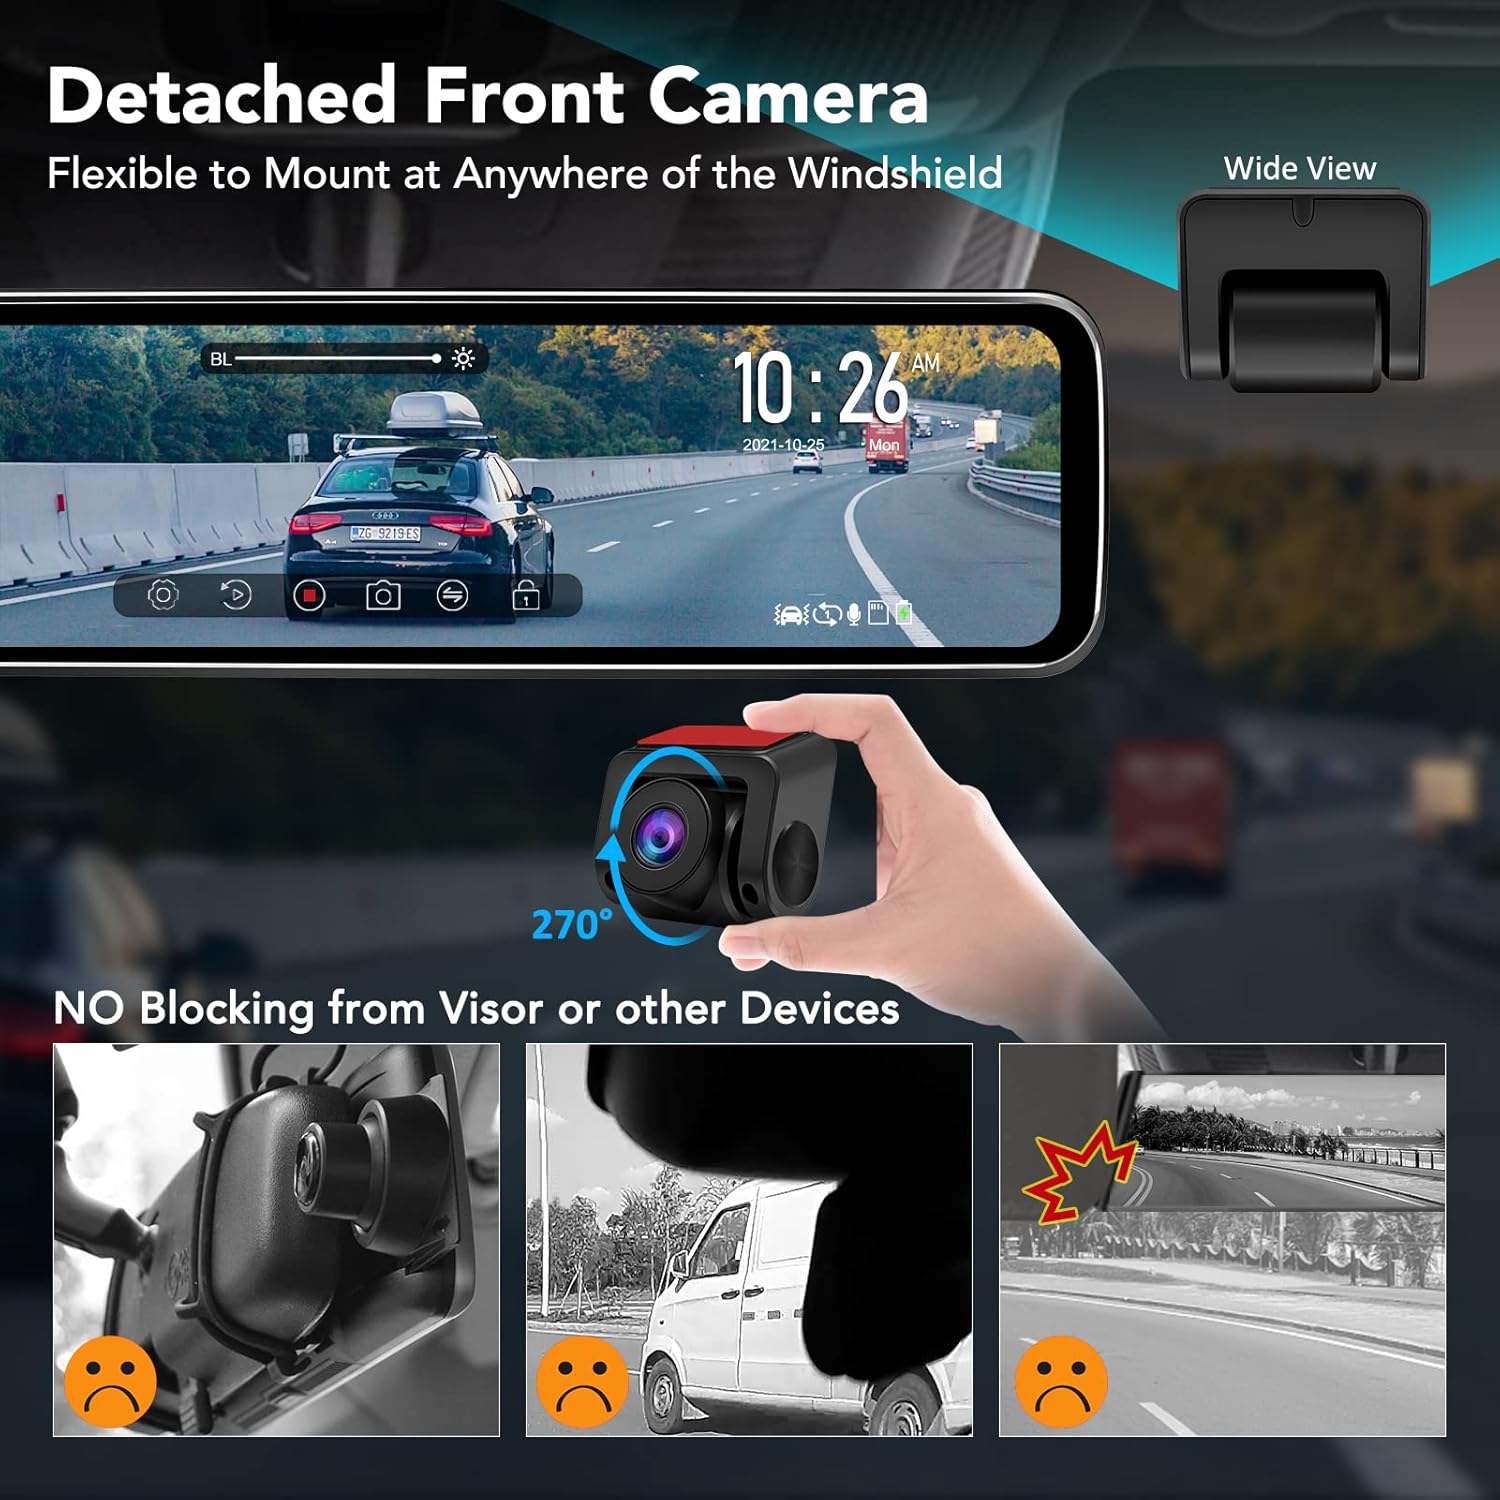
Figure 2.2: Detached Front Camera flexibility, allowing installation without blocking the visor or other devices.

Figure 2.3: The 11-inch screen size is optimized for compatibility with most vehicle models.
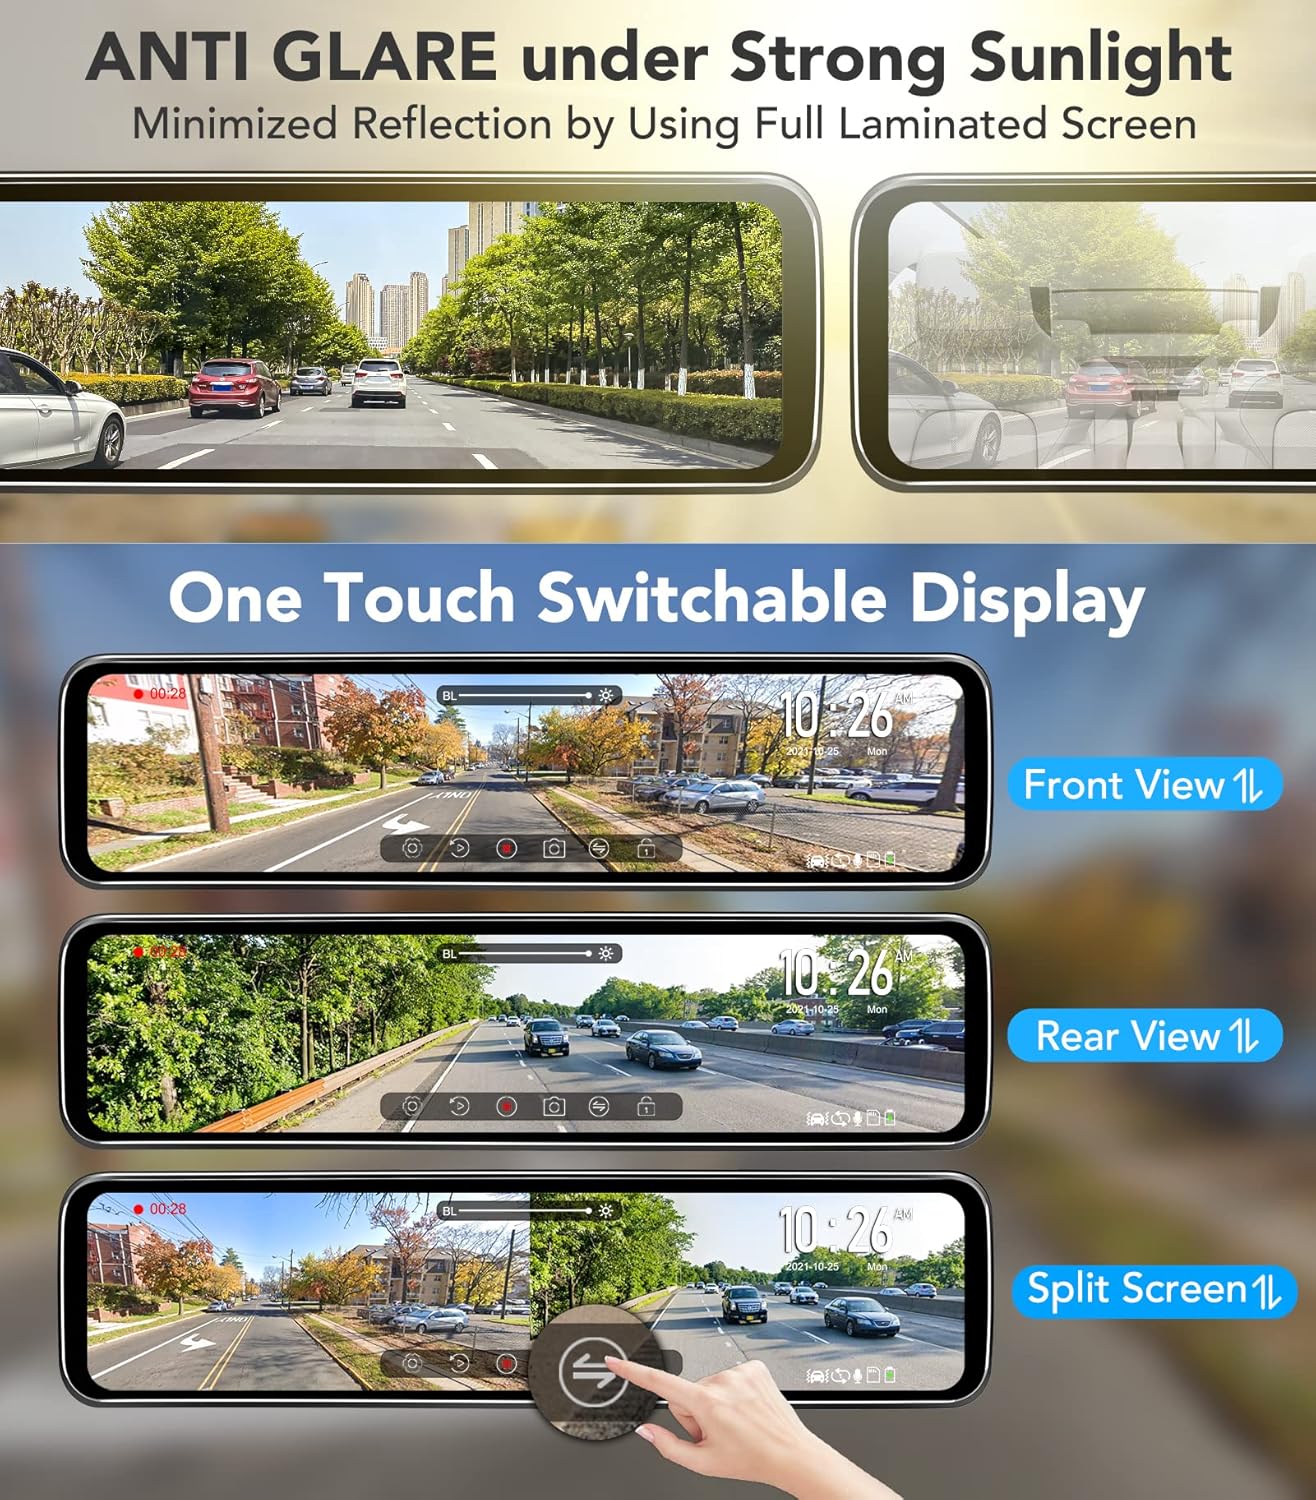
Figure 2.4: Anti-glare screen technology minimizes reflections, offering clear views in various display modes.

Figure 2.5: Dual SONY IMX335 sensors provide crystal clear Full HD 1296P images for both front and rear recording, day and night.
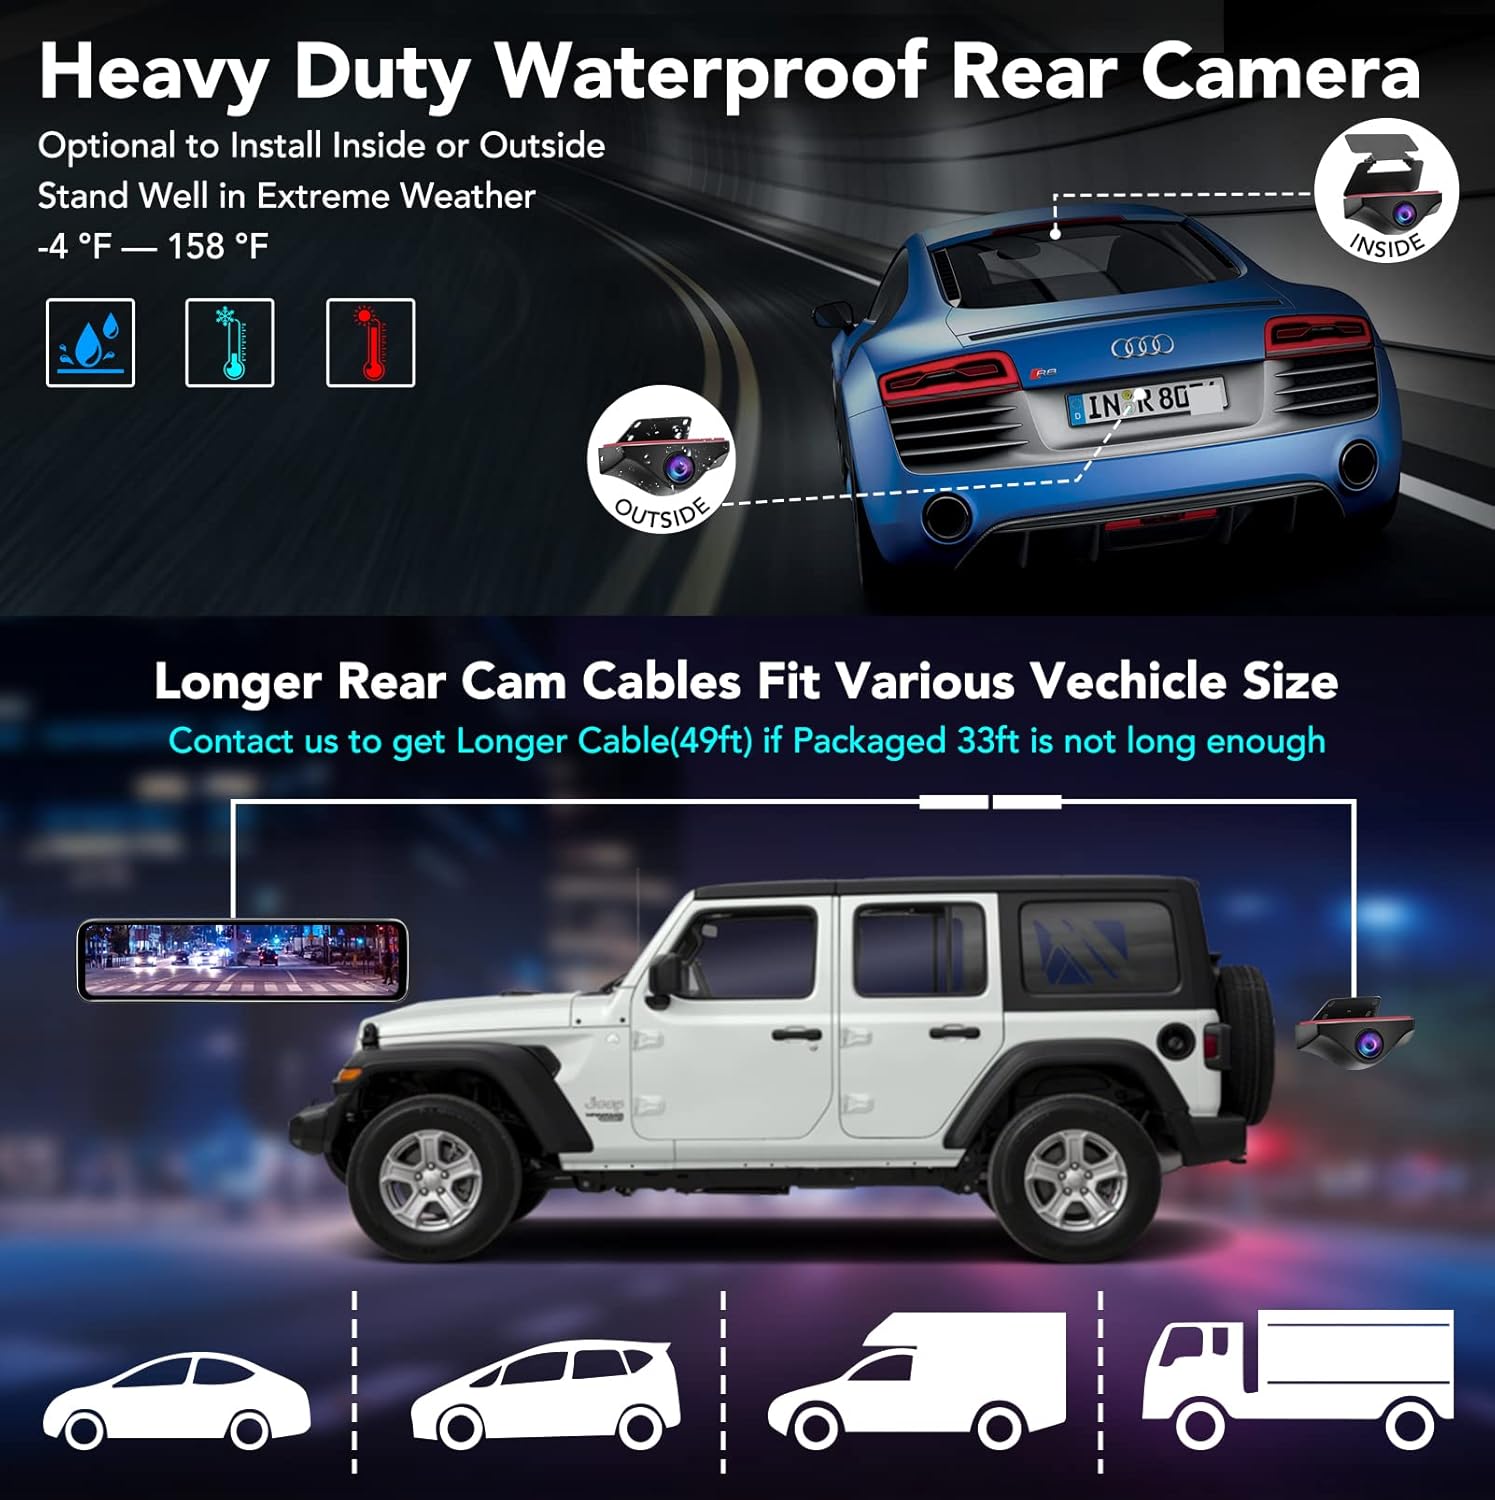
Figure 2.6: The heavy-duty waterproof rear camera can be installed inside or outside, with longer cable options available for larger vehicles.

Figure 2.7: Optional GPS antenna records driving data, and 24H Parking Monitoring detects and records collisions when parked (requires separate hardwire kit).
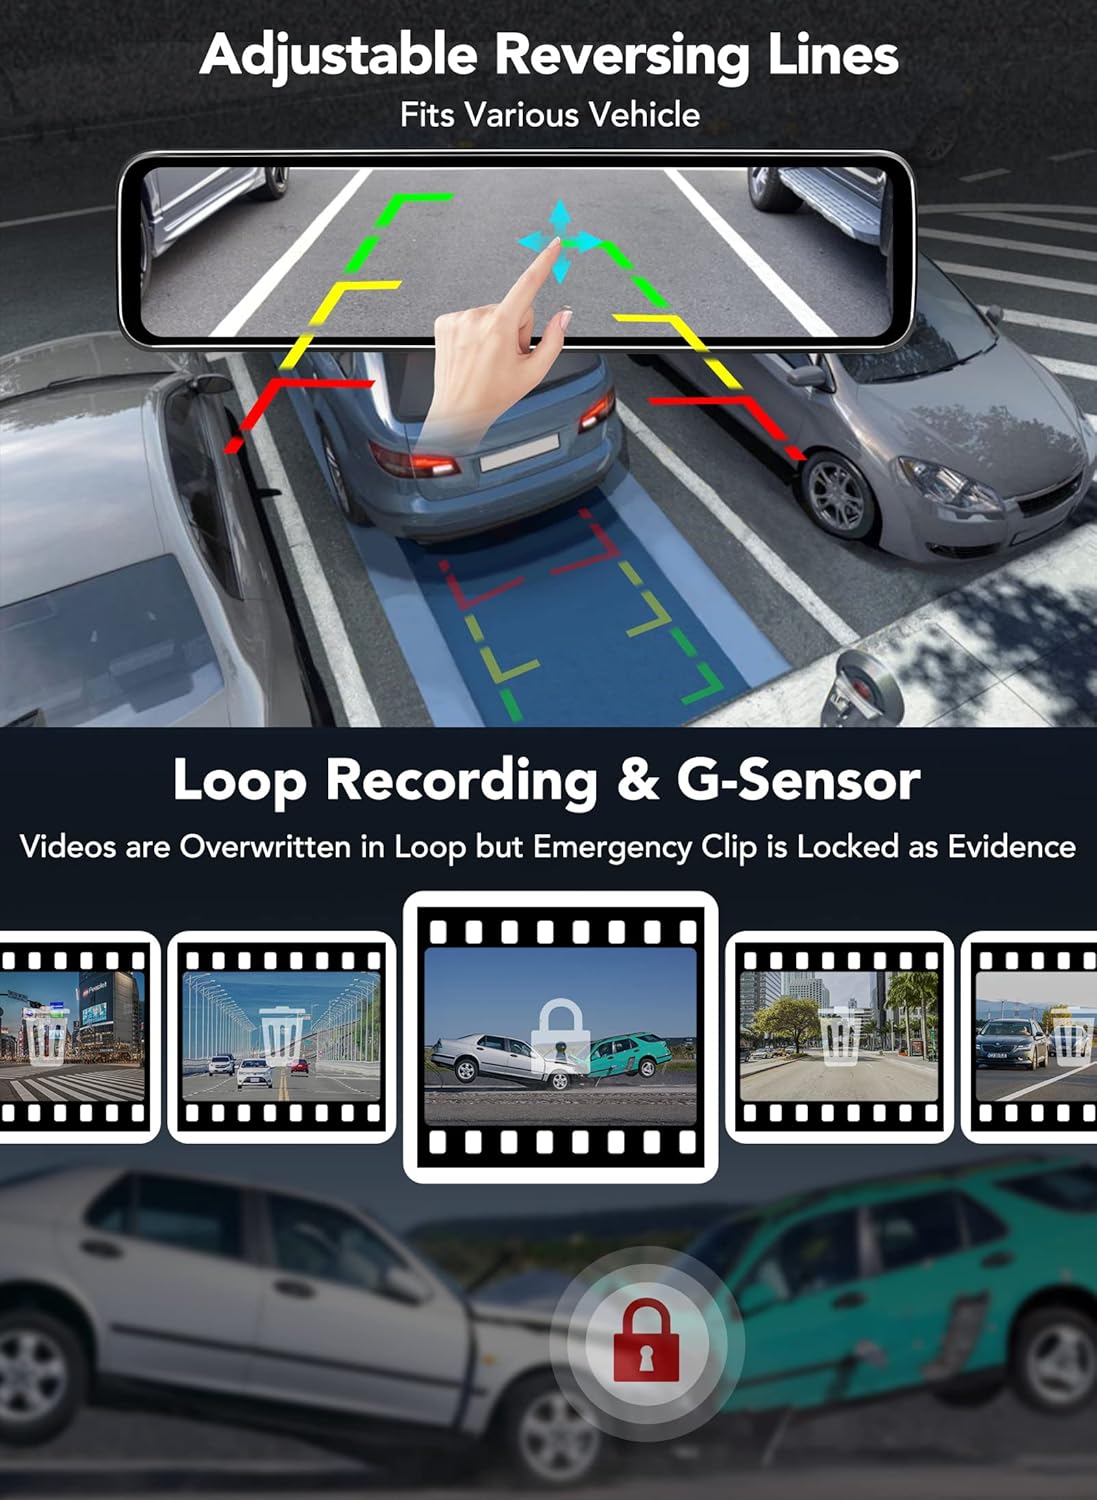
Figure 2.8: Features include adjustable reversing lines for parking assistance, continuous loop recording, and G-Sensor for emergency file locking.
3. Setup and Installation
Proper installation is crucial for the optimal performance of your URVOLAX Mirror Dash Cam. Please follow these steps carefully:
3.1 Mounting the Mirror Dash Cam
- Secure the main mirror unit over your existing rearview mirror using the provided rubber straps. Ensure it is firmly attached and does not obstruct your view.
- Connect the power cable to the mirror unit and route it along the windshield trim down to your vehicle's 12V power outlet (cigarette lighter socket).
3.2 Installing the Detached Front Camera
The detached front camera offers flexibility in placement:
- Identify a suitable location on your windshield that provides a clear view of the road ahead and does not interfere with your driving or vehicle's features (e.g., sun visors).
- Clean the chosen area thoroughly.
- Attach the front camera using its adhesive mount.
- Connect the front camera to the main mirror unit using the 3.5ft cable. Route the cable neatly along the windshield trim.
3.3 Installing the Rear Camera
The rear camera can be installed either inside or outside your vehicle:
- For internal installation: Mount the camera on the inside of your rear window, ensuring a clear view.
- For external installation: Mount the camera near your license plate or another suitable exterior location. The camera is waterproof and designed to withstand extreme weather.
- Connect the rear camera to the main mirror unit using the provided 33ft cable. Route the cable carefully to avoid pinching or damage. For larger vehicles like trucks, vans, or RVs, a 49ft cable is available upon request from URVOLAX support.
- Connect the red wire from the rear camera cable to your vehicle's reverse light power wire. This enables the parking assist feature when shifting into reverse.
3.4 Installing the GPS Antenna (Optional)
If you have purchased the optional GPS antenna:
- Mount the GPS antenna on your dashboard or another location with a clear view of the sky.
- Connect the GPS antenna cable to the designated port on the mirror unit. This will enable recording of driving speed and routes.
3.5 Hardwire Kit for Parking Monitoring (Optional)
For 24-hour parking monitoring, a hardwire kit is required and sold separately. Follow the hardwire kit's specific installation instructions to connect it to your vehicle's fuse box, ensuring continuous power to the dash cam even when the ignition is off.
4. Operating Instructions
Your URVOLAX Mirror Dash Cam is designed for intuitive operation. Here are the primary functions:
4.1 Powering On/Off
- The device will automatically power on and begin recording when your vehicle's ignition is turned on.
- It will automatically power off when the ignition is turned off.
- You can manually power on/off by pressing and holding the power button (location specified in product diagram).
4.2 Screen Display Modes
The 11-inch touch screen allows for easy switching between display modes:
- Front View: Displays only the front camera feed.
- Rear View: Displays only the rear camera feed.
- Split Screen: Displays both front and rear camera feeds simultaneously.
To switch between modes, simply tap the screen or use the designated icon on the touch interface. When in reverse gear, the display will automatically switch to the full-screen rear view with parking assist lines.
4.3 Recording Functions
- Loop Recording: The dash cam continuously records, overwriting the oldest files when the memory card is full. This ensures you always have the latest footage.
- G-Sensor (Emergency Lock): In the event of a sudden impact or collision, the built-in G-Sensor will automatically detect it and lock the current video segment, preventing it from being overwritten by loop recording. These files are stored in a separate, protected folder.
- Parking Monitoring: If the hardwire kit is installed, the dash cam will automatically wake up and record a short video clip if it detects a collision while your vehicle is parked. This clip will also be locked as an emergency file.
4.4 Adjusting Reversing Lines
When in reverse mode, you can adjust the parking assist lines on the screen to fit your vehicle's dimensions and preferences. Simply touch and drag the lines on the screen to reposition them.
4.5 Playback
To review recorded videos:
- Access the playback menu on the touch screen.
- Browse through the recorded files (normal recordings, locked emergency files).
- Select a file to play it back directly on the mirror screen.
5. Maintenance
To ensure the longevity and optimal performance of your dash cam, regular maintenance is recommended:
- Clean the Lenses: Regularly wipe the front and rear camera lenses with a soft, lint-free cloth to ensure clear video quality. Avoid abrasive materials.
- Clean the Screen: Use a microfiber cloth to gently clean the 11-inch display. Do not spray cleaning solutions directly onto the screen.
- Memory Card Management: Periodically format the memory card (at least once a month) within the dash cam's settings. This helps maintain card health and prevents data corruption. Back up any important footage before formatting.
- Firmware Updates: Check the URVOLAX official website periodically for any available firmware updates. Keeping your device updated can improve performance and add new features.
- Cable Inspection: Periodically check all cables for any signs of wear, fraying, or damage. Replace damaged cables immediately to prevent electrical issues.
6. Troubleshooting
If you encounter issues with your URVOLAX Mirror Dash Cam, please refer to the following common solutions:
| Problem | Possible Cause | Solution |
|---|---|---|
| Dash cam does not power on. | No power supply; loose connection. | Check power cable connection to the unit and 12V outlet. Ensure vehicle ignition is on or hardwire kit is properly installed. |
| Rear camera not displaying. | Loose cable connection; faulty camera/cable. | Ensure the rear camera cable is securely connected to the main unit. Check for any visible damage to the cable. Try restarting the device. |
| Poor video quality (blurry/unclear). | Dirty lens; protective film still on lens; low light conditions. | Clean camera lenses. Remove any protective film. Ensure sufficient lighting for optimal night vision performance. |
| Memory card error/recording stops. | Full memory card; corrupted card; incompatible card. | Format the memory card regularly. Use a high-quality Class 10 or U3 microSD card. Replace if corrupted. |
| Screen flickering or no image. | Software glitch; loose internal connection. | Try unplugging and re-plugging the power cable. If the issue persists, contact customer support. |
| Parking monitoring not working. | Hardwire kit not installed or faulty. | Ensure the hardwire kit is correctly installed and providing continuous power. Check its connections to the fuse box. |
If the problem persists after attempting these solutions, please contact URVOLAX customer support for further assistance.
7. Specifications
| Feature | Detail |
|---|---|
| Model Name | RM |
| Screen Size | 11 inches |
| Video Capture Resolution | 1296p (Full HD) |
| Front Camera Sensor | SONY IMX335 |
| Rear Camera Sensor | SONY IMX335 |
| Connectivity Technology | USB |
| Special Features | Loop Recording, Night Vision, G-Sensor, Parking Monitoring (with optional hardwire kit), Adjustable Reversing Lines, Split Screen |
| Mounting Type | Rearview Mirror Mount |
| Color | Black |
| Item Weight | 2.79 pounds |
| Package Dimensions | 13.3 x 4.8 x 2.83 inches |
8. Warranty and Support
URVOLAX is committed to providing high-quality products and customer satisfaction. For warranty information, product support, or to inquire about accessories like longer rear camera cables (49ft) or hardwire kits, please visit the official URVOLAX website or contact their customer service directly. Details for contacting support are typically found on the product packaging or the brand's online store page.


