ULANZI VL110
ULANZI VL110 RGB LED Video Light Wand User Manual
Model: VL110
1. Introduction
Thank you for purchasing the ULANZI VL110 RGB LED Video Light Wand. This portable and versatile lighting tool is designed for various photography and videography applications, offering adjustable color temperature, full RGB control, and multiple scene effects. Please read this manual thoroughly before use to ensure proper operation and to maximize the product's potential.
2. Safety Information
- Do not expose the device to water or high humidity.
- Avoid direct eye exposure to the light source.
- Do not disassemble or modify the product. Repairs should only be performed by authorized personnel.
- Keep out of reach of children.
- Use only the provided Type-C charging cable or a compatible certified cable.
- Do not operate in environments with extreme temperatures.
3. Product Overview
The ULANZI VL110 is a compact and powerful RGB LED light wand. It features an intuitive control panel and a magnetic design for flexible placement.

Figure 3.1: ULANZI VL110 Light Wand. This image displays two VL110 units, one showing the front panel with the LCD screen and control buttons, and the other showing the light tube illuminated with a rainbow gradient. The compact size and design are visible.
Components and Controls:
- LED Light Tube: Provides illumination.
- LCD Display: Shows current settings (mode, brightness, color temperature, battery level).
- Control Buttons:
- Power Button: On/Off.
- Mode Button: Cycles through CCT, RGB, and Scene modes.
- Adjustment Buttons (+/-): Adjusts brightness, color temperature, hue, or saturation depending on the mode.
- Type-C Charging Port: For recharging the built-in battery.
- 1/4-inch Screw Holes: Two standard 1/4-inch screw holes for mounting on tripods, light stands, or other accessories.
- Magnetic Back: Allows attachment to metal surfaces.
- Splicing Buckle: Detachable collar for connecting multiple VL110 units.
4. Setup
4.1 Charging the Battery
The ULANZI VL110 has a built-in 2600mAh rechargeable battery. Before first use, fully charge the device.
- Locate the Type-C charging port on the light wand.
- Connect the provided Type-C USB cable to the light wand and the other end to a USB power adapter (not included) or a computer USB port.
- The battery indicator on the LCD screen will show charging status. A full charge takes approximately 1.7 hours.
- The light can be used while charging.

Figure 4.1: Battery Charging. This image illustrates the built-in 2600mAh battery and shows the LCD screen displaying the battery charging icon, indicating the device is being charged.
4.2 Mounting the Light Wand
The VL110 offers multiple mounting options:
- Handheld: The light wand is lightweight (235g) and designed for comfortable handheld use.
- Tripod/Light Stand: Use the 1/4-inch screw holes to attach the light to a tripod, light stand, or camera cage.
- Magnetic Adsorption: The built-in magnets allow the light to be attached to most metal surfaces for convenient placement.
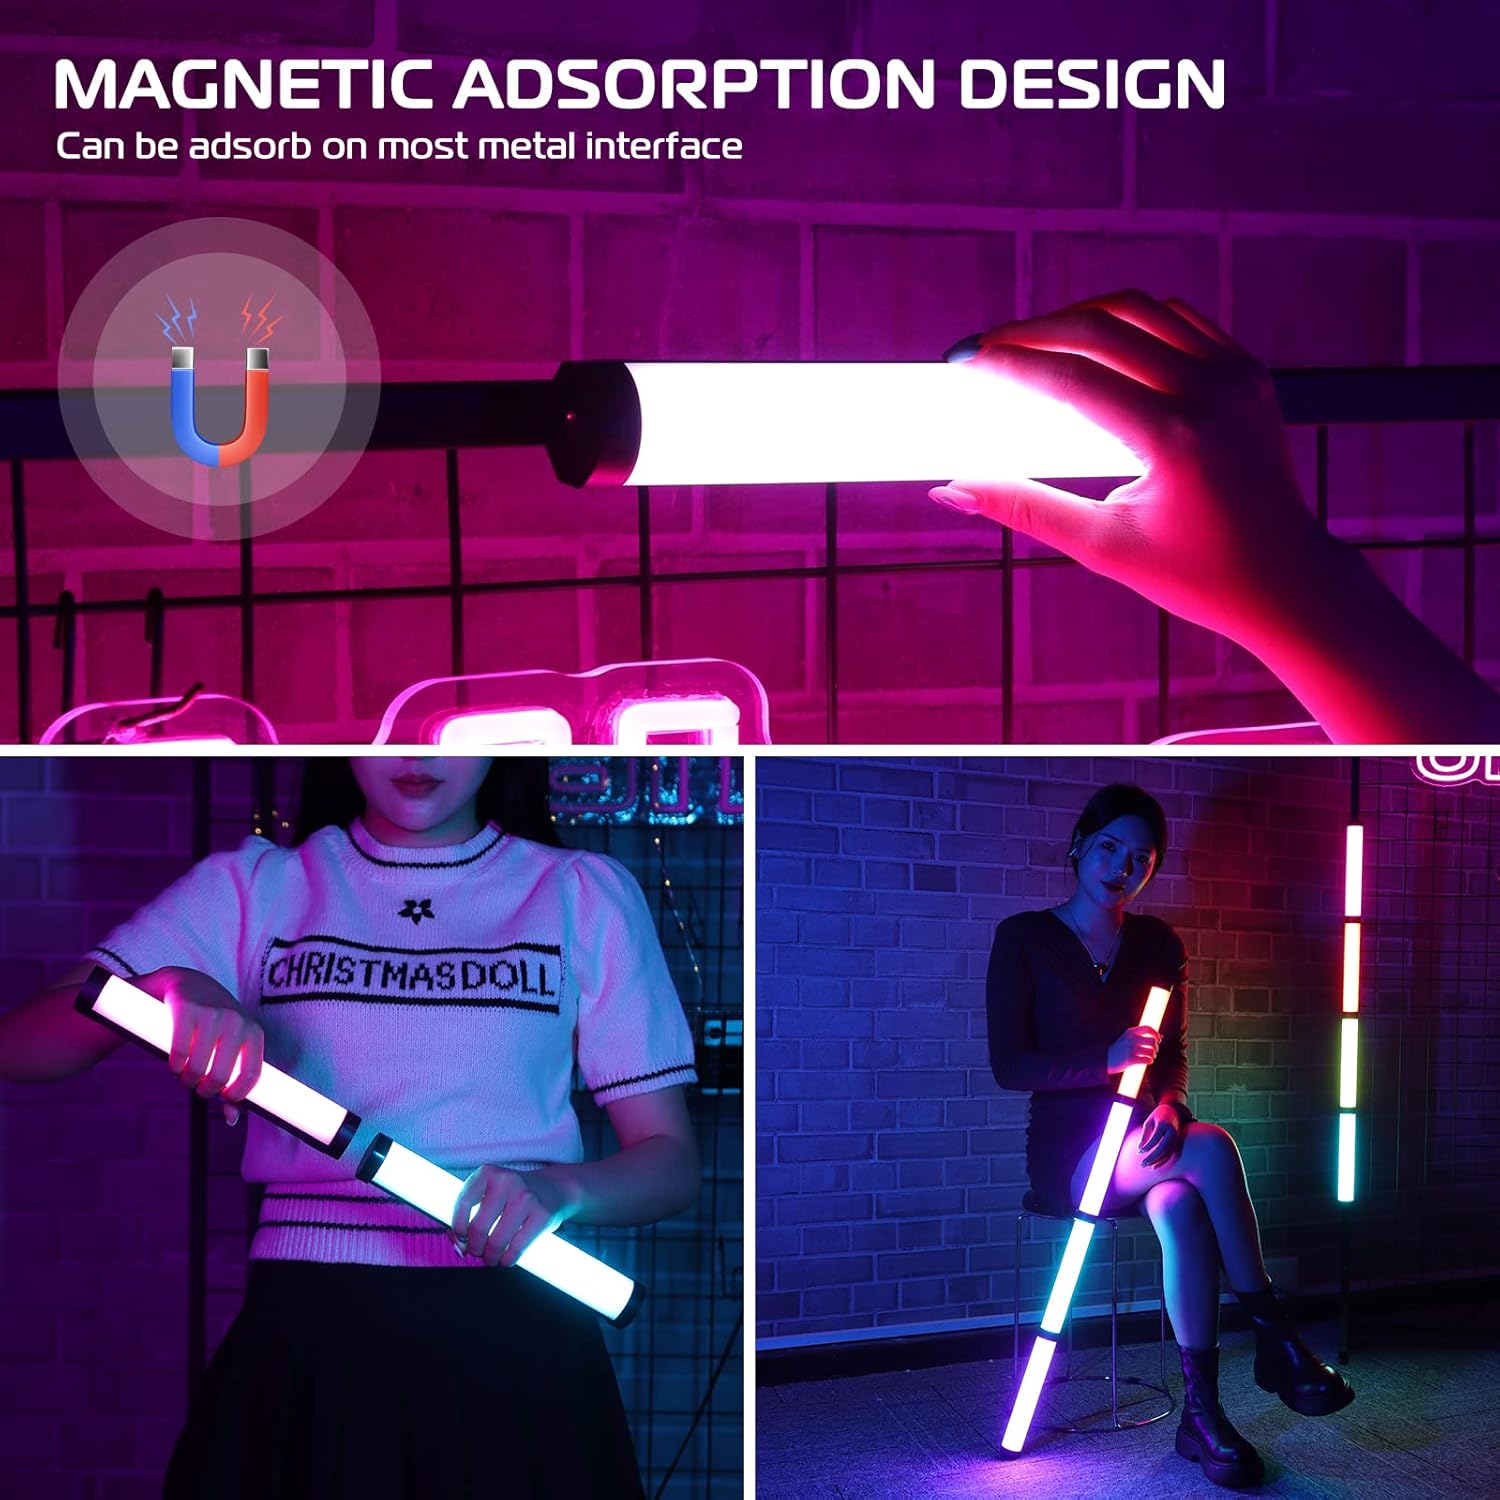
Figure 4.2: Magnetic Adsorption. This image shows the ULANZI VL110 light wand magnetically attached to a metal grid, highlighting its magnetic adsorption design for versatile placement.
4.3 Splicing Multiple Units (Optional)
Multiple VL110 units can be connected together using the detachable collar at the bottom of each unit to create a longer light source.
- Remove the detachable collar from the bottom of one VL110 unit (Unit A).
- Align the top of another VL110 unit (Unit B) with the exposed connection point of Unit A.
- Twist Unit B approximately 30 degrees to lock it into place with the built-in buckle.
- It is recommended to assemble no more than three lights to avoid potential damage.

Figure 4.3: Splicing Light Wands. This diagram illustrates the three-step process of connecting two ULANZI VL110 light wands using the detachable collar and built-in buckle for extended length.
5. Operating Instructions
5.1 Power On/Off
Press and hold the Power button to turn the light wand on or off.
5.2 Mode Selection
Press the Mode button to cycle through the three main operating modes: CCT Mode, RGB Mode, and Scene Mode.

Figure 5.1: Operating Modes. This image visually explains the three main modes: CCT Mode (showing warm and cool white light), RGB Mode (displaying various colored lights), and Scene Mode (showcasing icons for 20 different lighting effects like police car, fire, lightning, etc.).
5.3 CCT Mode (Correlated Color Temperature)
In CCT Mode, you can adjust the color temperature from 2500K (warm) to 9000K (cool) and the brightness from 0% to 100%.
- Press the Mode button until "CCT" is displayed on the LCD screen.
- Use the Adjustment buttons (+/-) to change the color temperature.
- Press the Mode button briefly to switch to brightness adjustment. Use the Adjustment buttons (+/-) to set the desired brightness.
5.4 RGB Mode
In RGB Mode, you have full control over the hue (0-360°) and saturation, along with brightness adjustment.
- Press the Mode button until "RGB" is displayed on the LCD screen.
- Use the Adjustment buttons (+/-) to change the hue (color).
- Press the Mode button briefly to switch to saturation adjustment. Use the Adjustment buttons (+/-) to set the desired saturation.
- Press the Mode button briefly again to switch to brightness adjustment. Use the Adjustment buttons (+/-) to set the desired brightness.

Figure 5.2: Detailed Adjustments. This image provides a visual guide to the adjustment capabilities: 0-100% brightness, 2500K-9000K color temperature, and 0-360° RGB color adjustment, illustrated with various lighting examples.
5.5 Scene Mode
The VL110 features 20 pre-programmed lighting effects to simulate various scenarios.
- Press the Mode button until "Scene" is displayed on the LCD screen.
- Use the Adjustment buttons (+/-) to cycle through the 20 available scene effects.
- Some scene effects may have adjustable parameters (e.g., speed or intensity), which can be modified by pressing the Mode button briefly and then using the Adjustment buttons.

Figure 5.3: 20 Scene Effects. This image displays icons for all 20 pre-programmed scene lighting effects, including Police Car, Ambulance, Fire, Lightning, Fireworks, Television, Candle, Party, and more, providing a quick visual reference for available options.
6. Maintenance
- Clean the light wand with a soft, dry cloth. Do not use harsh chemicals or abrasive materials.
- Store the device in a cool, dry place away from direct sunlight when not in use.
- If storing for an extended period, charge the battery to approximately 50% every three months to prolong battery life.
7. Troubleshooting
| Problem | Possible Cause | Solution |
|---|---|---|
| Light does not turn on. | Battery is depleted. | Charge the light wand using the Type-C cable. |
| Light flickers or is unstable. | Low battery or faulty connection. | Ensure battery is charged. Check Type-C cable connection if operating while charging. |
| Controls are unresponsive. | Temporary software glitch. | Turn off the device and turn it back on. If issue persists, contact customer support. |
| Cannot change modes/settings. | Incorrect button press sequence. | Refer to Section 5: Operating Instructions for correct button usage. |
8. Specifications
| Feature | Detail |
|---|---|
| Model | VL110 RGB |
| Brand | ULANZI |
| CRI | CRI ≥95 |
| Operating Voltage | 3.7V |
| Power | 7.5W |
| Battery Capacity | 2600mAh |
| Charge Type | Type-C |
| Light Angle | 120° |
| Color Temperature | 2500K-9000K |
| Illuminance (0.3m) | 1150LUX |
| Charging Time (Full) | Approx. 1.7 hours |
| Light Beads | White 44pcs, Yellow 44pcs, RGB 22pcs |
| Continuous Working Time (Max Brightness) | ≥1.5 hours |
| Dimensions | 24cm (length) x 4cm (width) approx. |
| Weight | 235g / 0.52 lb |
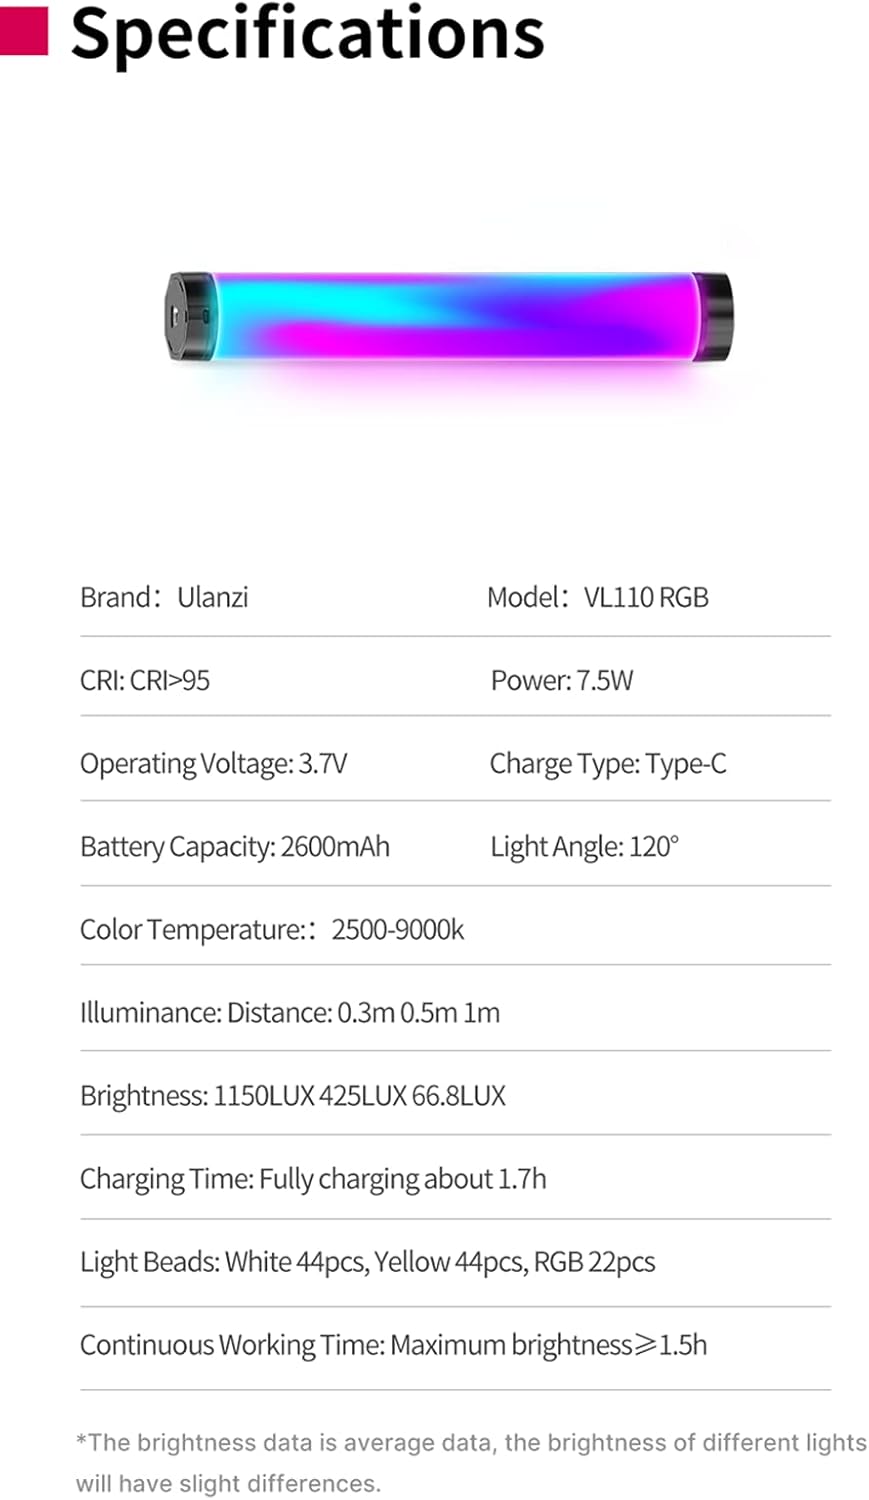
Figure 8.1: Product Specifications. This image presents a table summarizing the key technical specifications of the ULANZI VL110, including brand, model, CRI, power, battery, color temperature, and more.
9. Product List
The following items are included in the product package:
- 1 x ULANZI VL110 RGB LED Video Light Wand
- 1 x Type-C Charging Cable
- 1 x Product Box

Figure 9.1: Package Contents. This image displays the items included in the ULANZI VL110 product package: the product box, the VL110 RGB light wand itself, and the Type-C charging cable.
10. Warranty and Support
ULANZI products typically come with a standard manufacturer's warranty. Please refer to the warranty card included in your package or visit the official ULANZI website for detailed warranty terms and conditions.
For technical support, troubleshooting assistance, or warranty claims, please contact ULANZI customer service through their official channels. Keep your purchase receipt as proof of purchase.
Online Resources:
- ULANZI Official Website: www.ulanzi.com
- ULANZI Amazon Store: Visit ULANZI Store on Amazon
Ask a question about this manual
Ask about setup, troubleshooting, compatibility, parts, safety, or missing instructions. Manuals+ will review the question and use this page’s manual context to help answer it.