1. Product Overview
The Rugged Radios R1 is a versatile 5-watt handheld two-way radio designed for reliable communication across various environments, including business, schools, churches, and construction sites. It features both digital and analog capabilities, dual-band VHF/UHF operation, and a long-range antenna. The R1 is built for durability and ease of use, offering crystal-clear transmission and reception.

Figure 1: Front view of the Rugged Radios R1 Handheld Two-Way Radio.
2. Key Features
- Digital and Analog Capabilities: The R1 supports both Digital Mobile Radio (DMR) for superior voice clarity by removing background noise, and analog for compatibility with older radio systems.
- Dual Band VHF/UHF: Operates on both Very High Frequency (VHF) and Ultra High Frequency (UHF) bands, allowing for optimal performance in different terrains. VHF is ideal for open spaces, while UHF is better for urban areas or forests.
- Dual Channel Monitoring: Listen to two channels simultaneously and easily toggle between them for transmission, ensuring you never miss important communications.
- Customizable Channel Presets: Quickly access your most used channels with programmable preset buttons.
- Text Messaging: In digital mode, the R1 can send preset or manually entered text messages to other compatible radios.
- USB Charging: Conveniently charge the radio using the included USB cable.
- Built-in Safety Flashlight: Provides illumination in low-light conditions or emergencies.
- Easy-to-Use Keypad and Interface: Intuitive design for straightforward operation.
- Standard Two-Pin Accessory Port: Compatible with a wide range of Rugged Radios accessories, including speaker mics, moto kits, and intercoms.

Figure 2: Labeled diagram highlighting key components of the R1 radio, including the power/volume knob, speaker, microphone, backlit display, push-to-talk button, side keys, and simplified keypad.

Figure 3: Side view of the R1 radio, illustrating the mic and 3.5mm headphone jack, belt clip, push-to-talk button, side keys, and rechargeable Lithium-Ion battery compartment.

Figure 4: Detailed view of the R1 keypad, showing Confirm/Select (OK), Channel Preset 1 (P1), FM Mode (FM), Lock/Space, Up/Down Select arrows, Back/Exit, Channel Preset 2 (P2), Flashlight, and Settings buttons.

Figure 5: The R1's built-in flashlight, activated via the keypad, useful for navigating in dark conditions.
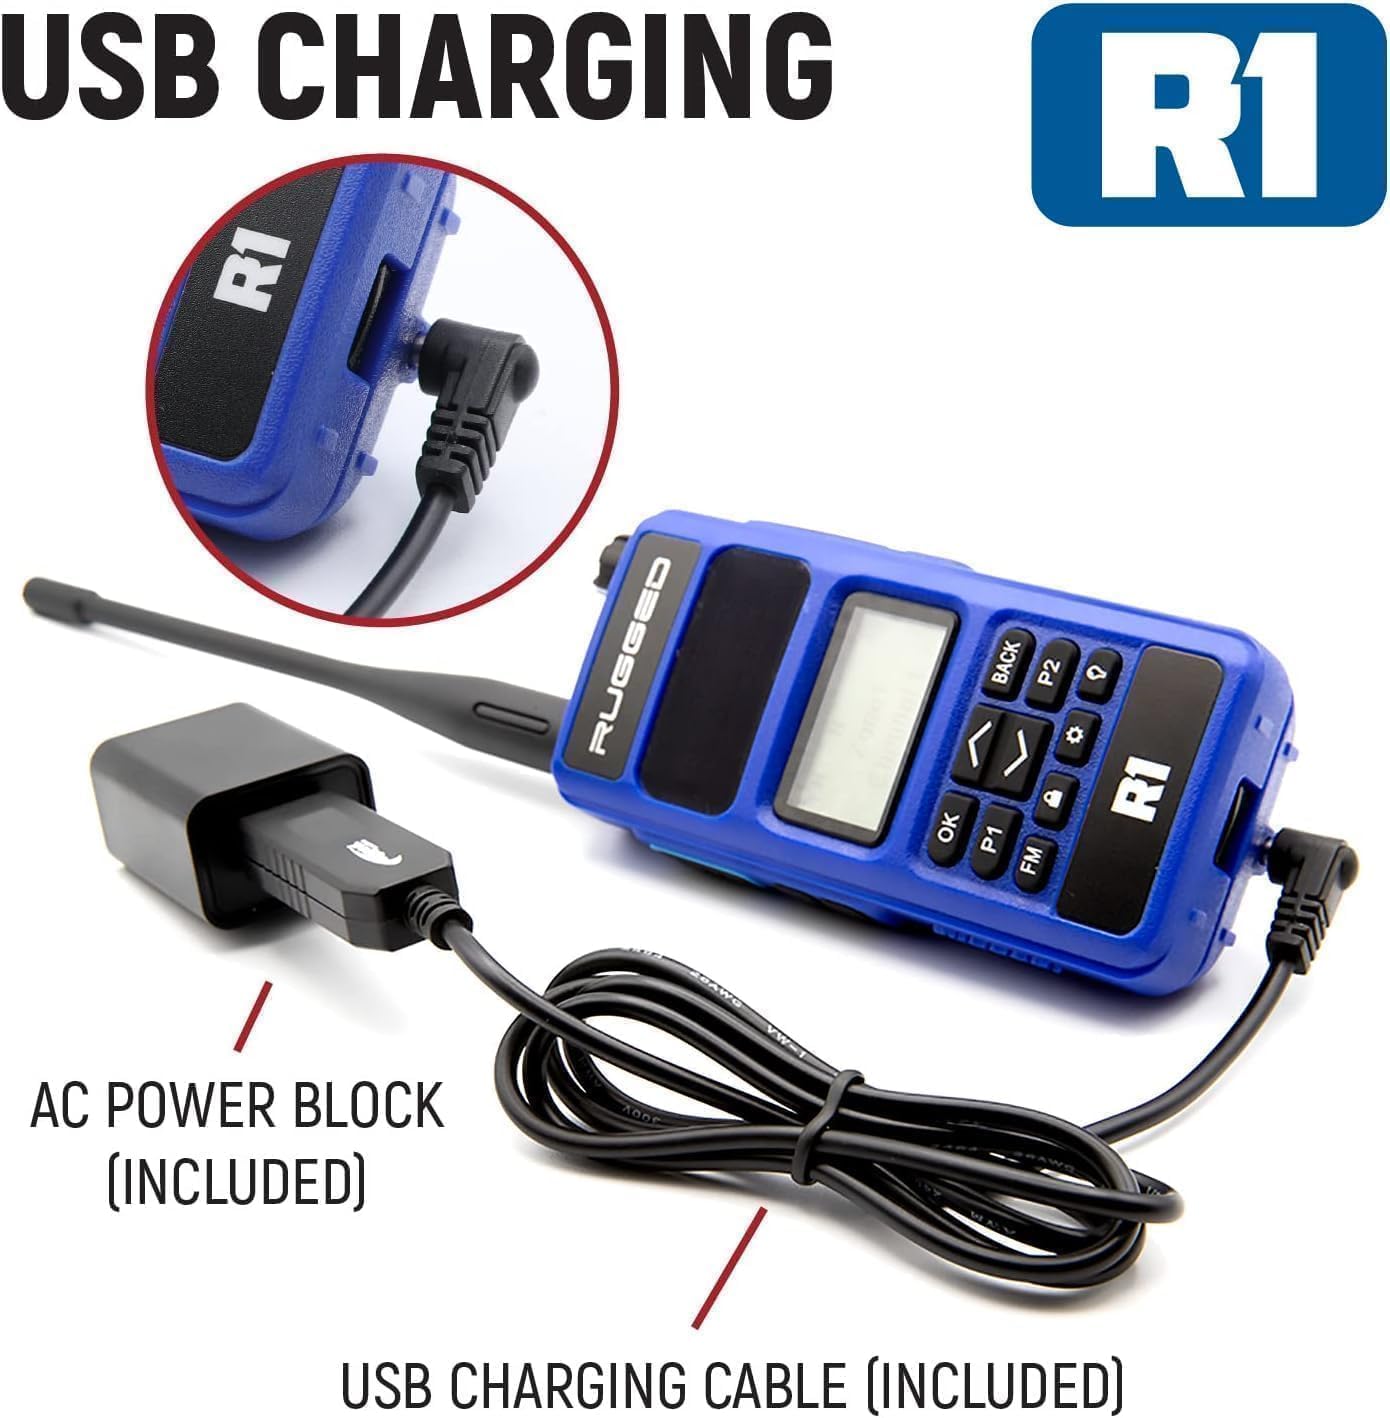
Figure 6: The R1 radio connected for USB charging, showing the included AC power block and USB charging cable.
Video: R1 Features Overview
This video provides a detailed overview of the Rugged Radios R1, demonstrating its key features and functionalities. It covers digital and analog capabilities, dual-band VHF/UHF operation, text messaging, dual channel monitoring, and channel presets.
- Digital and Analog Capabilities: Explained from 0:11 to 0:17 and demonstrated from 1:21 to 2:04.
- Dual Band VHF/UHF: Discussed from 0:17 to 0:22 and further explained from 2:08 to 2:31.
- Dual Channel Monitoring: Highlighted from 0:22 to 0:39 and demonstrated from 2:58 to 3:19.
- Text Messaging: Covered from 2:35 to 2:53.
- Channel Presets: Explained from 3:23 to 3:39.
3. Setup
- Charge the Battery: Before first use, fully charge the included Lithium-Ion battery using the provided USB charging cable and AC power block. Connect the USB cable to the radio's charging port and the power block to a standard electrical outlet. The charging indicator will show progress.
- Attach the Antenna: Screw the antenna clockwise onto the antenna connector at the top of the radio until it is finger-tight. Do not overtighten.
- Attach the Belt Clip: If desired, attach the belt clip to the back of the radio using the provided screws.
- Power On/Off: Rotate the Power/Volume knob clockwise to power on the radio. Rotate counter-clockwise until a click is heard to power off.
4. Operating Instructions
- Adjust Volume: After powering on, rotate the Power/Volume knob to adjust the listening volume.
- Select Channel: Use the Up/Down arrow buttons on the keypad to scroll through available channels. The selected channel will be displayed on the backlit screen.
- Transmit (Push-to-Talk - PTT): To transmit, press and hold the PTT button on the side of the radio. Speak clearly into the microphone. Release the PTT button to listen.
- Dual Monitor Mode: Activate dual monitor mode through the radio's menu settings. This allows you to monitor two channels simultaneously. You can then toggle between the primary and secondary channels for transmission using a programmable side button or menu option.
- Channel Presets (P1/P2): Use the P1 and P2 buttons on the keypad for quick access to pre-programmed channels. These can be customized via software.
- Text Messaging (Digital Mode): When operating on a digital channel, access the text messaging feature through the menu. You can select from preset messages or manually compose a message using the keypad.
- Flashlight: Press the dedicated flashlight button on the keypad to turn the built-in flashlight on or off.
- FM Radio: Press the FM button on the keypad to activate the FM radio function. Use the arrow keys to tune to stations.
5. Maintenance
- Battery Care: To prolong battery life, avoid fully discharging the battery frequently. Charge the battery regularly, even if the radio is not in active use. Store the radio and battery in a cool, dry place.
- Cleaning: Clean the radio's exterior with a soft, damp cloth. Do not use harsh chemicals or abrasive cleaners. Ensure all ports are dry before use.
- Antenna Inspection: Periodically check the antenna for any damage or loose connections. Replace if necessary to ensure optimal performance.
- Software Updates: Check the manufacturer's website for any available software updates to ensure your radio has the latest features and performance enhancements.
6. Troubleshooting
| Problem | Possible Cause | Solution |
|---|---|---|
| Radio does not power on | Low or dead battery; Incorrect battery installation | Charge the battery; Reinstall the battery correctly |
| Cannot transmit or receive | Incorrect channel selected; Out of range; Antenna not properly attached | Verify channel settings; Move closer to other radios; Check antenna connection |
| Poor audio quality (static, unclear) | Weak signal; Interference; Incorrect squelch setting | Move to an area with better reception; Adjust squelch level in settings |
| Keypad is unresponsive | Keypad lock activated; Software glitch | Unlock the keypad (refer to operation section); Power cycle the radio |
7. Specifications
- Brand: Rugged Radios
- Model Number: R1
- Number of Channels: 1024
- Frequency Range: VHF and UHF bands
- Connectivity Protocol: DMR, VHF, UHF
- Talking Range Maximum: 2 Miles (approximate, varies by terrain)
- Voltage: 3.7 Volts
- Number of Batteries: 1 Lithium Ion (included)
- Product Dimensions: 1.25"D x 2.25"W x 9.25"H
- Water Resistance Level: Not Water Resistant (IP65 rating for dust and water jets)
- Compatible Devices: Business band radios with the same frequencies and DMR digital radios
8. Warranty Information
Rugged Radios guarantees its Radios, Intercoms & Headsets to be free from manufacturing defects in material and workmanship under normal use for a period of three (3) years from the date of purchase. All other Rugged Radios branded products carry a one-year warranty. In the event of a defect covered by the warranty, Rugged Radios, at its discretion, will either repair or replace the product. This action constitutes the full extent of Rugged Radios' liability and the customer's sole and exclusive remedy.
Rugged Radios shall not be responsible for any defects or damage resulting from mishandling, abuse, misuse, improper storage, or improper operation of the device, including use with incompatible or inferior equipment, or failure to maintain specified environmental conditions.
9. Customer Support
For further assistance, technical support, or warranty claims, please contact Rugged Radios customer service. Refer to the official Rugged Radios website for the most up-to-date contact information and support resources.


