NAAFIE DSO-10100S
HTC Instruments DSO-10100S Digital Storage Oscilloscope User Manual
Model: DSO-10100S
1. Product Overview
The HTC Instruments DSO-10100S is a high-performance 2-channel digital storage oscilloscope with a 100MHz bandwidth and a built-in signal generator. Designed for precision measurement and analysis, this device is ideal for educational, industrial, and research applications. It features a clear LCD display and intuitive controls for efficient waveform capture and analysis.

Figure 1.1: Front view of the DSO-10100S, showing the LCD display, control panel, and input channels.
2. Key Features
- Horizontal Time Base Range: 50S/div ~ 10nS/div, allowing for a wide range of signal observation.
- Vertical Sensitivity: 50mV/div ~ 500V/div, providing flexibility for various voltage levels.
- Automatic Measurement: Includes peak value, amplitude, maximum value, minimum value, top value, bottom value, middle value, average value, root-mean-square (RMS) frequency, cycle, rise time, fall time, positive pulse width, negative pulse width, positive duty cycle, and negative duty cycle.
- Stored Waveform: Built-in 1GB storage space, capable of storing up to 1000 screen capture pictures and 1000 groups of 240Kbit waveform data.
- Power Voltage: Operates within 100~240VACRMS, 45~440Hz, CAT II standards.
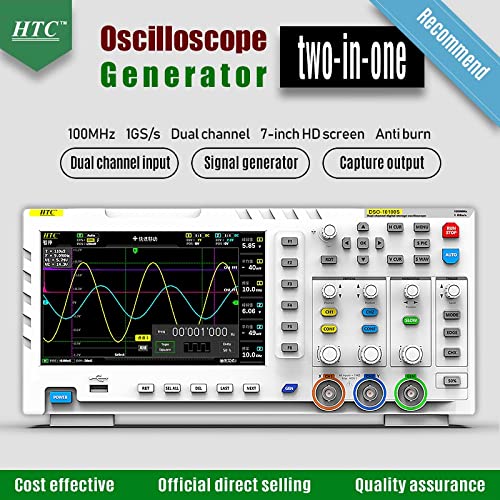
Figure 2.1: The DSO-10100S functions as both an oscilloscope and a signal generator, offering versatile testing capabilities.
3. Setup Guide
- Unpacking: Carefully remove the oscilloscope and all accessories from the packaging. Verify that all components listed in the packing list are present.
- Power Connection: Connect the provided power cord to the oscilloscope's power input and then to a suitable AC power outlet (100-240VAC, 45-440Hz).
- Probe Connection: Connect the oscilloscope probes to the BNC input connectors (CH1, CH2) on the front panel. Ensure a secure connection by twisting the BNC connector until it locks.
- Initial Power On: Press the POWER button located on the front panel to turn on the device. The display will illuminate, and the system will perform a self-test.
- Probe Compensation: For accurate measurements, it is crucial to compensate the probes. Connect the probe to CH1 and the probe tip to the probe compensation output (usually a square wave signal). Adjust the compensation screw on the probe until a flat-top square wave is displayed on the screen. Repeat for CH2.

Figure 3.1: Angled view of the DSO-10100S, highlighting the BNC input connectors for channels and the various control knobs and buttons.
4. Operating Instructions
4.1 Basic Waveform Display
- Connect Signal: Connect the signal source to the desired input channel (CH1 or CH2) using a compensated probe.
- Adjust Vertical Scale: Use the VOLTS/DIV knob for the respective channel to adjust the vertical scale, making the waveform fit vertically on the screen.
- Adjust Horizontal Scale: Use the SEC/DIV knob to adjust the horizontal time base, controlling how much of the waveform is displayed horizontally.
- Trigger Setup: Adjust the TRIGGER LEVEL knob to stabilize the waveform. Press the AUTO button for automatic setup, or use MODE and EDGE buttons for manual trigger settings.
4.2 Automatic Measurements
The DSO-10100S offers a comprehensive set of automatic measurements:
- Press the MEASURE button (if available, or navigate through the menu).
- Select the desired measurement type (e.g., Peak-to-Peak, Frequency, RMS) from the on-screen menu.
- The measured values will be displayed on the screen.
4.3 Signal Generator Function
The built-in signal generator can produce various waveforms for testing circuits:
- Connect the signal generator output to the circuit under test.
- Access the signal generator menu (refer to the on-screen interface or dedicated button).
- Select the waveform type (e.g., Sine, Square, Triangle), frequency, and amplitude.
- Adjust parameters as needed for your application.
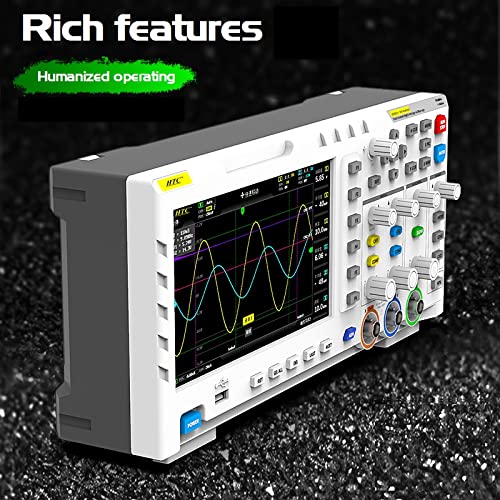
Figure 4.1: The DSO-10100S features a user-friendly interface designed for efficient operation and access to its rich functionalities.
5. Maintenance
- Cleaning: Use a soft, dry cloth to clean the exterior of the oscilloscope. For stubborn dirt, a slightly damp cloth with mild detergent can be used. Avoid abrasive cleaners or solvents.
- Probe Care: Handle probes carefully. Avoid bending or kinking the cables. Store probes properly to prevent damage to the tips.
- Storage: When not in use, store the oscilloscope in a cool, dry place, away from direct sunlight, dust, and extreme temperatures.
- Calibration: Periodic calibration by qualified personnel is recommended to ensure continued measurement accuracy.
6. Troubleshooting
| Problem | Possible Cause | Solution |
|---|---|---|
| No display after power on | Power cord not connected; Power outlet issue; Device fault. | Check power cord connection; Test power outlet; Contact customer support. |
| No waveform displayed | No input signal; Incorrect probe connection; Vertical scale too high/low; Trigger not set correctly. | Verify signal source; Reconnect probe securely; Adjust VOLTS/DIV; Adjust trigger level or use AUTO. |
| Waveform unstable/rolling | Trigger level incorrect; Trigger source mismatch; Noise in signal. | Adjust trigger level; Ensure trigger source matches input channel; Use averaging or filtering if available. |
| Incorrect measurements | Probe compensation incorrect; Incorrect measurement settings; Uncalibrated device. | Perform probe compensation; Verify measurement parameters; Consider professional calibration. |
7. Specifications
| Specification | Value |
|---|---|
| Brand | NAAFIE (Manufactured by HTC INSTRUMENTS) |
| Model Number | DSO-10100S |
| Power Source | Battery Powered (Internal) / AC Power (100~240VACRMS) |
| Colour | White |
| Item Weight | 1 Kilograms |
| Min. Operating Voltage | 100 Volts (AC) |
| Max. Operating Voltage | 240 Volts (AC) |
| Specification Met | CE |
| Number of Memory Sticks | 1 (Internal 1GB storage) |
| Package Dimensions | 18 x 16.5 x 5 cm |
| Country of Origin | India |
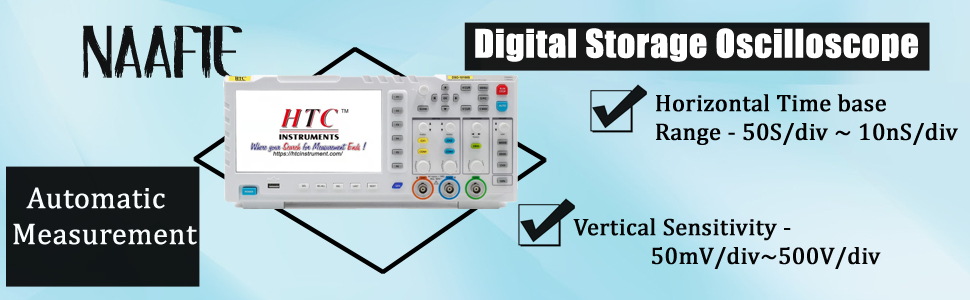
Figure 7.1: Overview of key specifications including horizontal time base and vertical sensitivity.
8. Warranty and Support
This product comes with a standard manufacturer's warranty. For specific warranty terms and conditions, please refer to the warranty card included with your product or contact the seller directly. For technical support, troubleshooting assistance, or service inquiries, please reach out to the customer support team of NAAFIE or HTC Instruments through their official channels.
Ask a question about this manual
Ask about setup, troubleshooting, compatibility, parts, safety, or missing instructions. Manuals+ will review the question and use this page’s manual context to help answer it.