Shop-Vac 8252605
Shop-Vac 8252605 16 Gallon Wet/Dry Utility Vacuum Instruction Manual
Model: 8252605
Introduction
The Shop-Vac 8252605 is a 16-gallon wet/dry utility vacuum designed for various cleaning tasks in home, garage, workshop, vehicle, construction, or jobsite environments. It features a 6.5 Peak HP motor with SVX2 Motor Technology for enhanced performance and motor life. The vacuum is equipped with a 2.5-inch diameter x 8-foot hose and a 12-foot power cord, offering onboard cord and accessory storage. It supports both wet and dry material pickup and includes a rear blower port for converting the unit into a blower. A range of accessories and filters are included to facilitate efficient cleaning.
Package Contents

Image: The Shop-Vac 8252605 wet/dry vacuum with all its components and accessories, including the main unit, extension wands, various nozzles, hose, and filters.
Verify that all items listed below are present in your package:
- 16 Gallon Wet/Dry Vacuum Unit
- (2) Extension Wands
- High Efficiency Filter Bag
- Foam Sleeve
- Cartridge Filter with Retainer Cap
- Utility Nozzle
- Floor Nozzle
- Elbow Grip
- 8 ft. LockOn® Hose (2.5 inch diameter)
- Fabric/Mesh Tool Bag
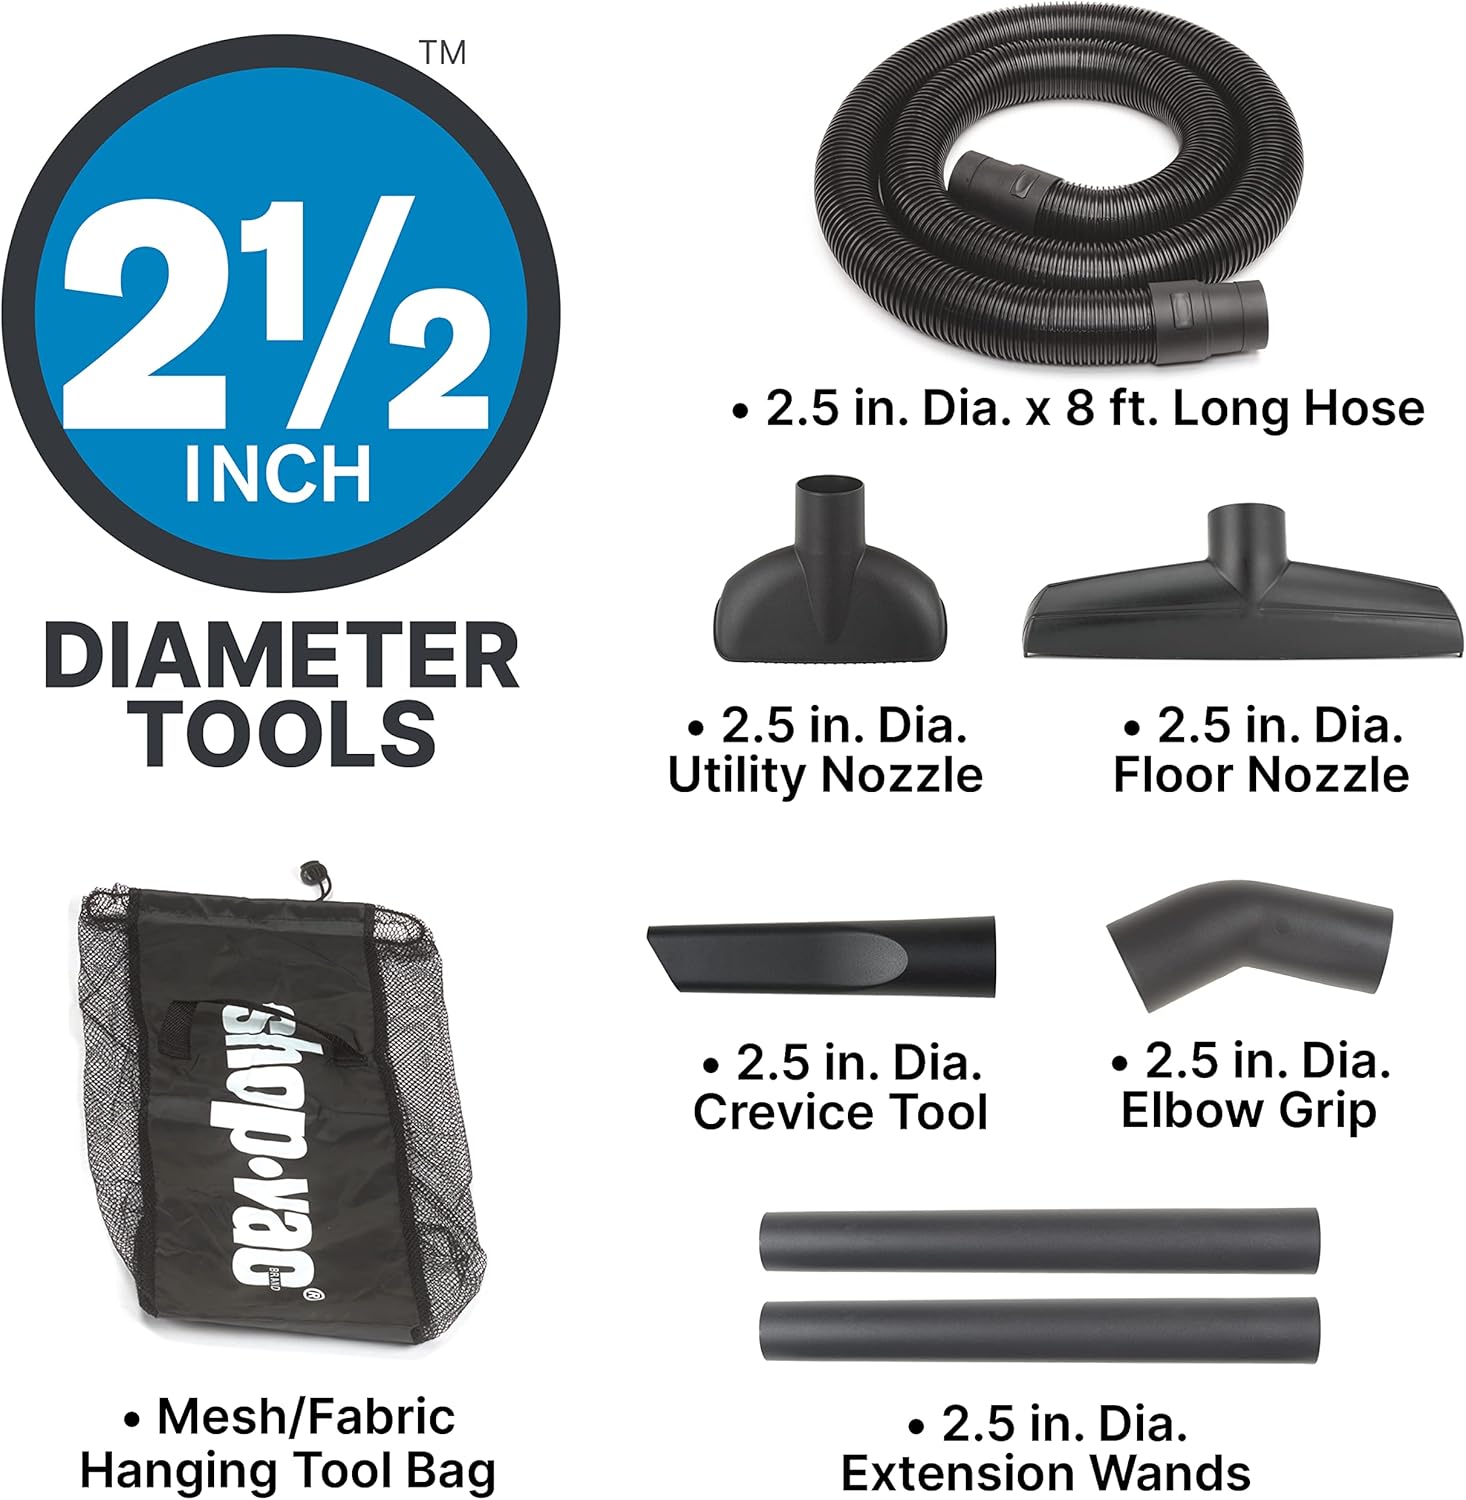
Image: A visual representation of the 2.5-inch diameter accessories included with the vacuum, such as the hose, utility nozzle, floor nozzle, crevice tool, elbow grip, and extension wands.
Setup
Assembly
- Unpack Components: Carefully remove all items from the packaging.
- Attach Casters: Insert the four casters into the caster feet on the bottom of the vacuum tank. Ensure they are securely seated.
- Install Filter:
- For Dry Pickup: Install the cartridge filter over the filter cage and secure it with the retainer cap. For fine dust, also install the high-efficiency filter bag inside the tank, ensuring the cardboard collar covers the inlet.
- For Wet Pickup: Remove the cartridge filter and install the foam sleeve over the filter cage.
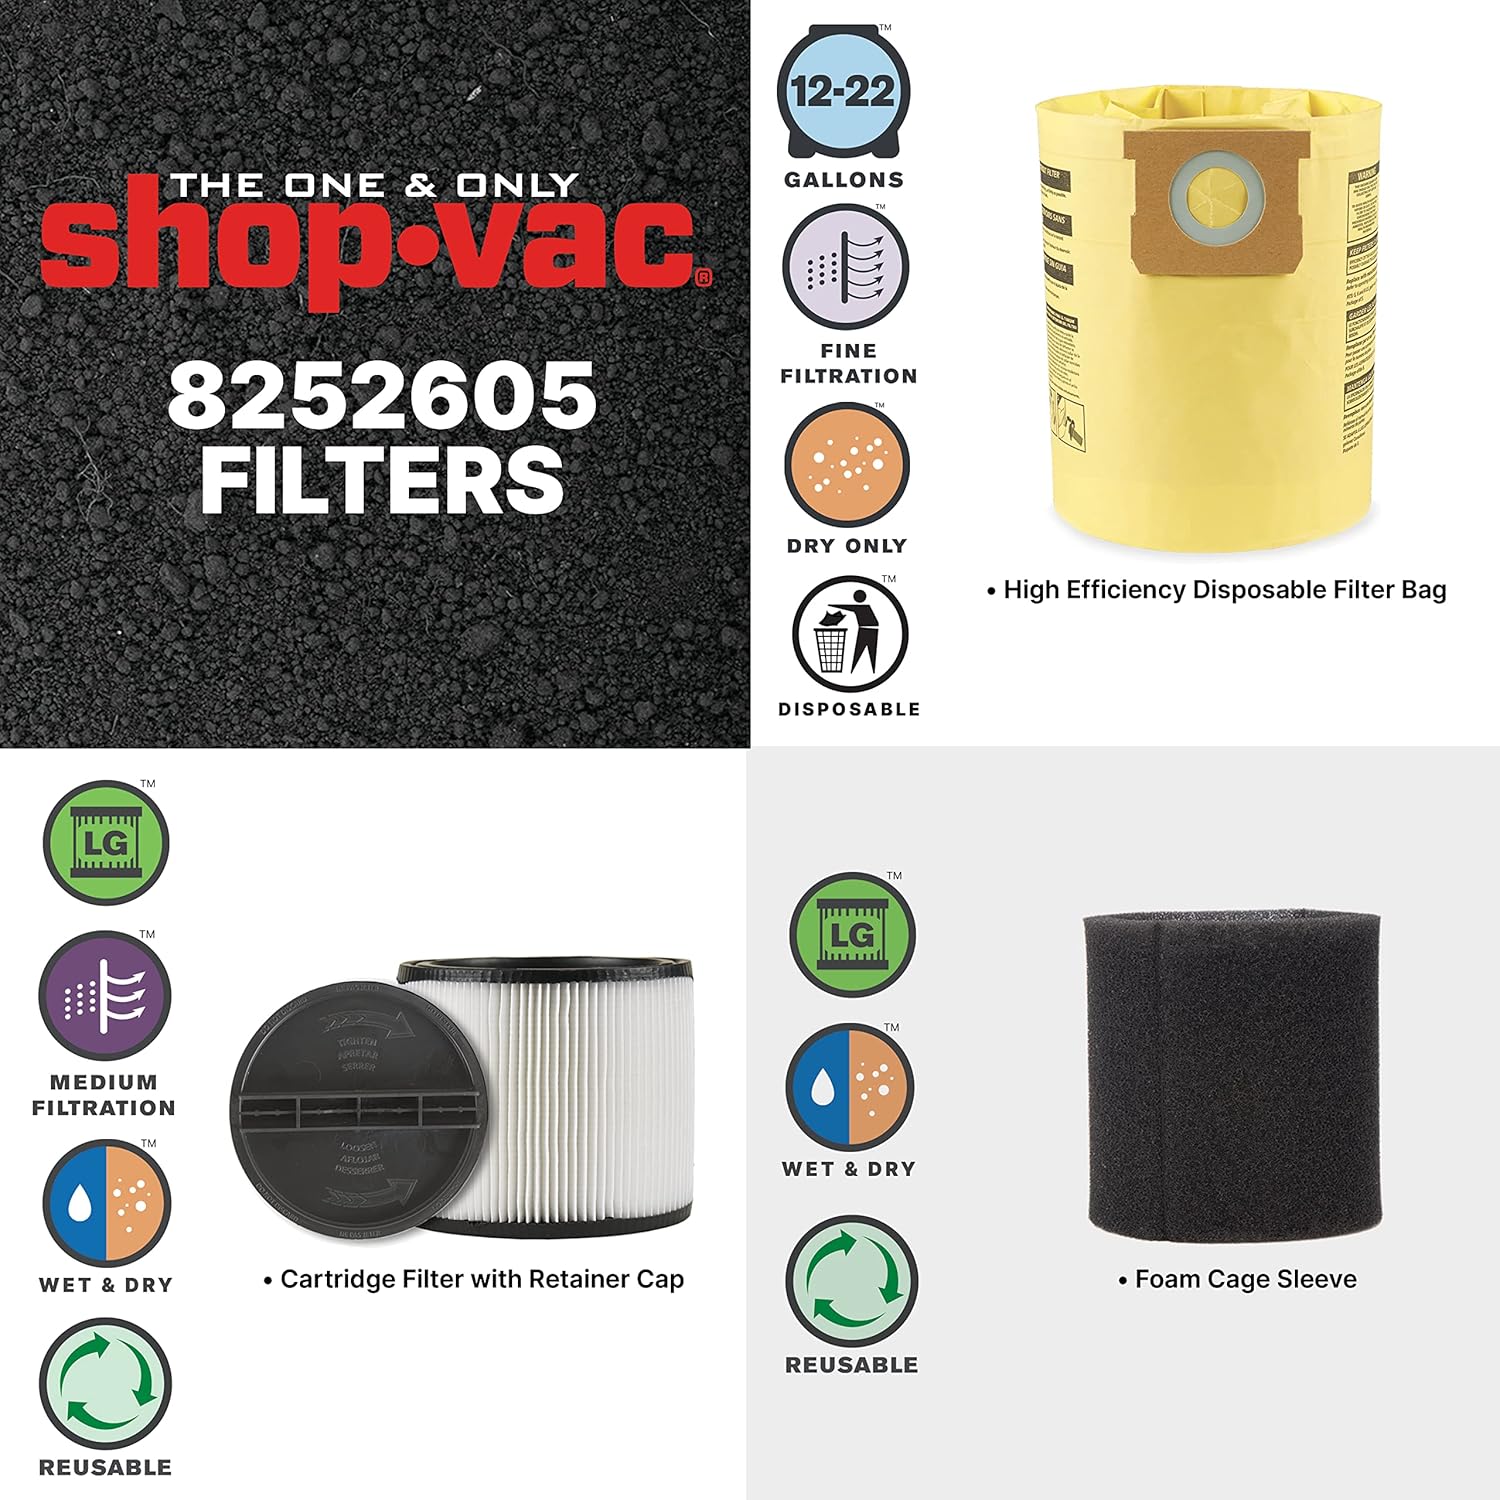
Image: Various filters for the Shop-Vac, including a high-efficiency disposable filter bag for dry-only fine filtration, a reusable cartridge filter for medium wet/dry filtration, and a reusable foam sleeve for wet/dry use.
- Attach Hose: Connect the 2.5-inch diameter LockOn® hose to the inlet port on the front of the vacuum tank. Twist to secure.
- Attach Accessories: Select the appropriate nozzle or tool for your task and attach it to the end of the hose or extension wands.
Power Connection
Ensure the vacuum is switched off before plugging it into a standard 120-volt grounded electrical outlet. The vacuum features a 12-foot power cord.
Operating Instructions
Dry Pickup
For dry debris, ensure the cartridge filter is installed and secured. For fine dust or to extend the life of the cartridge filter, use a high-efficiency disposable filter bag. Turn the vacuum on using the power switch. Guide the nozzle over the dry material to be collected.

Image: A utility nozzle effectively collecting sawdust from a workbench, demonstrating dry pickup capabilities.
Wet Pickup
Before wet pickup, remove the cartridge filter and install the foam sleeve over the filter cage. Do not use a filter bag for wet pickup. Turn the vacuum on and guide the nozzle over liquids. The vacuum will automatically shut off when the tank is full. Turn off the vacuum and unplug it before emptying the tank.
Blower Function
To use the vacuum as a blower, detach the hose from the front inlet port. Connect the hose to the rear blower port located on the motor housing. The vacuum can then be used to blow debris from surfaces or hard-to-reach areas.

Image: An annotated diagram of the Shop-Vac unit, pointing out features such as the power switch, lid latches, hose port, blower port, tool storage, and tank drain.
Accessory Use
- Utility Nozzle: General purpose for various debris.
- Floor Nozzle: Ideal for larger floor areas.
- Crevice Tool: For narrow spaces and corners.
- Extension Wands: Extend reach for floors or high areas.

Image: The crevice tool being used to clean dust from the top of kitchen cabinets, demonstrating its utility for tight spaces.
Maintenance
Emptying the Tank
After wet or dry pickup, turn off and unplug the vacuum. Release the lid latches and remove the motor head. For wet pickup, drain the liquid using the tank drain with cap located at the bottom of the tank, or carefully tip the tank to empty. For dry pickup, empty collected debris into a waste receptacle.
Filter Care
- Cartridge Filter: For dry use, tap the filter gently to dislodge dust. For heavy dirt, rinse under running water and allow to air dry completely before reinstallation. Replace when damaged or suction decreases significantly.
- Foam Sleeve: Rinse with water and allow to air dry completely before reinstallation.
- High Efficiency Filter Bag: These are disposable and should be replaced when full or when suction decreases.
General Cleaning
Wipe the exterior of the vacuum with a damp cloth. Do not use harsh chemicals. Periodically check the hose and accessories for blockages and clear as needed.
Troubleshooting
| Problem | Possible Cause | Solution |
|---|---|---|
| Vacuum does not turn on. | No power, faulty switch, or tripped circuit breaker. | Check power cord connection, wall outlet, and circuit breaker. Ensure switch is in the "ON" position. |
| Low suction. | Clogged filter, full tank, hose/accessory blockage, or improper filter installation. | Clean or replace filter. Empty tank. Check hose and accessories for obstructions. Ensure filter is correctly installed. |
| Motor overheats. | Restricted airflow due to clogged filter or hose. | Turn off and unplug the vacuum. Allow to cool. Clean or replace filter. Clear any blockages in the hose or accessories. |
| Water leaks from tank. | Tank drain cap loose or damaged, or tank seal compromised. | Ensure tank drain cap is securely tightened. Inspect tank for cracks or damage. |
Specifications
- Model: 8252605
- Capacity: 16 Gallons
- Motor: 6.5 Peak Horsepower (SVX2 Motor Technology)
- Amperage: 12 Amps
- Voltage: 120 Volts
- Hose Diameter: 2.5 Inches
- Hose Length: 8 Feet (2.4 Meters)
- Power Cord Length: 12 Feet
- Filter Type: Cartridge (for dry), Foam Sleeve (for wet), High Efficiency Filter Bag (for fine dry)
- Special Features: Wet/Dry capability, Blower function, Onboard tool storage, Tank drain
- Dimensions (Product): 21 x 25 x 23 inches (approximate)
- Weight (Item): 26.7 pounds
- Manufacturer: Shop-Vac USA LLC

Image: Details on the SVX2 Advanced Motor Technology, highlighting increased performance and longer motor life, accompanied by visuals of the vacuum performing dry and wet cleanup tasks.
Warranty and Support
Specific warranty details for the Shop-Vac 8252605 are typically provided with the product documentation at the time of purchase. For detailed warranty information, product registration, or technical support, please refer to the official Shop-Vac website or contact their customer service department. Keep your proof of purchase for warranty claims.